Advanced Server Configuration
The setup procedure outlined in "First Start" gets you up and running with a working and secure BLOCKS server. The basic system set up in "First Start" used its own, separate, small network, where each computer had a fixed IP address, assigned manually. While that's useful for getting up and running and making sure everything works, it's not practical for everyday use. This article describes various options for configuring BLOCKS and for integrating it with another, already existing network:
- Changing the IP address of the BLOCKS computer, along with other network settings, making it fit within an existing network.
- Assigning IP addresses automatically to most computers on the network using a DHCP server.
- Using a DNS server for accessing important computers on the network, such as the BLOCKS server, by name rather than by IP address.
- Configuring some additional options of the BLOCKS server, such as the ability to use it as a Display Spot as well as a server, or activating the mirroring server for building redundancy.
Changing the BLOCKS server's IP Address
If you're building a new network for BLOCKS, we recommend that you stick with the addresses and other settings established in First Start, with the BLOCKS server at 10.2.0.10 and a network mask of 255.255.0.0. These settings match default settings in other parts of the server's configuration, and provide ample room for display spots and other network devices, both with fixed and automatically assigned IP addresses.
However, if you need to integrate BLOCKS into an already existing network, you will likely have to change the server's IP address and other network settings to match the existing network. The information you need before you can do so is:
- What fixed IP address can I use for the BLOCKS server.
- What netmask should I use (often a group of numbers such as 255.255.255.0 or 255.255.0.0).
- Does this network have Internet access? If so, what's the IP address of the gateway. This is often an IP address similar to others on your network, but ending in 1, such as 10.2.0.1.
- Does this network already have a DHCP server for allocating IP addresses automatically?
- Is there already a local DNS server on this network, for binding local computer names to IP addresses.
 While not strictly necessary, being able to use names rather than numeric IP addresses makes configuration easier, and simplifies any changes you may need to make later, since IP addresses of the BLOCKS server and possibly other devices, are only stored in one place.
Equipped with the above information, which you should be able to obtain from your network administrator, you can now change the settings of your BLOCKS server. Please refer to the instructions under Basic Network Configuration to apply your new settings. You should now be able to connect the BLOCKS server to your existing network.
If you're also using the built-in DHCP server and/or DNS, you need to update their settings to match your new configuration, as described below.
Securing your Server
In case you want to expose your Blocks server on a public network, such as one accessed over wifi by guests, or perhaps even from the Internet, there are a number of precautions you need to take. For instance, you should strongly consider using a secure connection (https) to your server. That applies in particular if your server is exposed to the internet. You should also make sure to have a proper firewall in place. Such a firewall is often part of the networking infrastructure. If you have no external firewall in place, you should at least apply a software firewall, such as ufw, which is included in our Linux server image.
Whenever in doubt, consult with professional security experts before exposing your server to public networks or the internet.
Assigning IP Addresses Automatically
A DHCP server automatically assigns IP addresses to some network devices, thus removing the need to specifying hard-coded IP addresses everywhere. Most networks have such a DHCP server, sometimes built into a router or similar device. If you already have such a DHCP server, you may prefer to keep it. If not, the BLOCKS server can perform this function as well (see DHCP and DNS below for details).
Some devices on the network must have known IP addresses, and can not use dynamically assigned addresses. This includes the BLOCKS server itself, as well as other devices acting as "servers", such as displays and projectors to be controlled over the network (e.g., to turn power off), MODBUS I/O modules, etc. Such devices can either be assigned a fixed address in its settings, or handed a known IP addresses by a DHCP server.
In addition to automatically assigning IP addresses, the DHCP server also tells clients where to find the DNS server (internal or external).
Using a DNS Server for Accessing Computers by Name
A DNS server provides name lookups for clients on your network, allowing you to access the BLOCKS Server, and possibly other devices on the network, by name rather than by its IP address. This is particularly important if you want to allow guests to access BLOCKS using their own mobile devices, e.g. to create a mobile guide system.
If your BLOCKS Server will be part of an existing network that has a local DNS server, all you need to do is adding a name for your BLOCK Server to your DNS, pointing it to the fixed IP address of the BLOCKS server.
If you're setting up a new network for use by BLOCKS, displays and other clients, you may want the server running BLOCKS to also act as a local DNS. Such functions are already installed and pre-configured in the Linux OS image. See below for how to enable those services, and where to find their settings.
Configuring BLOCKS Server Options
The following options affect the behavior of the server in various ways, such as:
- Startingand stopping your BLOCKS server.
- Running two BLOCKS servers in tandem for redundancy and fail-over.
- Run a Display Spot on the screen of the BLOCKS server.
- Show GUI windows indicating that BLOCKS is running, or hide such windows.
You can switch among these options using a command included with the server, named option-select.sh. To use this command, do as follows:
- Start your Linux based BLOCKS server.
- Once the desktop appears, click the Terminal icon in the icon bar on the left hand side (highlighted in the screenshot shown below).
- Type ./option-select.sh into the terminal window (note the leading period).
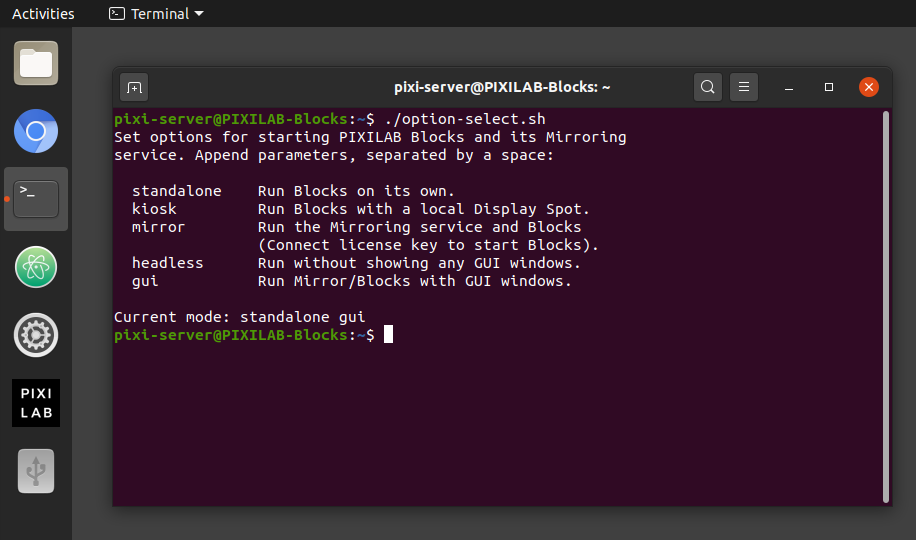
Doing so shows the various options available, along with the currently selected options (standalone and gui in the screenshot shown above).
To select another set of options, type those options after the command name. For instance, to use the sever's display as a Display Spot, type:
./option-select.sh kiosk
Specifying the kiosk option implicitly also selects the headless option to avoid having any Blocks windows appearing on top of the Display Spot.
Start BLOCKS either by clicking the PIXILAB icon in the icon bar or by typing the command:
./start.sh
Doing so will start BLOCKS along with a full-screen web browser connecting to BLOCKS as a Display Spot. Connect to BLOCKS using another computer to configure this display spot and add content to it. To get rid of the full-screen web browser, do as follows:
- Connect a keyboard to the server computer.
- Press Alt-F4 to close the browser window.
- Open a terminal window.
- Type ./stop.sh to stop the full screen browser from re-appearing.
- Type the following command if you want to return to the stand-alone BLOCKS server mode:
./option-select.sh standalone gui
The command shown above also re-enables the GUI mode, making BLOCKS' window appear on screen while running.
Enable Optional server services
Your blocks server comes with various extra server functions pre-installed. You may want to enable and use those if you don't already have other similar functions running on your network (e.g., DHCP and DNS).
Webmin
Webmin is a browser interface for managing many functiontions on your server from the desktop or over the local network using a web browser.
DHCP and DNS
A DHCP server assigns IP addresses to network devices configured to use "dynamic" or "automatic" addressing, thus removing the need to specifying hard-coded IP addresses for players and other network devices. Most networks have such a DHCP server, sometimes built into a router or similar device. If you don't already have such a DHCP server on your network, your BLOCKS server can be configuref to perform this function.
A DNS server provides name lookups for clients on your network, allowing you to access the BLOCKS Server, and possibly other devices on the network, by name rather than by its IP address. This is particularly important if you want to allow guests to access BLOCKS using their own mobile devices, e.g. to create a mobile guide system.
Viewing Logs in Webmin
When things don't work as expected, valuable information can often be found in various log files. Those exist as text files on the server itself, byt can be viewed remotely through webmin.
File Transfers and Sharing
Sometimes, you may want to copy files to/from the server. You can do so directly in webmin (under Others > File Manager). This can be useful for occasionally pulling or uploading a file from/to the server. You can, for instance, use this method to download archived log files from the server by selecting "File Manager" under "Others" in the menu on the left hand side, navigating to /home/pixi-server/PIXILAB-BLOCKS-root/logs and clicking the name of one of the "archived" log files. A similar method can be used to upload files to the server.
However, it's often more convenient to connect to the server by mounting it as a network volume on your own laptop, rather than copying files back and forth. This makes the server files directly accessible, without having to copy them.
Server Redundancy (Mirror server)
While the Blocks server software is very robust, the complete system can never be more reliable than the hardware it runs on. If your Blocks server dies for some reason, your system will stop functioning. To safeguard agains such major disasters, you can install a secondary Blocks server in your system.
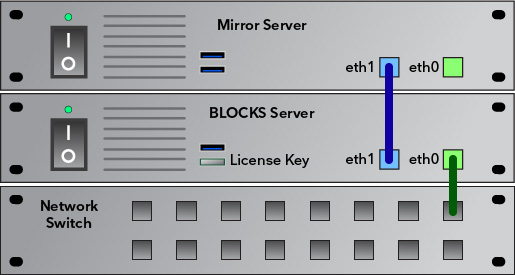
Specialized mirroring software running in the background keeps this second server in lock-step with the primary server – copying all changes across as they happen in real time. Should the main server die, you can immediately switch over to the mirror copy, and be back up and running in a matter of minutes.
Uninterruptible Power Supply
For critical applications, we recommend the use of uninterruptible power supply (UPS) with the server. An UPS can shorten downtime and perform a controlled power down in the event of a power failure. Software for the popular APC brand of UPSes is preinstalled on server image version 191001 and later.