Blocks Mirroring Service
Our Linux-based server supports a hardware redundancy feature for increased system reliability. While the Blocks server software is very robust, the complete system can never be more reliable than the hardware it runs on.
Introduction
A typical Blocks system has a single server computer and a main network switch.
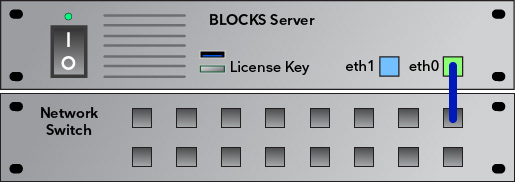
In such a system, both the server computer and the main switch constitute a single point of failure. If any of these components die, the entire system stops.
The first thing you should do if any of these components appear to not function is to make sure they're actually on. You may also connect a computer directly to the main switch and try to log in to your Blocks system from there. If that works, the problem is downstream from the main switch, such as in a secondary switch further out or in the player device.
Once you determined that power's on and you can't reach Blocks even from a computer plugged into the main switch, the next step is typically to power down the server computer, wait a minute then power it up again. While waiting, also power-cycle the main switch. If this restores full functionality, you should take a look at the server log files to see if they give any clue to what happened. The problem may have been caused by some software error, or some intermittent hardware error.
If you suspect that the main switch is the culprit, replace it with another similar switch, then restart the Blocks server, to see if the problem goes away. Having a backup switch ready to go in the rack may be a good idea to safeguard against such problems.
 If your switch is "managed", with specific settings applied, make sure the spare switch is set up in the same way.
However, if your Blocks server dies, and won't come back by turning power off and back on again, things are a bit more difficult. Assuming you have an up-to-date backup of your Blocks root directory, as well as other relevant server settings, you can replace the server with a new one, and bring it back to life using those backups. However, that may take a while to accomplish, rendering your entire Blocks installation non-functional in the meantime.
A better option is to have a spare server sitting in the rack all along, just as suggested for the main switch above. If you're sufficiently concerned about your system's reliability to keep such a spare on hand, this feature is for you.
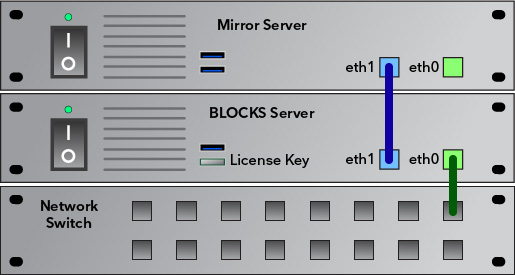
The Blocks Mirroring Service will keep your spare computer up to date with any changes applied to Blocks. As soon as you make any changes, such as editing a block or adding a new spot, those changes are copied across to the mirror server. Note, in the illustration above, that the main Blocks server is still connected and used as it was in the stand-alone illustration shown at the beginning of this article. The Mirror server uses a second network port as a backdoor connection to your Blocks server. This backdoor is used as a secure channel for copying all changes across as the system runs.
Furthermore, the Mirror Server is en exact copy of the main Blocks Server. All its settings and configurations are identical. The only difference between the two is which one has the Blocks license key. The license key controls which of the two computers that run Blocks. Apart from this difference, they're identical.
Hence, should disaster strike and your main Blocks server dies, all you need to do is to move the license key and the network connection to the other server.
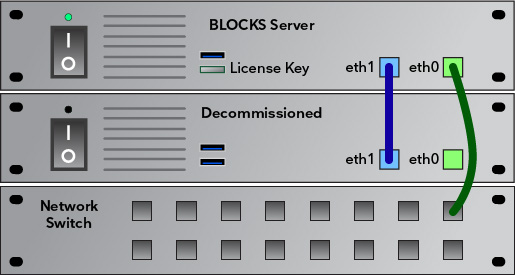
Once that's done, the old Blocks server can be removed in order to be repaired or replaced. All players and other parts of your system will pick up where they left off once they see the new server, allowing you to be up and running in a matter of minutes rather than hours or days.
What you Need
To use this new capability, you need the following:
- A Blocks server with at least two network ports, running our current Linux server image and Blocks 4.1 or later.
- A second, identical computer.
- A sufficiently large USB hard disk to use for backing up and cloning your main server.
- The "Mirroring Service" license added to your Blocks license key.
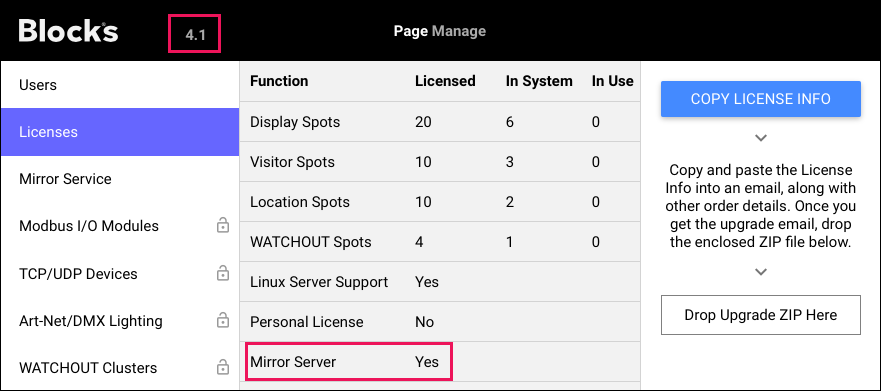
To verify eligibility, do as follows:
- Open your Blocks editor.
- Select the "Manage" page.
- Select "Licenses".
- Look for the "Mirror Server" license option.
Configuring the Blocks server
Assuming you have your Blocks server configured and running as you want, there are a few additional settings you need to apply before proceeding with cloning the server. You may also want to take this opportunity to update the operating system of your server.
Open the Settings panel of your server by clicking the cog-wheel icon on the left hand side, then select Network. This lists the network interfaces available on your computer, allowing you to turn them on or off and set their configuration. The illustration below shows the settings of a Blocks server that has two network interfaces, of which only the first one has been used so far. You settings should look similar, but the interfaces may have other names.
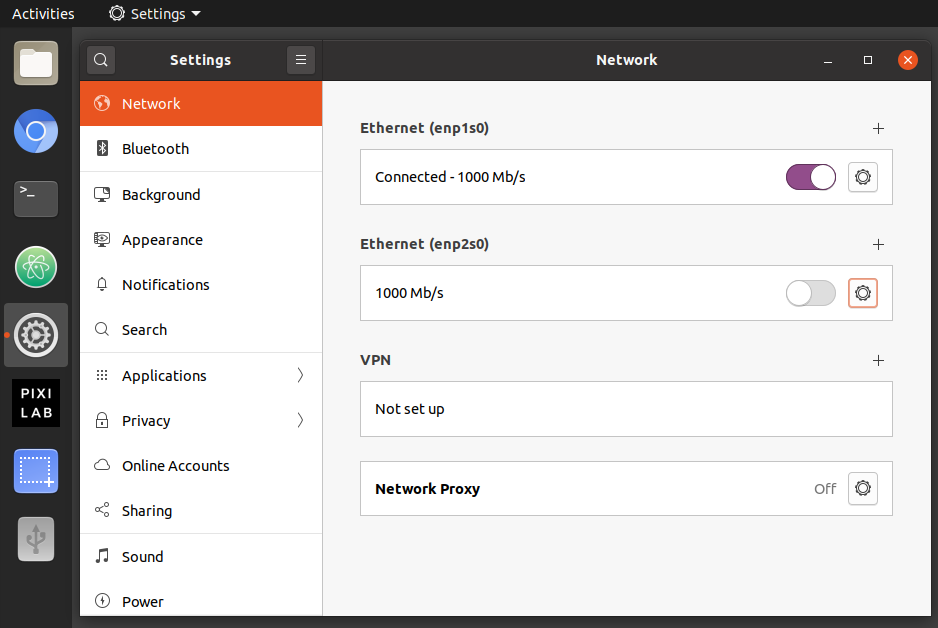
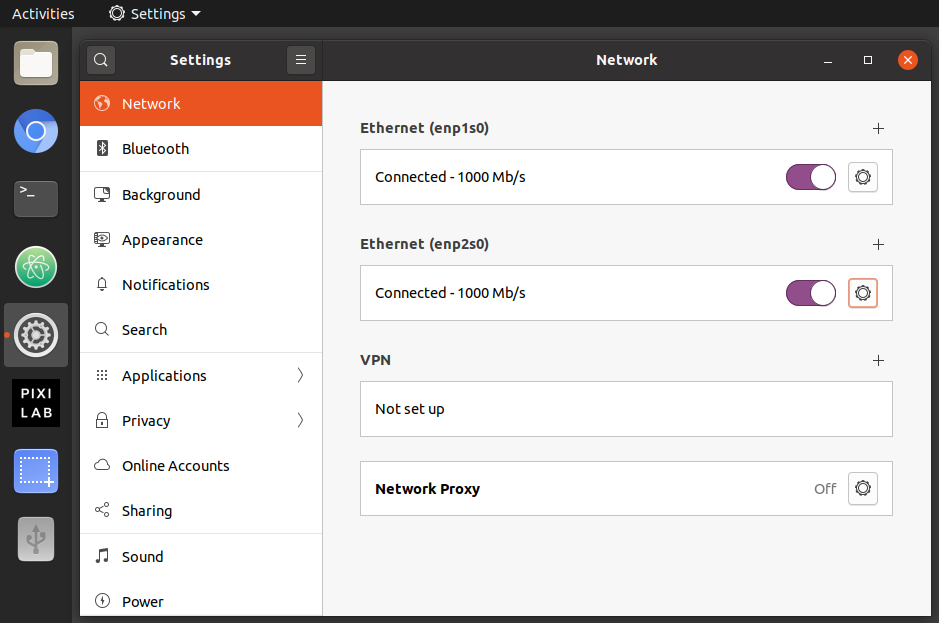
Identify the second network interface, which will be used as the mirror server back-channel. Turn it on using the purple switch. This enables the network interface.
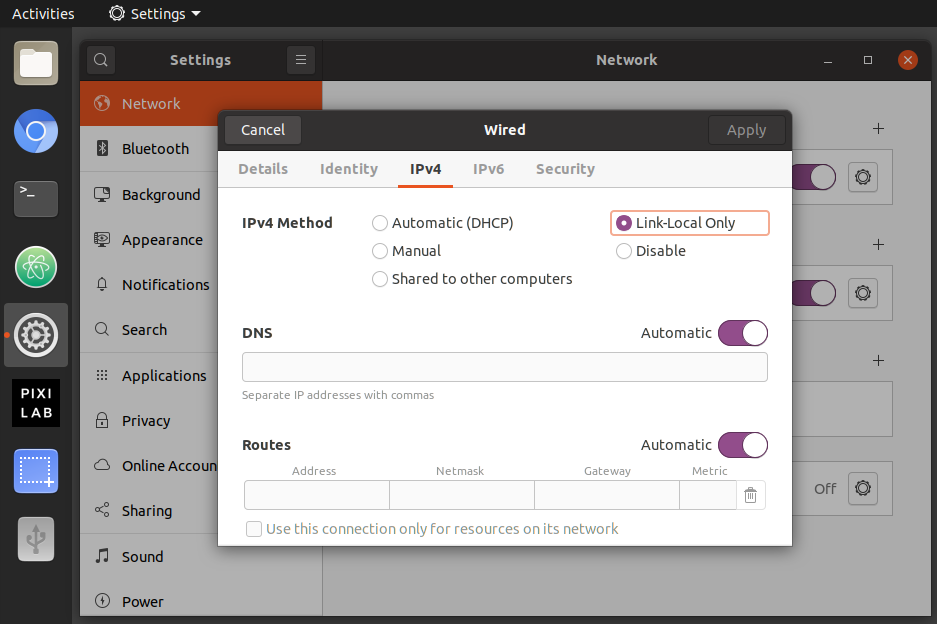
Click the small cogwheel button next to the purpose switch. This opens the settings for this network interface. Chose "Link-Local Only", as shown below. This option allows the two computers to talk to each other over their private network link.
Restart your server to make sure that everything still works as before. Then use the option select command to select the mirror mode:
./option-select.sh mirror gui
See below if you receive a warning message related to SSH when giving this command.
The gui option will make Blocks show windows on screen while running. This is helpful if you like to access your server using the graphical user interface. If not, you can instead pass headless as the second option. But if you have GUI access to the server, leave it set to gui for the time being, as the mirror service shows its own window with it status, which may help getting things up and running.
Start Blocks by either of the following means:
- Click the PIXILAB icon on the left hand side.
- Type ./start.sh into a terminal window.
This will now start the mirroring service, with its window appearing on screen. Assuming the license key is still connected to this computer, Blocks will also be started, appearing on top of the mirroring service's window.
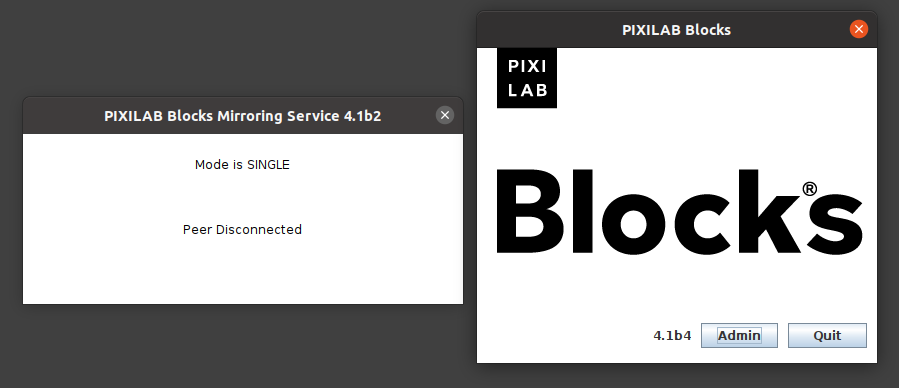
At this point, the mirroring service is running in SINGLE mode, as indicated in its status window. This means that no mirror server has been found. The mirror server is the other (redundant) computer, which is not yet connected. The mirror service, now running in the background will keep looking for its peer, and will connect automatically once found.
Enabling SSH
The mirroring service uses SSH (secure shell) for its secure back-channel. This requires SSH to be enabled. If that's not the case, a message to this effect will be shown when enabling the mirror option. To enable SSH, do as follows:
- Switch to the pixi-admin user.
- Open a terminal window.
- Type the following command into the terminal window:
sudo systemctl enable ssh
Type the pixi-admin's password when requested. Then restart the computer and re-run the option-select command.
Security Considerations for SSH
Since SSH can be used to access your server over the network, it is very important that you have secured the configuration of your Blocks server. At a bare minimum, you must change the default passwords as described under First Start.
If you don't plan on using SSH with password to manage the server remotely, you may want to disable this ability. Follow these instructions to disable password login over SSH:
- Switch to the pixi-admin user.
- Open a terminal window.
- Type the following command into the terminal window:
sudo nano /etc/ssh/sshd_config
Enter the pixi-admin's password when requested. This opens the configuration file for SSH using a simple text editor called nano. Press the down-arrow key on the keyboard to scroll down to the bottom of the file. After the last line, type a new line with the following content:
PasswordAuthentication no
Press Enter at the end of the line, to close off the new command added, then proceed as follows:
- Press Ctrl-O. That is, type the letter O while holding down the Ctrl key (not the Command key, for those Mac users out there).
- Press Enter to save the file using its current name.
- Press Ctrl-X to exit the editor.
- Restart the computer.
This setting disables the ability to access the computer over the network using SSH with a password. The mirroring service can still function, since it uses SSH in another way that's not depending on a password. Should you ever change your mind and want to use SSH with password to access the server remotely, just remove that last line you added to sshd_config above and restart. Remember to make sure you're using a secure password.
Cloning the Blocks Server
Once you have configured your main Blocks Server as described above and have it all working as desired, it's time to make the Mirror Server by cloning the Blocks server. This is done using a program called Clonezilla. Read this article on getting started with Clonezilla.
You'll also need a second USB storage device. This may be a USB stick with enough room to store the actively used data from your Blocks server's disk. Or it may be an external USB disk drive. This storage device must be formatted as FAT32 or NTFS.
Shut down and re-boot your now fully configured Blocks server from the Clonezilla USB stick. Select the USB stick as the boot device in the computer's BIOS, accessed by pressing a dedicated key on the keyboard during startup.
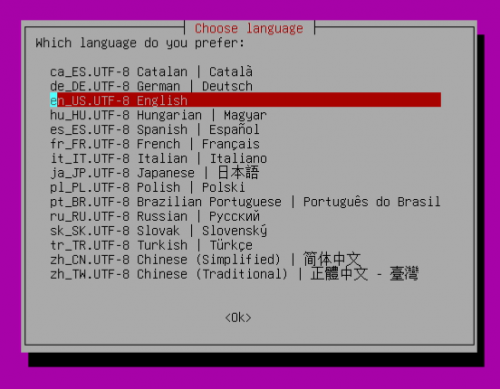
Once Clonezilla has started, Select "English".
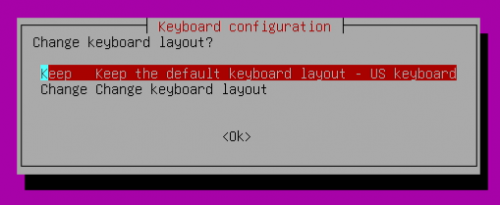
Select your keyboard layout, if you have a non-english keyboard, or just select "Keep the default".
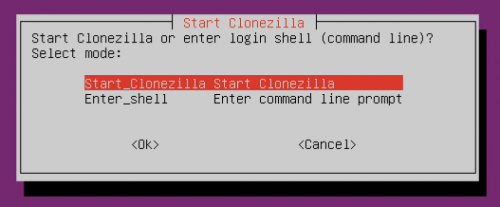
Select "Start Clonezilla".
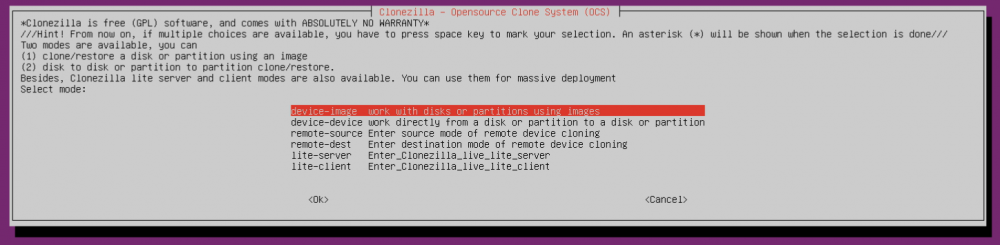
Select the "Device-image" option.
Select the "Use local device" option.

Connect the second USB stick or external drive. This drive must have enough free space to hold the used disk space from your Blocks server. Wait a few seconds as instructed, then press Enter.

Once your newly connccted drive appears, press Ctrl-C to continue.
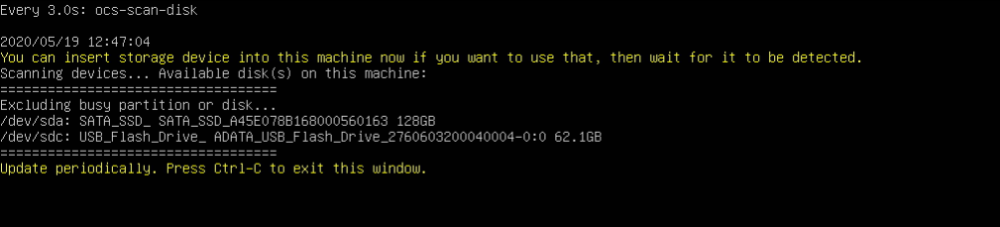
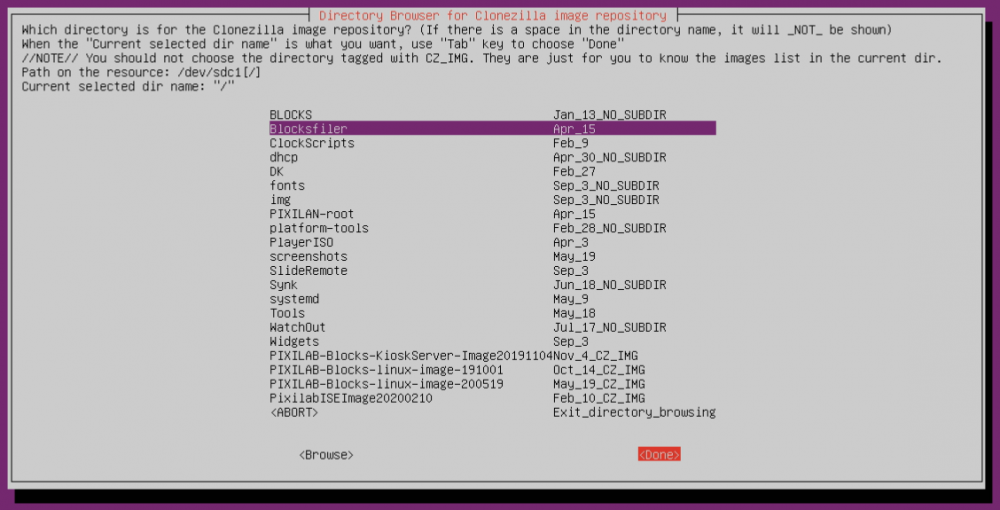
Select the newly connected drive as your destination.

Click Done and press Enter to create the image at the root level of the drive.
Press Enter to continue.

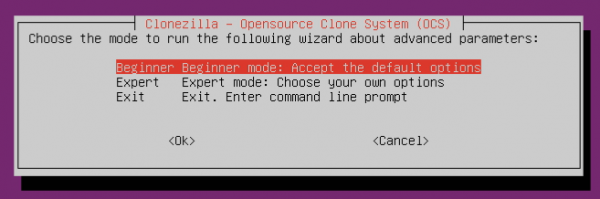
Select "Beginner mode".
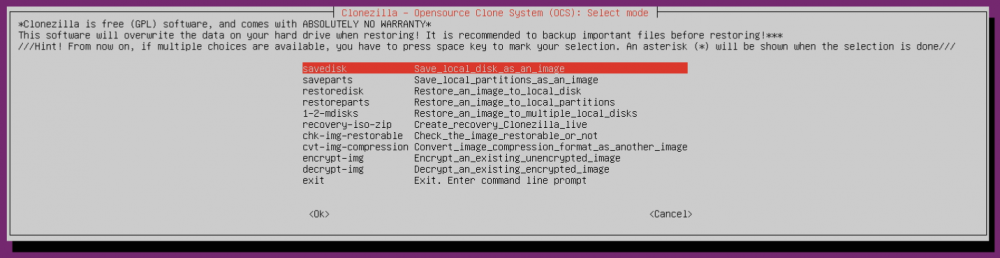
Select the "savedisk" option to create an image from the server's internal disk.
Give the image a descriptive name.

Select your source disk (the internal disk of your Blocks server).

Skip "check and repair the source filesystem".

Skip "checking if the saved image is restorable".

Choose to "not encrypt the image".

Choose "poweroff" to shut down the computer once the clone has been created.

Press Enter to continue.

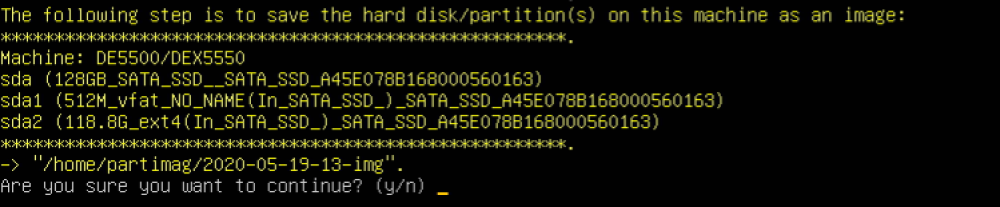
Verify the details, then confirm by pressing y followed by Enter.
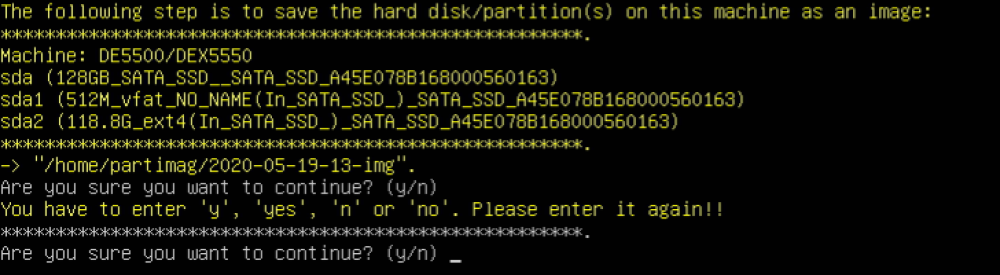
Double-check the details, then confirm by pressing y followed by Enter again.
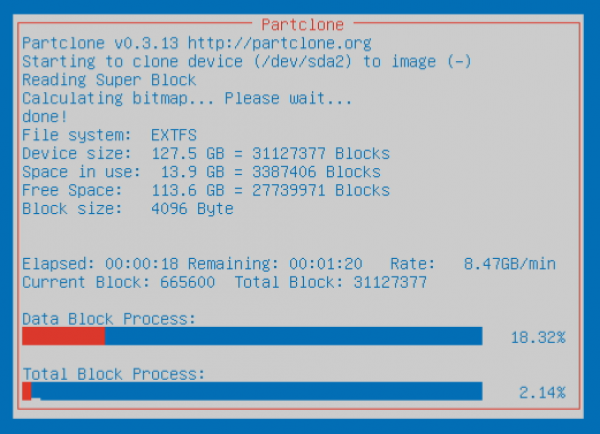
Wait for the cloning to conclude. This may take several minutes, depending on the amount of data on your source disk. Make sure the operation completes successfully.
The computer will shut down automatically once a clone has been made. Remove the USB sticks/drives. Restart your Blocks server and make sure it comes back OK. If it doesn't, re-enter its BIOS settings and set it back to start from its internal drive.
This guide describes how to write the image to your Mirror Server, thus making it an exact copy of your Blocks server. Store your clone image for safekeeping. It contains a complete snapshot of your Blocks server at this point in time, thus acting as a full backup.
Connecting the Mirror Server
Once the cloning operation is complete, connect the mirror server as shown below, using the second network interface a a back-channel between the two.
Do not connect the main network port to the switch. Since it has the same configuration and IP address as the main Blocks server, only one of them may be connected to the switch at any time.
Power up both computers. It's helpful to have a display connected to both computers during the set-up process, so you can see what's happening. Both computers should launch the mirroring service, with its status window appearing on screen. However, only the main Blocks server will launch Blocks. As mentioned above, this is controlled by the presence of the license key. Unplugging the license key from the main Blocks server automatically shuts down Blocks here.
Any errors in the connection process will also be indicated there. In addition, the mirror service will also write its own log file in the same directory as Blocks' log files (in the logs directory inside your Blocks root directory).
Once the two computers connect to each other, the one running Blocks will be marked as MIRRORING SOURCE and the other as MIRRORING DESTINATION.

The IP address of the other computer will also be indicated in the status window. This link local address is dynamically assigned, and will not match the network address of your Blocks server. It is used only for the mirroring communication.

Monitoring the Mirror Server
Since there's no direct network connection to the mirror server, you can not connect to it over the network to view its status. Instead, its status is shown in Blocks. Go to the Manage page then select Mirror Service in the list.
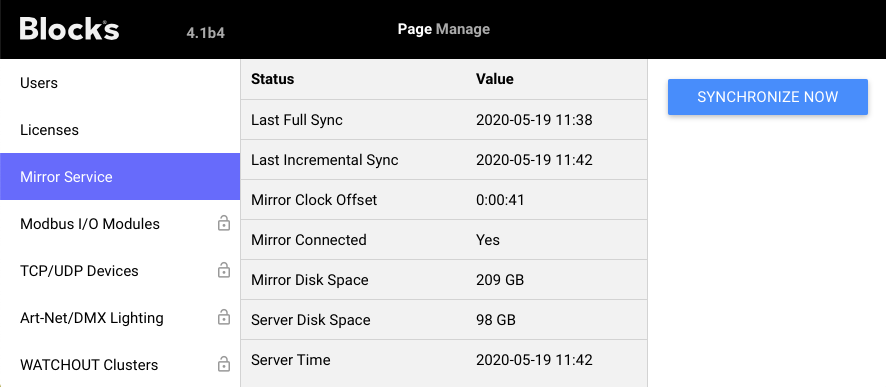
- Last Full Sync. When a full file synchronization was last performed. This is generally done once every night (see Mirror Server Configuration below for other options).
- Last Incremental Sync. When an incremental file sycnhronization was last performed. An incremental sync is performed whenever a change is made through the Blocks editor, such as adding a Spot or changing a Block.
- Mirror Connected. Indicates that the Mirror Server is online.
- Mirror Clock Offset. Shows the difference between the clock in the Blocks Server and the Mirror Server. Check this status every few months or so, and adjust its clock as required, so it doesn't get too far off. Since the Mirror Server doesn't have Internet access, it can't set its clock automatically.
- Mirror Disk Space. Shows the amount of free space on the Mirror server. Check this every now and then, especially after adding new content, to make sure there's at least 15 GB of free disk space.
- Server Disk Space. Indicates the amount of free space on the Blocks Server itself. This also makes sens to keep an eye on – especially before adding a significant amount of new content.
- Server Time. Shows the current time of the clock in the Blocks Server. If your server has Internet access, this is generally adjusted automatically. If not, you may want to check this every few monts to make sure that it is reasonably accurate.
- Sync Errors. Cumulative count of data sync errors that have occurred, if any. Check the Mirror log file for details.
The "Synchtronize Now" button can be used to force a full synchronization. Use this after making manual changes to the files in the /home/pixi-server directory of the Blocks server, such as updating Blocks itself or the mirroring service (the files PIXILAN.jar and MIRROR.jar respectvely). Doing so pushes those changes over to the Mirror Server immediately rather than waiting for the next scheduled full synchronization.
Testing the Mirror Server
Assuming a display is still connected to the mirror server, open a directory in your Blocks root containing blocks, such as
public/block/Main
Then create a new block using the Blocks editor:
- Open the Display page.
- Select the Main group (matching the directory selected above).
- Chose "Add Text" on the Block menu, adding a new block.
- Change the text in the block. Blocks automatically saves changes as you edit.
Now, looking inside the directory opened on the mirror server, you can see how the block you just added also appears there. As all blocks and other data entered into Blocks live in this file hierarchy, all the mirror service need to do is to maintain an up-to-date copy of the data on the Mirror Server.
In addition to those immediate changes that are initiated as soon as you make changes to blocks, spots and other settings available in the Blocks editor, the mirror service will also run a daily full mirror, to bring along any other files that may have changed for other reasons, such as someone installing or updating devices drivers on the main Blocks server. Even the Blocks program file (named "PIXILAN.jar") and the mirroring service program file (MIRRIR.jar) will be copied across if those are updated on the main Blocks server.
How often, and when, this full mirror will be performed can be set in the configuration file, along with some other options (see below). If not specified there, a full mirror will be performed every morning at 03:00.
Switching Servers
Once you have everything up and running, with the mirroring service doing its job, you can try your disaster recovery plan by doing as follows:
- Move the Blocks license key from its USB port on the Blocks Server to a USB port on the Mirror Server.
- Move the main network connection (the one connecting the Blocks server to the switch) to the corresponding network port on the Mirror Server.
The roles of the two computers will now be reverse, as indicated in the status windows of the mirror services as well as by the fact the Blocks will now be started on the other computer.
Display spots or other clients will re-connect to the new server within a few minutes, without any changes needed.
Once you verified full operation of your system, move the license key and network connection back to the original Blocks server again.
IMPORTANT: Mark these two items, as well as their designated connectors on the Mirror Server clearly, so you (or someone else) knows what to move where if disaster strikes.
Mirror Server Configuration
The mirroring service can be configured in the PIXILAB-Blocks-config.yml file also used by Blocks. Add a top-level entry in this file with the following settings (where all settings are optional, with reasonable defaults):
mirror:
  fullSyncTimes: ["03:00"]
  fullSyncOnStartup: false
  logging:
    handlers: java.util.logging.FileHandler
    java.util.logging.FileHandler.level: WARNING
The settings shown above correspond to the default settings, which applies if you don't add any mirror settings at all. You can change those settings as follows:
- Specify another time for full synchronization, or several fullSyncTimes, like this: ["03:00", "12:30"]
- Set fullSyncOnStartup to true to run a full synchronization once when mirroring service is started.
- Set java.util.logging.FileHandler.level to ERROR for less verbose logging, or INFO for more details (sometimes useful when troubleshooting).
The following additional, advanced settings are available in version 7.1 and later, then specified under the "mirror:" heading as shown above.
  interface: enp2s0
  subnet: 192.168.0.0/24
NOTE: There are two spaces at the beginning of each line, as required when used under the "mirror:" heading.
- The interface setting is useful if your computer have more than one network interface with link local addressing. If so, use this setting to specify the name of the desired synchronization backdoor network interface.
- The subnet setting lets you specify a non link local subnet (in CIDR notation) for use as the data synchronization backdoor. This is useful in cases where you may want to use this interface for other purposes, such as remote management of the servers. You would then either set fixed addresses (within the specified subnet) or use dynamically assigned addresses (DHCP).
The settings under logging follow the java.util.logging standard, sometimes referred to as JUL, allowing you to use any settings available there, for example to log to an external log handler.
Troubleshooting
Unless the advanced subnet setting is used (see above), the server-to-server backdoor connection assumes the use of self-assigned ("link local") addresses. Such adresses are in the 169.254.x.x address range. There must not be any additional network interfaces in either computer having such IP addresses. If there are, do either of the following:
- Disable any such interface(s). in some cases this may need to be done in the computer's BIOS settings.
- Change their addresses to keep them out of this address range.
- Use the advanced interface setting to specify which interface to use.
Verifying over SSH
The mirroring service shows its status window while running, as described above. If you're accessing your server using a terminal session over SSH, you can instead use this command to ascertain whether the mirroring service is running, while being logged in as the pixi-server user:
systemctl --user status blocks.mirror
Using Firewall
If the server has the firewall enabled the following must be allowed: udp port 4445 tcp port 4444
sudo ufw allow 4444/tcp
sudo ufw allow 4445/udp
This must be done on both master and mirror.
Custom path to Blocks' Executable Files
The Mirror service assumes that the main Blocks executable file (named "PIXILAN.jar") is located in /home/pixi-server/, which is the case if you're using our Linux server image. However, if you're configuring a server on your own and chose to locate Blocks executable files elsewhere, you must specify the directory where PIXILAN.jar resides using the BLOCKS_HOME envirtonment variable. This is an advanced configuration option, and is normally not required.
Implementation Notes
These notes provide additional understanding of how the mirroring service works. While not generally something you need to know, these details may be of assistans in some installations or when troubleshooting a system.
Synchronized files
The following directories and files are synchronized:
- /home/pixi-server/PIXILAB-BLOCKS-root/*
- /home/pixi-server/native/*
- /home/pixi-server/*.sh (e.g., the command-line start and stop scripts)
- /home/pixi-server/PIXILAN.jar (the Blocks software)
- /home/pixi-server/MIRROR.jar (the Mirroring software)
- /home/pixi-server/PIXILAB-Blocks-config.yml (if it exists)
NOTE: Any additional files you want to synchronize, such as SSL certificates, must be placed inside the PIXILAB-BLOCKS-root
Starting/stopping Blocks
The Linux systemd feature is used to start and manage most programs that aren't started manually. This includes Blocks as well as the Mirroring service. You can see how this is done inside the start.sh and stop.sh scripts located in the home directory of the pixi-server user. When not using the mirroring service, systemd directly starts and manages Blocks.
However, when using the mirroring service, systemd starts the mirroring service (referred to by the name blocks.mirror). Then, when appropriate (i.e., when the license key is connected) the mirroring service starts Blocks. Likewise, if the license key is disconnected (e.g., to be moved to the other server), the mirroring service shuts down Blocks. Here, systemd isn't directly responsible for starting/stopping Blocks. Therefore, viewing its systemd status (e.g. using the systemctl –user status blocks command) will show its status as inactive, even though it's running. Other system commands can be used to look at running processes.
The mirroring service also generates its own log, found in the logs directory inside your Blocks root directory. Check these log files if you encounter any problems related to the mirroring service.