 IMPORTANT: This document is obsolete and describes an older version of out linux server. The current method is described here here.
DHCP Server
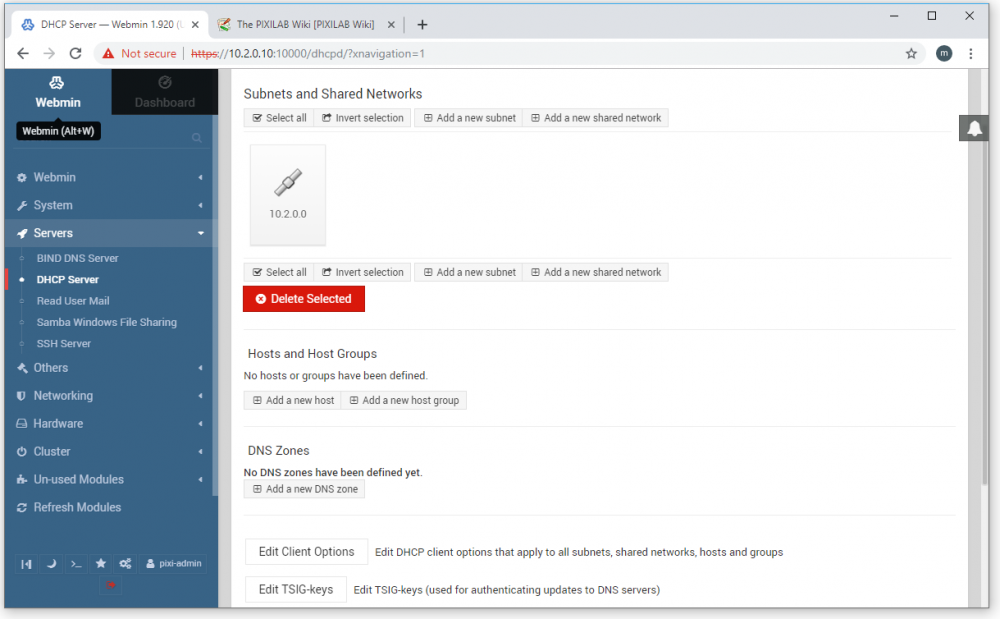
The DHCP server configuration is found under Servers/DHCP Server in the menu shown on the left hand side. Click that item to open the "DHCP Server" panel.
Scroll down a bit and click the "Edit Network Interface" button. In the list that appears, make sure that your Ethernet interface is selected, then click Save.
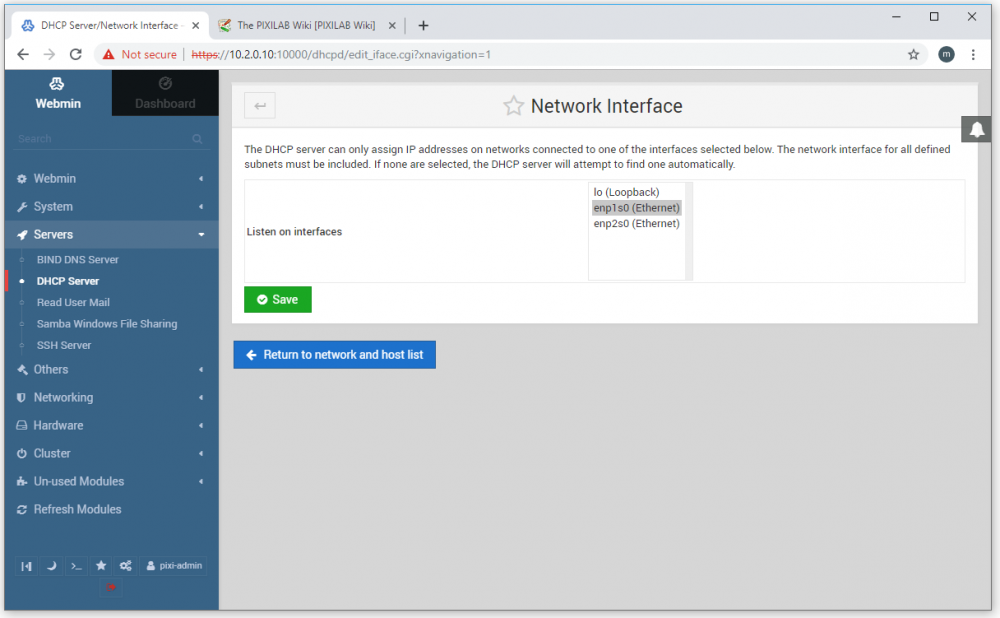
The exact name shown for your Ethernet interface (in the illustration above "enp2s0") may vary. If you have multiple ethernet interfaces, you may need to revisit Networking menu to learn about the proper network interface name.
Return to the "DHCP Server" page and click the small, red pen symbol in the top right hand corner of the rectangle with the 10.2.0.0 IP address. This opens the configuration for this subnet.

As you may recall from the "Basic Network Configuration" section of the First Start article, we gave the server the IP address "10.2.0.10", with a netmask of "255.255.0.0" (or "16" as this is sometimes called). Hence, the BLOCKS server is in the "10.2.0.0" subnet, which is the subnet about to be managed by this DHCP server. If you gave the server another IP address for some reason, you need to adjust the subnet address managed by the DHCP server accordingly, which is done in the "Network address" field.
Here, you also specify the range of addresses allocated to dynamic clients. You typically want a small number of addresses reserved for network devices that need a fixed IP address (such as the BLOCKS Server itself). In this example, we're allowing the DHCP server to dynamically allocate address in the 10.2.5.1 through 10.2.16.254 range, giving us loads of dynamic adresses, while all addresses below 10.2.5.1 can be used for fixed IP address, as those are off limits for the DHCP server. You can adjust those numbers as you see fit. Click the green "Save" button at the bottom of the window if you make any changes.
Client Options
In addition to merely handing out dynamically assigned IP addresses to clients, a DHCP server can also inform clients of other important pieces of information. Those are called "Client Options". To review those options, first return to the top level "DHCP Server" view, then click the "Edit Client Options" button.
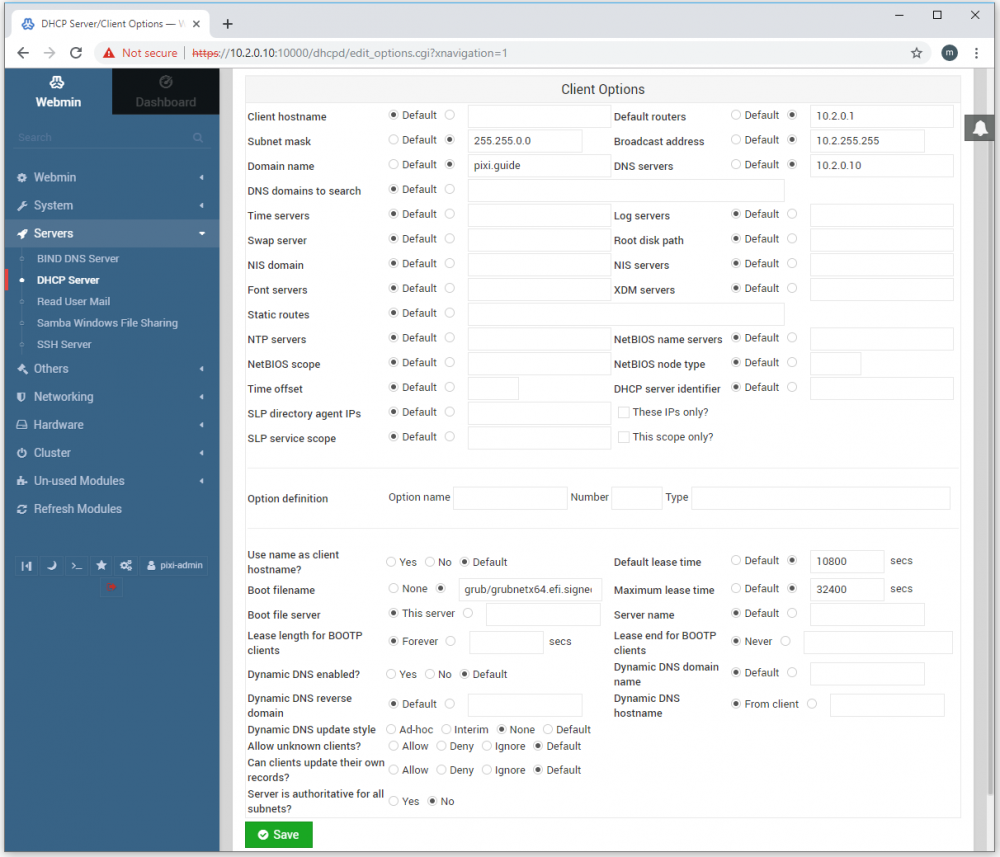
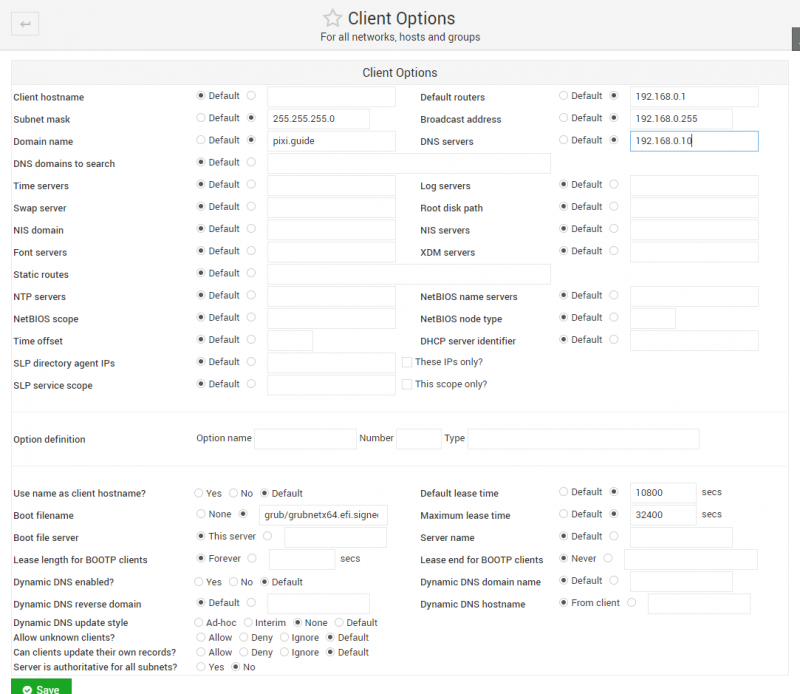
The following options have been specified here. Again, you may need to adjust those as appropriate if you change the server's address or other network-related options.
- Subnet mask. Specifies the type of subnet being used (in this case a B-class).
- Domain name. Informs clients about the default domain name, which in this case refers to the name to be given to the BLOCK Server.
- Broadcast address. Consists of the base network address with 255 in the last segment, and is used for some specialized network functions.
- DNS server. The IP address of the DNS to be used by DHCP clients. The address shown here is the address of the BLOCKS Server itself, which we'll configure to use as a DNS later in this article. Leave empty if you don't want to use a DHS server, or modify as appropriate if you prefer to use another DNS server already available to you.
- Default router. Enter the router address to be used by clients if you want them to have access to the internet or other "outer" network. The router is a separate piece of hardware, sitting between the BLOCKS Server's network and another, outer network (possibly the Internet). The router typically has an address ending in ".1". Remove this field if you don't want to provide access to any outside network.
- Boot filename. Set to "grub/grubnetx64.efi.signed " as shown above and select this radiobutton instead of None. This option supports network (PXE) booting of PIXILAB Player with BLOCKS 3.
Click the green "Save" button at the bottom of the window if you make any changes.
If your DHCP server is already up and running, you need to click the green "Start Server" button at the bottom of the the top level "DHCP Server" window to activate those changes. Existing clients may need to disconnect and then re-connect to the network to pick up any changes.
Enabling and Starting the DHCP Server
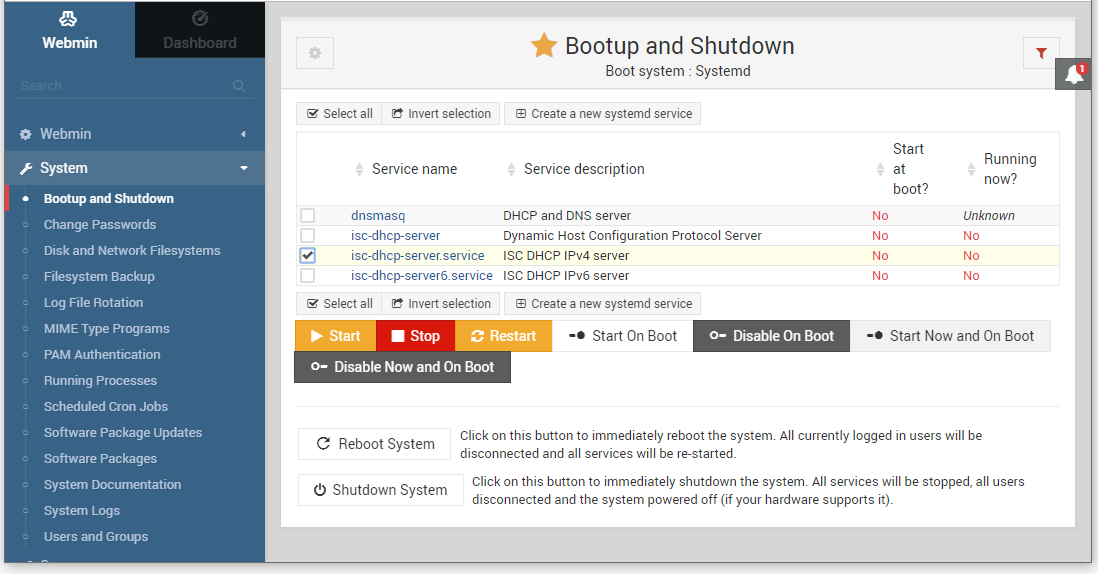
To start your DHCP server, and to make sure that it will start automatically if the server is restarted, select "Bootup and Shutdown" under System in the menu on the left hand side. Once the list of services appear, type dhcp into the filter field in the top right hand corner to see only relevant services. Put a checkmark next to "ics-dhcp-server.service" as shown below, then click "Start Now and on Boot". Return to this page, filter on dhcp again, and verify that both the "Start at boot" and "Running now" columns read "Yes" for the service you just enabled. The service will automatically start the "ics-dhcp-server".
Verify Operation of the DHCP Server
Once the DHCP server is properly configured and started, connect another computer to the same network, and set it to use "Automatic" or "DHCP" addressing mode. This will cause it to look for a DHCP server on the network, obtaining its address and other settings from there. Here we're using a Mac set to "Automatic". Once it connects to the network (indicated by the green circle next to the interface name), the settings obtained from the DHCP server appear as "IP Address", "Subnet Mask", "Router" and "DNS Server". The values indicated here should match your DHCP server settings, as described above.

If you don't get any values in those fields, here are some points to check
- Check that the DHCP server is indeed running (see above).
- Ensure that your separate computer is connected to the same network as the server (open a terminal window and type "ping 10.2.0.10" to verify that it reaches the server).
- If you just made changes to your separate computer's network settings, make sure you've clicked any "Apply" button to make those changes take effect.
Macs may take 1-2 minutes to connect properly to DHCP (showing a "green light" in the settings) if no internet connection can be found, which will be the case here since we're on a small local test network.
Editing DHCP Server settings
If you're using the built-in DHCP server, you need to change its settings if you change the IP address of the server.
- Use Webmin.
- Select DHCP server under the Servers heading on the left hand side.
- Click the icon for your subnet (initially named 10.2.0.0)
- Change its settings to match your network.
As an example, to configure a lass C network with the base address 192.168.0.0:
- Set the "Network address" to the base address of your network.
- Set "Netmask to 255.255.255.0.
- Set "Address ranges" to 192.168.0.25-192.168.0.254 (defines the range of dynamically assigned addresses).
- Click save.
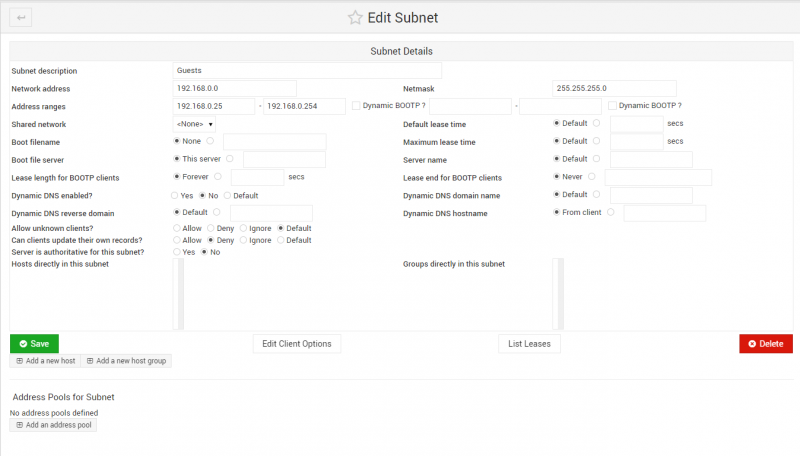
- Back on the main "DHCP Server" page, click "Edit Clients Options" button at the bottom of the window.
- Specify "Default router", "Broadcast address" and "DNS server" and "Subnet mask" as appropriate for your network (see example below).
- Click Save.
Restart the DHCP server using those new configurations by clicking the "Start Server" button at the bottom of the main "DHCP Server". Then restart the devices that use dynamically assigned addresses to pick up those changes.