Advanced Interaction from a Custom Web Page
The application note titled "Basic Interaction from a Custom Web Page" desicribes a simple form of interaction (starting a named task). However, some applications ned a tighter integration, with direct read/write. and rea-ltime access to the inner workings of Blocls. This application note shows how such advanced integration can be accomplished, including:
- Making HTTP requests to Blocks, triggering a custom action on the server and passing a result back to the web page.
- Setting any property in your Blocks system from the web page.
- Subscribing to property changes to keep your web page in the loop, regardless of how the property was changed.
- Passing more complex data to Blocks using a web channel.
- Invoking server-side scripts from your web page.
As a bonus point, this application note also shows how you can make a call out to another web service (here a Google charts service for generating a QR code), returning the result to your custom Blocks application.
Installation
You need a computer with a running blocks server and a web browser to run this application note. Here's the Blocks root for this application note. See the the general setup section for details on downloading and installation. Once that general setup is done, follow these steps to run the application note:
- Start Blocks.
- Open the Blocks editor using the Admin button.
- Log in using the proper credentials (default user name is admin and the password is pixi).
- Open a second browser window to the same address as the editor window, but replace /edit/xxx with /spot. This opens a test spot display.
- Double-click TheSpot in the editor and reassign it to the ID shown in your separate spot window. This will be your test spot, controlled from the custom app.
- Open a third browser window, using the same host and port as the editor window, but instead of /edit type /public/pubsubpeer-test, showing a page that looks like the one shown below.
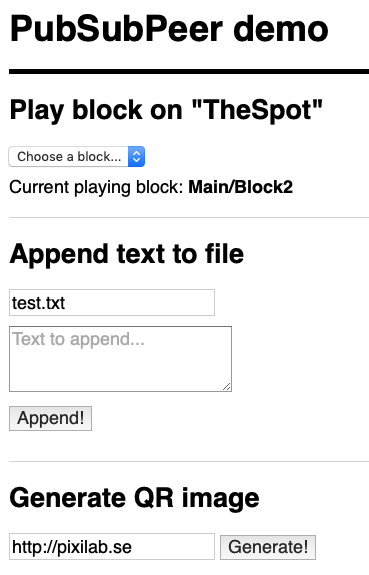
Running the Example
Now choose "Block1" or "Block2" on the "Play block on" dropdown. You test spot window will show the selected block.
The text under the dropdown, titled "Current playing block" shows the name of the currently playing block. Note that this information is obtained "live" from Blocks, which you can see by dragging the other Block to the Spot in the editor window, which then immediately updates the block name on the custom web page.
Type some text into the text area titled "Text to append", then click the "Append" button. Now look into the script/files directory inside the blocks root installed above, and you'll find a text file named test.txt, with the text you just typed appended.
Finally, press the "Generate" button. After a brief pause, a QR code appears below the field with the text entered into the field next to the Generate button. This image is stored in the file located at public/custom/qr.png, from where the custom web page retrieves it.
Behind the Scenes
This example consists of the following components:
- A custom web page (public/pubsubpeer-test/index.html).
- An associated custom JavaScript, loaded by the custom web page (public/pubsubpeer-test/js/main.js).
- The PIXILAB Websocket API script (public/pubsubpeer-test/js/pub-sub-peer.js).
- A server-side user script (script/user/CustomWebPageCommunicator.ts).
The server-side user script performs a number of functions:
- Responds to the websocket requests for writing data to a file.
- Handles the HTTP POST request that generates a QR code image.
- Manages the Google charts round-trip to generate the QR web page.
- Renders the QR web page to a PNG file.
- Returns the result as an image path as the result of the HTTP request. allowing the custom web page to render the QT code using an IMG tag.
The HTML web page as well as all the scripts have ample comments, explaining what's going on, so please refer to those for full details.
Passing complex data
While the Websocket API provides a very efficient method for observing and manipulating individual property values, you sometimes need to pass more complex data to the server or back to the client. There are two mechanisms for doing so:
- Using a regular HTTP POST request, passing and returning JSON-formatted data.
- Using a named websocket channel.
Both of these methods are described in detail below.
PIXILAB Websocket API
As mentioned above, the file at public/pubsubpeer-test/js/pub-sub-peer.js implements the websocket API allowing a custom web page to talk directly to Blocks. This uses the same bidirectional, high-performance method as used by Blocks itself for all buttons, sliders and other controls.
Following is a description of each public API function. See examples and more details of how these calls are used in the main.js script file.
PIXILAB_BLOCKS.PubSubPeer
Top level function for establishing a connection to Blocks. Use it like this:
/**
 * Instantiate a PubSubPeer that auto-connects to the blocks server
 * using a websocket.
 *
 * The PIXILAB Websocket API is defined in the pub-sub-peer.js script, which
 * attaches its root object as a global (window) variable named PIXILAB_BLOCKS.
 */
const pubSubPeer = new PIXILAB_BLOCKS.PubSubPeer(
	onServerConnectionChange
);
This call returns a pubSubPeer that manages the websocket connection to the server.
The example shown above assumes that the custom web page is served by the Blocks server. If it is served from some other server, you must add a second parameter that is the URL for accessing the websocket endpoint on your Blocks server, like this;
const pubSubPeer = new PIXILAB_BLOCKS.PubSubPeer(
	onServerConnectionChange,
	"ws://<nameOrIp><:nonStandardPort>/rpc/pub-sub"
);
Replace <nameOrIp> with the IP number or resolvable name to your Blocks server. If you're running on a non-standard port, append the port number separated by a colon. Hence, if your Blocks server rus on 10.1.0.10 using the standard port, the call would look like this:
const pubSubPeer = new PIXILAB_BLOCKS.PubSubPeer(
	onServerConnectionChange,
	"ws://10.1.0.10/rpc/pub-sub"
);
The first parameter of the PubSubPeer constructor call is an optional callback function, in the example above called onServerConnectionChange, which in the sample code looks like this:
/**
 * The server connection state has changed. Here we just log that event, but you
 * may want to use it to indicate the server is temporarily offline, or similar.
 */
function onServerConnectionChange(connected) {
	console.log(connected ? 'Connected to server' : 'Disconnected from server');
}
The argument passed to this function is true when the connection is established and false if the connection is lost. The example code merely logs a message when this function is called.
pubSubPeer.set
This function allows you to set any property in your Blocks server (unless it's protected by a role restriction). it takes two parameters:
- The full path to the property to set. This is the same path as used in, e.g., a Task trigger. In the example, this is "Spot.TheSpot.block", setting the current block of the Spot named TheSpot.
- The value to set the property to. In this example, the value is a string specifying a block name, as taken from the dropdown list, including "Main/Block1" and "Main/Block2". The name must include both the group name and the block name, separated by a slash.
 The type of the second parameter must match the value type of the property. For instance, if the property is numeric (such as the volume level of a Spot), you must pass a number here.
pubSubPeer.add
This is similar to the set function, and takes the same two parameters. When used with a numeric property, the value you specify will be added to the current value. Pass a negative value to subtract. When used with a string property, the value will be appended (concatenated) to the current string value.
The add methid is often simpler for such incremental adjustments than maintaining a subscription to the value in order to do the calculation on the client side based on the current value and then using the set function to change the value.
pubSubPeer.subscribe
Subscribe to the value of the specified property. It accepts the following parameters:
- The full path to the property to subscribe to (see above).
- An object containing a single function named dataReceived, that will be called whenever the value of the property changes.
The subscribe function returns the current value of the property if already known. If not, it returns undefined and you'll be notified by the dataReceived function being called once the value arrives.
You should pay attention to any initial value returned by the subscribe function, treating it the same way as any value change provided through the callback function. See main.js for an example of how this can be accomplished.
pubSubPeer.unsubscribe
This function allows you to terminate any value subscription initiated by the subscribe function if you're no longer interested in changes of a property. It takes the following parameters:
- The full path to the property to subscribe to (see above).
- The very same object as passed to the subscribe function.
The main.js example shows how to use this function, as triggered by the Unscubscribe button.
Passing data through a Channel
The example script shows how to use a named websocket channel to pass a JSON data object consisting of a filename and a message to the server. The server then writes the message to a file with the specified name. Such a mechanism could be used to implement some custom logging mechanism, for instance.
The receiving end of the channel is in this example managed by the server side script. This is specified in main.js as 'Script.user.CustomWebPageCommunicator', which indicates that the channel is owned by the user script named CustomWebPageCommunicator, which is the server-side user script mentioned above. The specific channel name used in the example is 'append-to-file'. You can see this channel being established by the CustomWebPageCommunicator user script like this:
/**
 * Establish a websocket channel named "append-to-file", accepting
 * JSON data representing a AppendToFileData object from the web peer.
 * Note that such channels aren't restricted to JSON data, but can handle
 * any text.
 */
this.establishChannel(
	"append-to-file",
	data => {
		/* Parse the data as it is from its JSON string
		   which is expected to be a AppendToFileData object.
		 */
		const appendToFileData: AppendToFileData = JSON.parse(data);
		// Pass the data to doAppendTextToFile, appending it to a file.
		return this.doAppendTextToFile(appendToFileData);
	},
);
To send data to this channel, the custom web page first calls PubSubPeer.channelName to obtain the full system name of the channel and then calls pubSubPeer.send to send the data through the channel.
PubSubPeer.channelName
This function takes the following parameters:
- The scriptContext, specifying the name of the script that owns the channel, such as 'Script.user.CustomWebPageCommunicator' in the example main.js.
- The channelName, which is the name of the channel established by the user script (here 'append-to-file').
The function returns the full system name of the channel which is then passed to pubSubPeer.send to send the data to the channel.
pubSubPeer.send
This function takes the following parameters:
- System channel name (as returned from PubSubPeer.channelName).
- The data to be passed to the channel, as a string. In the example, this contains JSON data containing an appendToFileData object, which is then received, deserialized and acted upon by the server side script.
Using HTTP requests
You can also use a plain HTTP POST request to make calls from a custom web page to a server-side script. This is often simpler, as it doesn't use a websocket connection, and therefore doesn't require the use of the more complex pub-sub-peer.js API. To use this method, implement a public function in your user script marked by a @resource() annotation. Here's the relevant snippet from the CustomWebPageCommunicator user script:
/**
 * Accept an HTTP POST at /rest/script/invoke/CustomWebPageCommunicator/generateQRImage.
 * This "screenshots" a web page containing a QR code and then moves the image to a folder
 * accessible from our custom app.
 *
 * See @resource() for details on how the endpoint URL is structured.
 */
@resource()
generateQRImage(data: QRData): Promise<string>
Note the following details:
- The request's path begins with /rest/script/invoke/, followed by the name of the user script containing the request handler.
- The function's name (generateQRImage in the example above) is used as the last segment of the request's path.
- The function must be marked with a @resource() annotation.
- The function must take a JavaScript object, which is automatically deserialized from its JSON form before calling the function (i.e., the function receives the object, not its JSON representation).
- If the function returns something, the result will be passed back to the server as the request's result (encoded as JSON).
- If the data isn't immediately available, the function may instead return a Promise, which should eventuallt be resolved (or rejected) once the result is available (or the request has failed).
The generateQRImage function used in the example CustomWebPageCommunicator script shows an example of how a deferred result can be returned by means of a promise. Here required since the Blocks server in its turn requires a number of time consuming steps:
- Make a request to the external Google Charts API to convert a string to a web page with a QR code.
- Render that web page to a PNG image file (using Blocks' WebRenderer internal API).
- Move the resulting file to its final resting place (using Blocks' SimpleFile internal API).
Once these three steps are done, the promise is resolved with the name of the generated image file, now available under /public on the Blocks server. If any error occurs, the promise is instead rejected, passing an error code back as the HTTP POST request's result. Upon receiving the result, the custom web page's main.js script proceeds by displaying the resulting image. Note that the fetch function, called to make the HTTP request from the client side, also returns a Promise object, eventually resolved with the result of the operation once its then function is called.