Use a Google Calendar as a feed in Blocks
This application note gives an example on how a Google Calendar can be used as a feed, allowing spots to read its events in Blocks. Using a Google Calendar is an easy and familiar way to manage events, which can then be automatically displayed on Spots.
In the first example, a public Google Calendar is used. This is the easiest method of implementing a Google Calendar, and is probably enough for most cases.
If a private calendar is required, the process is slightly different, where the biggest difference is in authentication. Follow the guide to do a public calendar feed before attempting a private calendar since some of the steps required is not repeated in the private calendar example.
Public calendar version
Prepare the Google Calendar
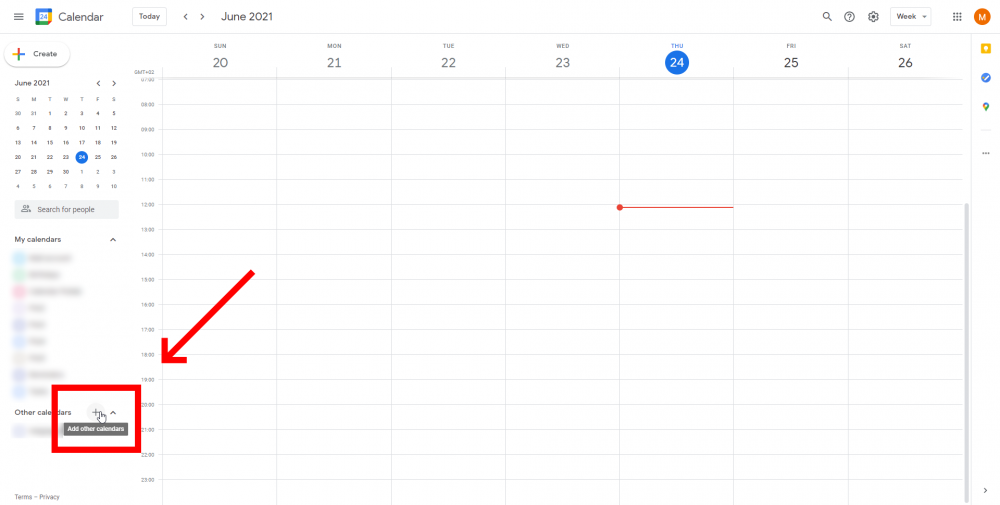
The first step of this implementation is to prepare a calendar. A free Google account is needed to create a calendar. When you are logged in, go to https://calendar.google.com/ and create a new calendar. If you already have a calendar made that you would like to use, you may skip this step.
Once the calendar is created, navigate to the calendar settings. This can be done from the sidebar on the left after creating the calendar. If you need to find this from the calendar home page, it is instead available when hovering over the calendar entry in the left sidebar.
In the calendar settings, there are a few things we need to do.
The first step is to make the calendar public. This is done under the Access permissions-section. Check the Make available to public-checkbox, and make sure the dropdown on the right has See all event detail is selected.
The next step is to find the Calendar ID. This can be found under the Integrate calendar-section, and is in the format xxxxxxxxxxxxxxxxxxxxxxxxxx@group.calendar.google.com. Copy this and store it until later.
The last step is to add some dummy events just for testing purposes today and in the next couple of days.
Generate an API Key
With the calendar done, we can move on to generating the API key needed to access the Calendar API.
This is done at Googles Cloud Platform. https://console.cloud.google.com/.
The first step of generating an API key is creating a new project at the cloud console.
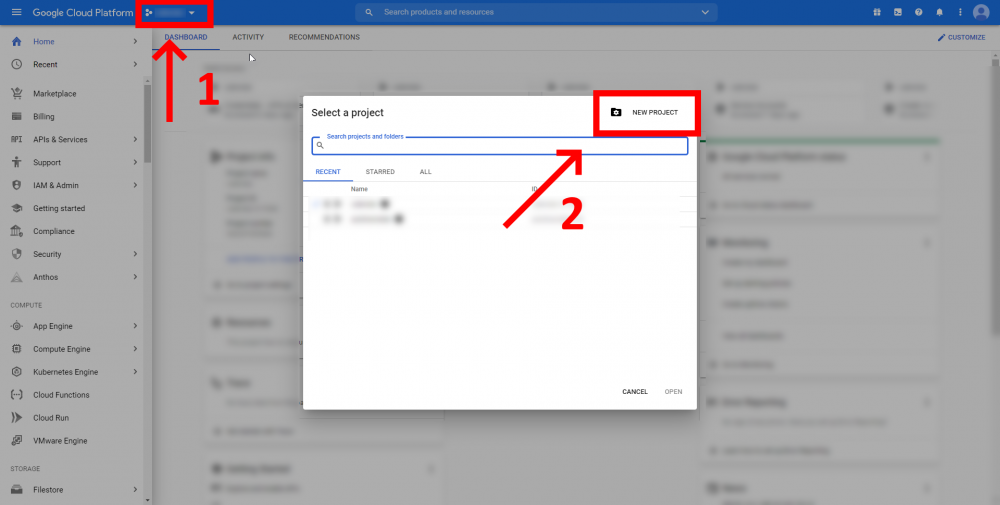 Name this project anything you want and click Create. This will put you back on the
dashboard page. From there, navigate to the Credentials-page under the APIs &
Services-menu.
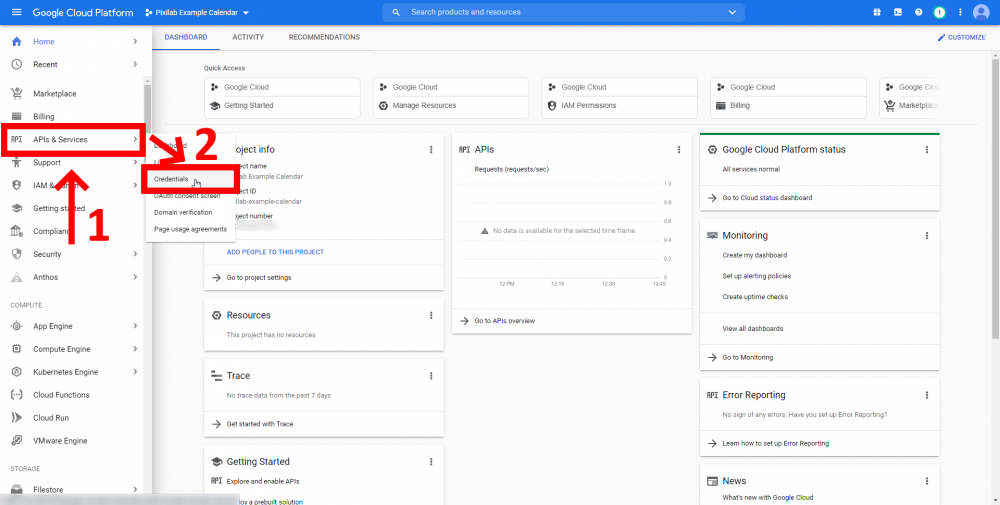 At the top of the screen, there will be a dropdown labelled Create credentials. From this,
select API key, which will open a pop-up with a string of text. Copy this and store it
temporarily in a file.
Before the key we just generated can be used, we need to enable Calendar API for the project. Do this by navigating to the API Library by selecting Library in the same menu as you used to navigate to the Credentials-page. When there, search for Calendar API and select it. On the Calendar API details page, there is a button labelled Enable. Press this. Make sure you enable the Calendar API, and not the CalDAV API, which also shows up on the search.
Install the Feed script
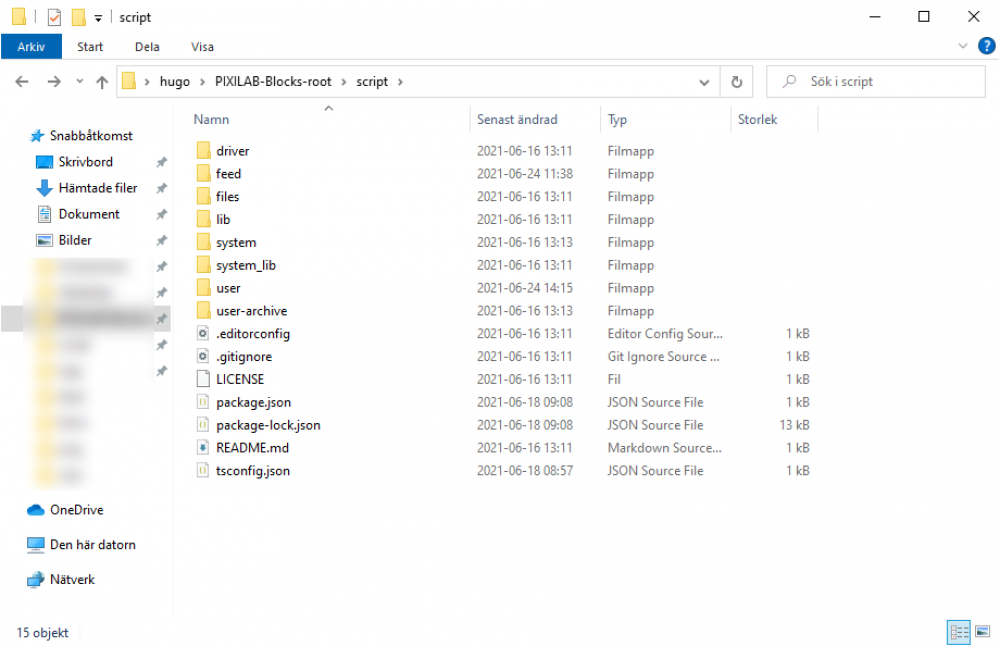
Install the feed script by unzipping this archive in PIXILAB-Blocks-root/script/feed. Make sure that you have downloaded and installed the latest script package from GitHub on the server, and that you are running Blocks 5 or higher. When everything is unzipped, make sure that the folder structure looks like this:
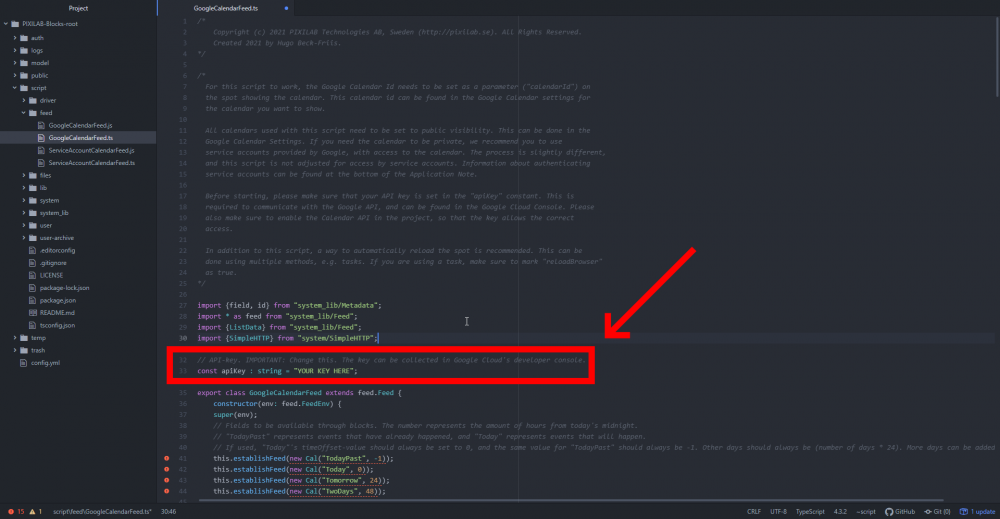
 Adjust the Feed script. Now that you have the feed script installed, we need to add our newly generated API key. To
do this, open the GoogleCalendarFeed.ts in a code editor, navigate to the constant apiKey, then change this to the API key you generated previously.
This script comes with four feeds built in but adding more is easy. These are “TodayPast”, “Today”, “Tomorrow”, and “TwoDays”. “TodayPast” and “Today” handle the events occurring today, with the difference being that “TodayPast” only loads the events that have already happened, and that “Today” only loads events that are yet to happen. “Tomorrow” and “TwoDays” load events from the next two days. To add more, copy one of the lines “this.establishFeed” and change the first parameter (e.g. “Today”) to anything you want (e.g. “ThreeDays”), and the second parameter to (number of days into the future * 24).
Prepare spots
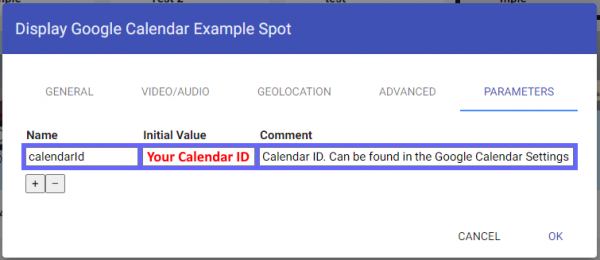
All spots with blocks using this feed script need the parameter calendarId set to the Google Calendar ID you copied before. Using spot parameters allows different spots to display different calendars. Spot parameters can be located in the Parameters-tab of the spot settings.
Example Block
For this guide, we will use an example block that can be downloaded from here. Once the block is imported you can make sure everything is set up correctly by loading it to a spot. If all events from your calendar in the timespan import correctly, everything is well. If not, please read through these notes again and check if you missed anything.
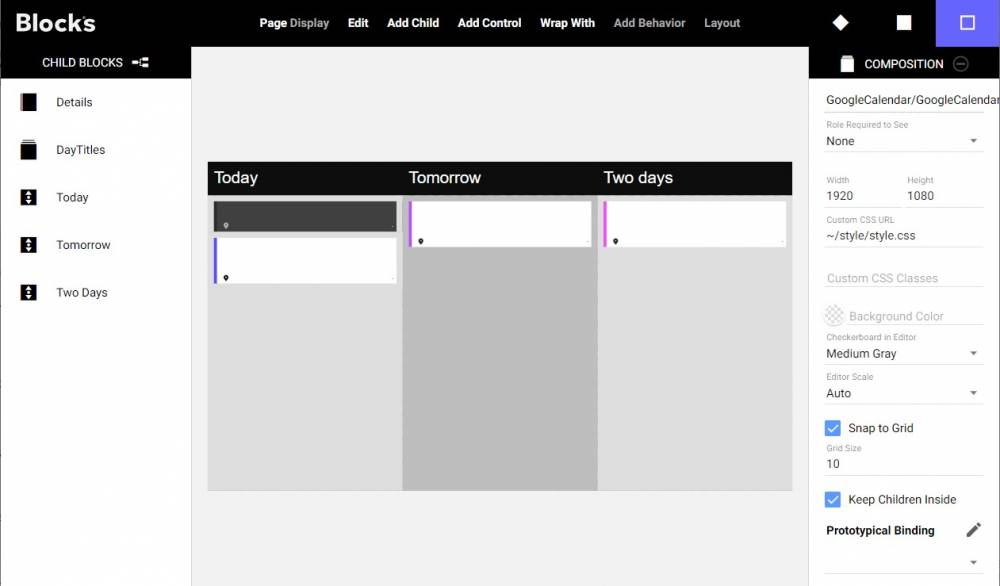
The layout is divided into three columns, today tomorrow and two days from now..The events has a details view stored in a book that is overlaying the standard view.
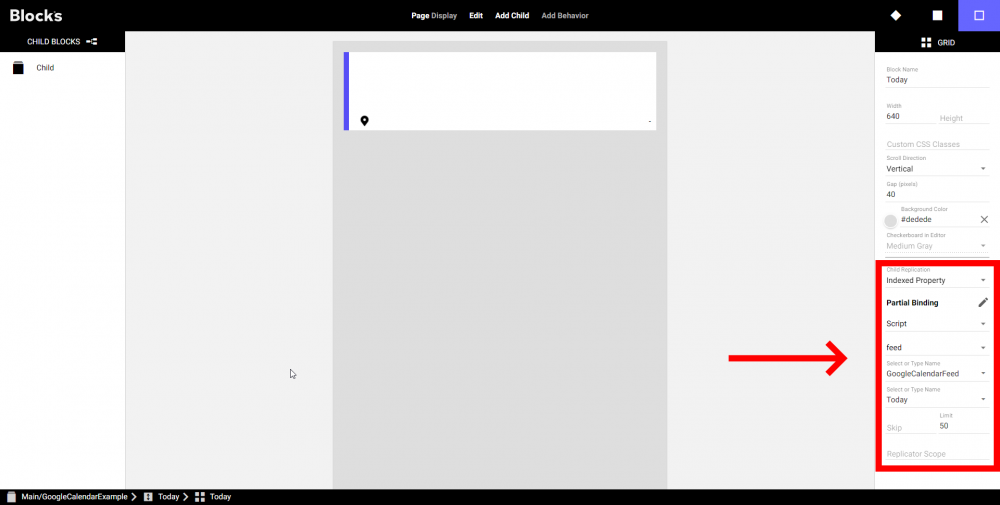
Let’s look at the events view for today. Within the scroll block (which allows the field to overflow if we have any events), there are two grid blocks. This is because we want to display events that already happened in a darker color. Because the feed is split between “TodayPast” and “Today”, what you can do with these past events is very flexible. Open the grid named “Today” and look at the Child Replication-field. This is what allows us to duplicate the child block we already have for each event that happens during the day.
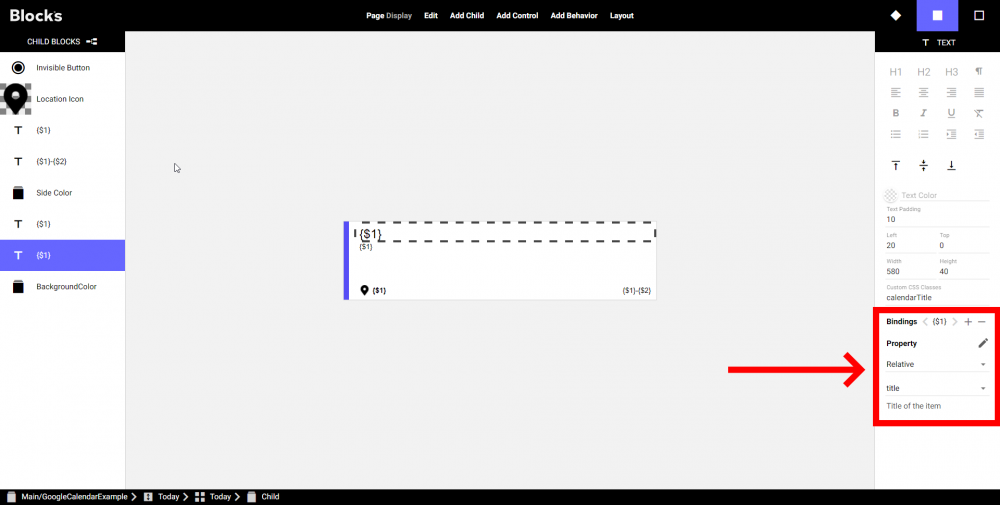
Next, open the child block and have a look at the text fields. They are all dynamic text with bindings, which can be found in the sidebar on the right side of the screen when the text is selected. The property for the title is set as Relative.title, which means that it changes to the right title depending on the event data. The relative event data is given by the parent grid with its child replication, based on the feed entries.
Last but not least, we have the detailed view.
This view contains a better view of the event details and includes the full description. The detailed view is done with a book, but before we leave the grid child block and look at how the book is structured, we should look at the Invisible button (which has been made invisible using custom CSS) and its bindings.
The action that happens when pressing the button is set to Go to local block, with the target block ../../../Details/Details. When going to the local block in this way, we can again use relative paths in the text bindings, allowing us to get the correct text for all calendar entries without creating additional pages in the book. The book itself only has two pages, where the first is empty. The reason for this is so we can easily make the details view appear and disappear as an overlay without changing the content in the background. When pressing the close button in the details view, we use the go to local block action and show the blank page.
Update spots
When adding, removing, or editing events in the Google Calendar, the spot showing the calendar need to be updated. Since the feeds are static once loaded, we need a way to update the content. Using this example, this needs to be done manually, but in many cases, it would be more beneficial to have some way to update the spots automatically. An example of a way to do this is using tasks running at an interval of e.g, 30 minutes to reload the spot (with reloadBrowser set to true). Another alternative, where suitable, is using slideshows in the top level of the block, which reloads the feed every time the block becomes active.
Private calendar version
If you need to use a private calendar, the process of obtaining the event data is slightly different. Instead of simply using an API key, we instead need to generate a Service Account Access Token. This section assumes you have done the Public calendar example first.
Scripts
For Private Calendar access a user script must be used, as well as a number of libraries that need to be imported. Download the archive from here. Extract the zip and copy all the files from the lib” folder in PIXILAB-Blocks-root/script/lib, and the files from the feed folder to PIXILAB-Blocks-root/script/feed.
Create a Google Service Account
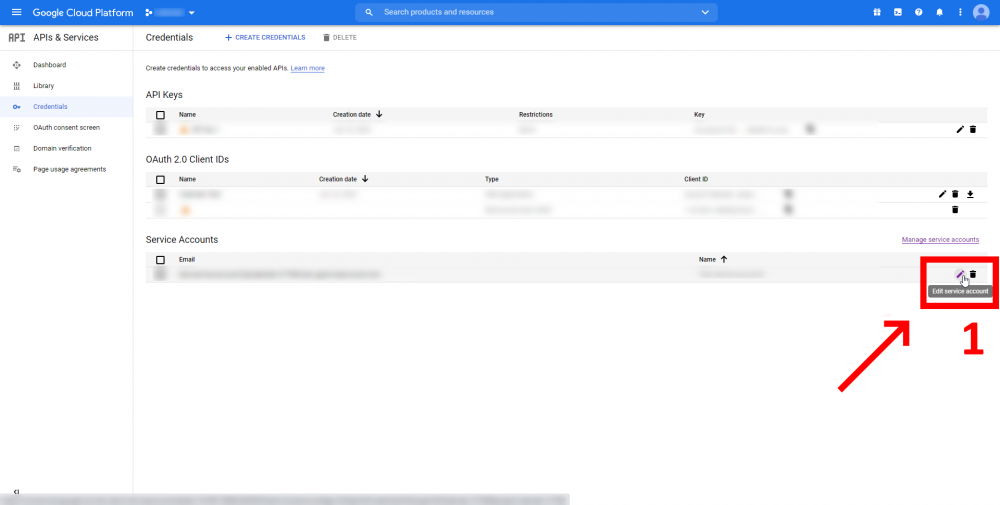
Open the Googles Cloud Platform. https://console.cloud.google.com/. Go to the Credentials page for your Google Cloud Project and select Service Account in the Create Credentials menu.
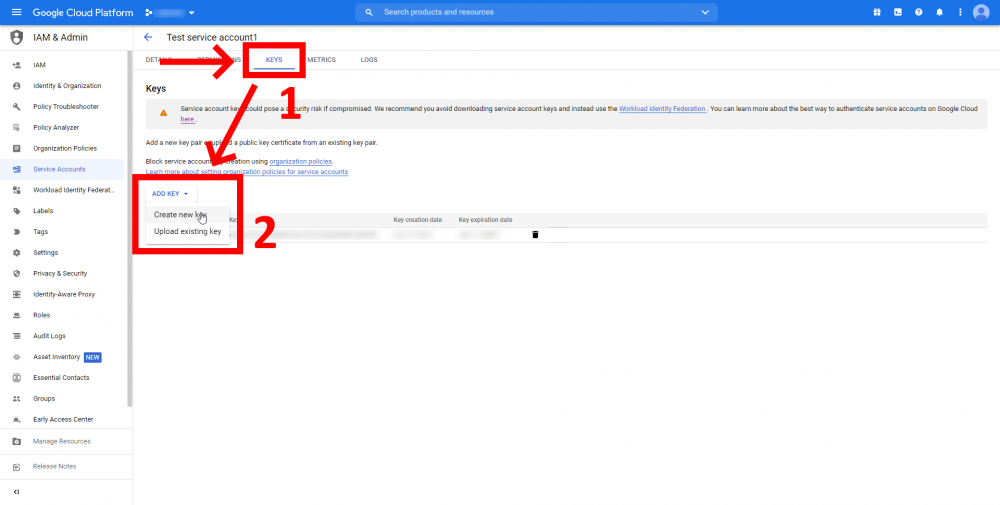
Set the name and continue through the next steps. This will put you back at the credentials page, where we now need to generate the service account credentials. Do this by going into the settings for the Service Account you just created (pencil icon on the right of the entry, from the credentials page), and navigate to the Keys tab. From here, select Add Key followed by Create New Key.
When you have pressed Create New Key, a menu will pop up with a few options for the credential format. Select JSON and click Create. This will give you a file with all the credentials. Keep the file for later.
Now that we have a Service Account created, invite the Service Account email to the calendar you want to use. Do this by going to the Google Calendar settings for the calendar you want to use and scroll down to Share with specific people. Here you can invite the e-mail address of the Service Account (available in the file you just downloaded, as well as in the Service Account settings). Set the permissions (right side of the entry) to See all event details or higher.
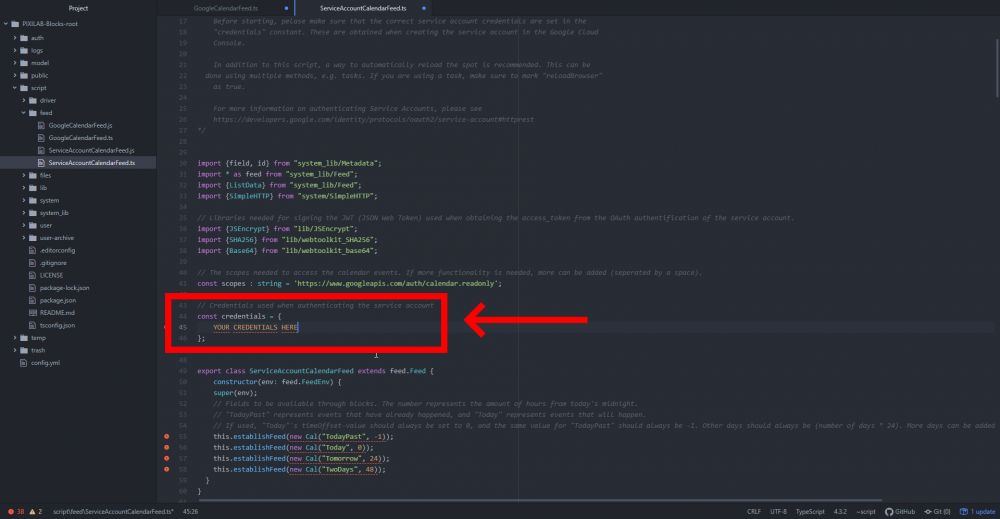
The next step is to put the credentials of the Service Account in the user script. Open the script (from “PIXILAB-Blocks-root/script/feed”) and find the constant credentials. Remove anything there and paste in your full credentials from the file you received from the Cloud Console. (This assumes you have a code editor available.)
Example Block
Finally, download this example block and import it into Blocks with the import block feature in the editor.
If everything works - Great! If not, please read through every step again and make sure everything has been done correctly
