Development Tools and Code
This describes the recommended toolset for development. Other editors and IDEs may work as well (including Atom, which we recommend until it was discontinued), but this is probably the best way to get up and running.

Install Visual Studio Code
Install the Visual Studio Code editor.
Install NodeJS and NPM
Those programs are required for many script-related operations as well as in some cases to install typescript.
Follow the instructions here to install Node.js and npm for Mac or Windows. If you're using our Linux based server, run the following commands in a terminal window, pressing return after each. Enter the password of the pixi-admin user when prompted to do so.
su pixi-admin
sudo apt install nodejs npm
exit
Install Typescript
In a terminal window with administration privileges, now install typescript. On MacOS or Linux, run this command in a terminal window:
sudo npm install -g typescript

su pixi-admin
Enter the password for the pixi-admin user. Then install typescript as described above. Finally, type exit to return to the pixi-server user (or just close the terminal window)
Install the Scripts
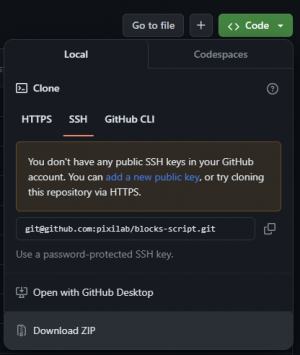
Download the Blocks scripting github repo as a ZIP file. This is done from a menu opened with the green code button.
Decompress the zip file.

Once this is done, your PIXILAB-Blocks-root/script directory should contain at least the following items
driver
system
system_lib
LICENSE
README.md
tsconfig.json
The first three items shown above are directories, containing the files obtained from github. They may contain additional files and directories if you had driver or other scripts installed before.

Running VSCode for the First Time
- Start Visual Studio Code.
- Open the PIXILAB-Blocks-root/script directory from within Visual Studio Code using File > Open Folder…
- Open a new terminal in Visual Studio Code using Terminal > New Terminal.
- Install driver development dependencies by typing npm install in the terminal, followed by Enter.
- Select Terminal > Run Build Task > tsc: watch to automatically compile TypeScript files as they are saved.
IMPORTANT: This last step must be repeated after restarting VS Code to re-activate the typescript compiler.
Under Windows, an error message similar to "[…] cannot be loaded because running scripts is disabled on this system." may appear following any of the commands above. This can be resolved by changing the Execution Policy: Run Windows PowerShell as administrator and type Set-ExecutionPolicy RemoteSigned, followed by Enter. Type "a" to select "Yes to all". Restart Visual Studio Code, close the terminal and open it again using Terminal > New Terminal.
Once you have those pieces in place, restart your local Blocks server and open the Blocks Editor using your web browser. You should now find the drivers on the Driver menu of a TCP Device added on the Manage page. If you don't see the drivers listed there, they're not installed in the proper location (see above).
Proceed with learning about basic concepts.
