A Remote Control Switching Blocks on Spots
This application note shows how to make a remote control for selecting what content to display on a selected Spot, letting you to pick both the target Spot and the content Block to show. Also provides additional details on the following:
- How to apply any content to any spot.
- The use of parameters and how to define those.
- Setting up transitions for use when switching content.
- How to remove all content from a Spot to show its settings on screen.
Installation
You need a computer with a running blocks server and a web browser to use this application note.
We have prepared a PIXILAB-blocks-root folder containing everything you need to run the examples. Download this ZIP file and unpack it. If you don't know how to do this, read the instructions in the general setup section.
If you have done the general setup, copied the files and pointed to this application notes root block, follow the next steps to run this application on your computer.
- Start Blocks.
- Open the editor using the Admin button.
- Log in using the name admin and the password pixi.
- Open a second browser window and type in the URL: http://localhost:8080/spot/?display=left
- Open a third browser window and type in the URL: http://localhost:8080/spot/?display=right
- Open a fourth browser window and type in the URL: http://localhost:8080/spot/index.ftl?mobile=Mob1, this is your remote device view.
- Position and scale all browser windows so you can see them all on your screens.
- Assign the ControlPanelIndex block to the visitor spot Mob1.
You should now be able to see something like this on your screen:
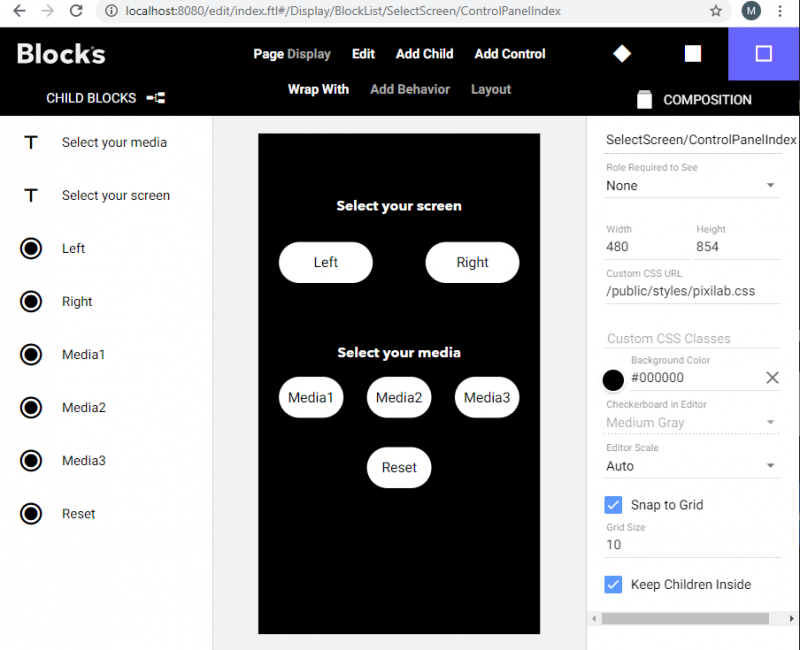
How to change content on the spot
Select which screen you would like to control by clicking the left or right button. As you can see the button gives you feedback to show which display is selected. Then choose your media by clicking any of the three media buttons. You should be able to set any content to any screen.
The Reset button simply removed the media from the selected screen.
How does it work?
This example uses the parametrization feature in Blocks. Basically, what happens when you click one of the buttons to select a screen is that the button sets a value to a local parameter. This value is then being used in the bindings that the media buttons use. One can think of parameters as variables. The parameter is in this case used to build the path to a binding in runtime.
In the editor, open the ControlPanelIndex block. Select the Left button to see its binding.

As you can see the button is bound to Set Property/Local/parameter/selectedSpot/Set to/DisplaySpotLeft. The selected screen is our parameter and we will set the value DisplaySpotLeft to it this parameter by pressing this button. If you select the Right button you can see that we apply a different value to the same parameter.
Now select the Media1 button to see its binding.
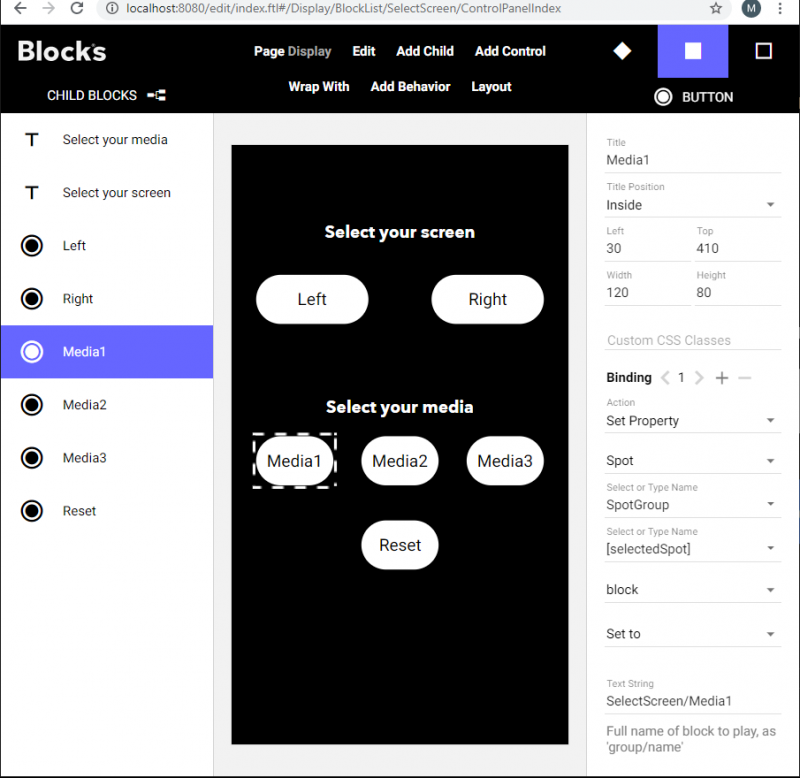
As you can see this button is bound to Set Property/Spot/Spotgroup/[selectedSpot]/block/Set to/Media1. Let’s take a closer look to what this means. We set a property to a spot; this spot is supposed to be found inside a spot group called SpotGroup. The spot is next in line to be defined, but we don’t want to hardcode this button to a specific spot. Instead we use the [selectedSpot] parameter as a placeholder for the not yet defined spot name that later in runtime will be defined by clicking the Left and Right buttons.
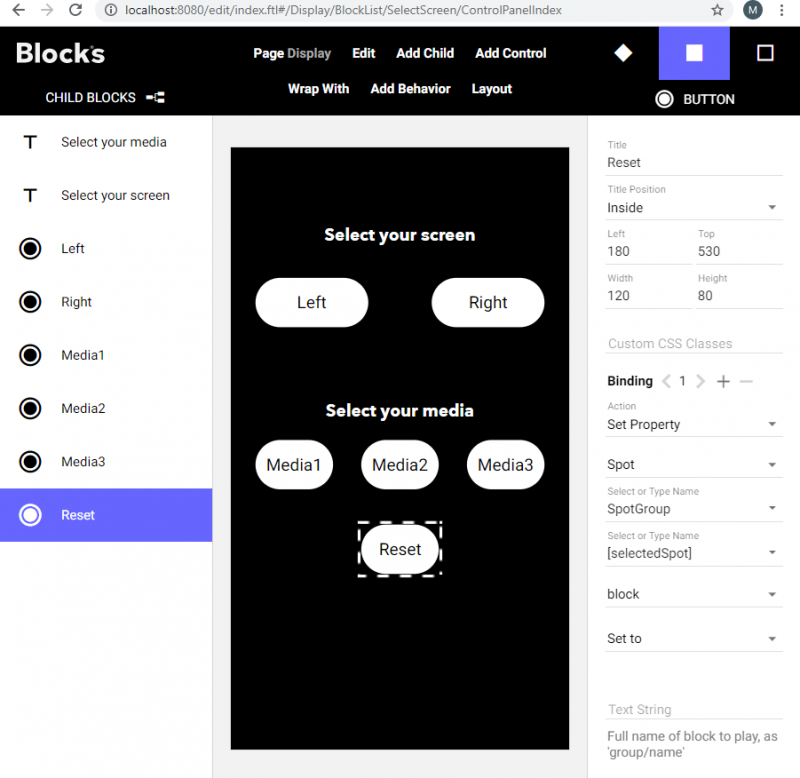
The Reset button simply sets the selected spots block to an empty string.
Learn more on the subject parameters in the Blocks manual chapter 10, Spot Parameters.
Transitions
In this case, essentially what you do is changing the playing block on the spot. Just like you do when you manually assign a block to a spot by drag it on to the spot in the editor hence the transitions in action here will be the spots default transitions set in the display spot settings.
What's more
Now let's explore this even further. Open a fifth browser window and open the http://localhost:8080/spot/index.ftl?mobile=Mob1 once more. This will give you the view of a second visitor spot. Visitor spots are individual, but they do share the same content.
Try to select screens and change content on both visitor spots. As you can notice, the buttons will provide accurate feedback across multiple devices as they are all bound to the same properties. So, the parameters are local, and every visitor spot has its own set of parameters holding its own values.
Where can this feature be useful?
Think of these two scenarios. You have an exhibition stand at a trade show with many workstations where you can hold presentations or perhaps demonstrations. You can apply this method to allow the staff to grab any screen that is available and put up any content on the display. Maybe there is a generic content across all stations when idle, that content can be changed at any time to any other content that supports a more specialized presentation about to begin.
Another example is a museum. The museum has screens and interactive kiosks around the exhibition. The museum also has got professional tour guides that may hold short presentations for the visitors at particular points of interest around the museum. Using this technique, it is possible for the guide to not only pause the content running on the screens, but he can also use the screen for supporting his story with special content. It doesn't stop here; the guided presentation can also use the control system in blocks to apply special light cues and controlling other features to the area. As we used a visitor spot to do this, you can have as many guides as you want, and they can all operate at the same time but in different areas.