Table of Contents
Collecting Basic Data using Visitors Phone
This application note provides a gentle starting point for learning about the Visitor Data Collection functionality of Blocks. While it shows the basic steps for collecting visitor data based on mobile phones, it provides no useful functionality beyond the data collection as such.
Installation
You need a computer with a running the Blocks server software and a web browser to use this application note. Your Blocks server must also have the additional Visitor Data Collection license (you can check this under Manage/Licenses).
There's a complete PIXILAB-blocks-root folder containing everything you need to run this application note. Download this ZIP file and follow the in the general setup instructions to get up and running.
Running the Application
Then follow these steps to run this application.
- Start Blocks.
- Open the editor using the Admin button.
- Log in using the name admin and the password pixi.
- Using a mobile phone (or, alternatively, a separate browser window on your computer), go to http://your-server-ip-and-port/spot?mobile=Visitor
- A basic user interface consisting of only a single name field, along with some buttons at the bottom, should appear.
- Enter your name. The name here is optional, and just shows how such basic information can be obtained through the visitor's phone.
- Press the Guide button at the bottom.
- Press 1 and then the play symbol appearing at the bottom of the screen, simulating visiting a spot with location ID 1.
- Return to the keypad and locate spot 2 in the same way.
Repeat the steps above using another phone or a separate browser (not just another browser window on your computer using the same browser as used above, if any).
Viewing the Results
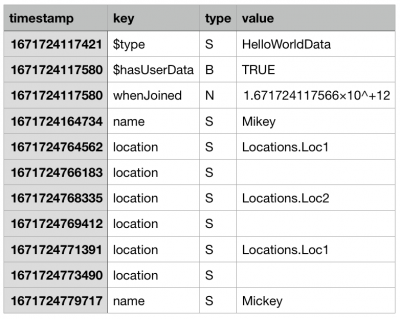
As mentioned at the beginning of this application not, all it does is collect data from visitor's phones. The resulting data ends up in the record directory of your Blocks server, in the subdirectory named after the data type collected, which in this case is HelloWorldData. Herein you'll find a folder named with the identity given to the visitor's phone, beginning with a P followed by a number. There's one such folder for each unique data record, containing at least a TSV file with a log of all the actions taken by the visitor affecting the data record. A TSV file is similar to its more well known CSV cousin, but uses tab characters as separators instead of commas. The content of the file can be viewed in a text editor, or opened using a spreadsheet such as Microsoft Excel or Apple Numbers. Here's an example of what it can look like:

This log file contains a complet transcript of all changes applied to the data record. This can be used to analyze where the visitor has been, in what order and how long each location is visited, for example. The data columns are:
- timestamp is the UNIX timestamp of the event, in milliseconds since 00:00:00 UTC on 1 January 1970.
- key is the name of the field in the data record that changed, for instance you can see how the location field has changed as the visitor moved to different locations.
- type is a single letter indicating the type of the field, as N for number, S for text string and B for boolean. Only those primitive types are supported.
- value is the new value assigned to the field specified by key.
The collection of fields match what data you want to collect, and is defined in the script managing the data collection. The name of this record type is then specified in the "Identify Individual Visitors by" field on the Identity tab of the Visitor Spot's settings.
The Script
The script defining the data record as well as how data is collected and used here is at script/user/HelloWorld.ts. This script consists mostly of comments providing detailed explanations on what's going on. You need to have the recommended set of development tools (or equivalent) to check out or modify this example.