Using Moments with WATCHOUT
While PIXILAB Moments can be used perfectly well stand-alone, directly driving a display device, there are cases where you want to use Moments as part of a larger context. A media server, such as Dataton WATCHOUT, is commonly used to handle such cases, managing playback of multiple sources in sync across several display devices.
In this case, you may prefer to play Moments through WATCHOUT rather than on a separate display device. This integration allows for seamless transitions and mixing of content generated live through Moments with pre-produced content managed by WATCHOUT.
There are three main options for integrating Moments into a WATCHOUT display system:
- Using a capture card to bring in Moments just like any other live feed.
- Using the WATCHOUT Dynamic Image Server.
- Using a separate application, such as vMix, rendering Moments into WATCHOUT.
Here's a brief rundown of the pros and cons, and some hints on how to go about these options.
Using a capture card
This is a simple and straightforward way of incorporating a computer (or other live feed) into WATCHOUT. Simply connect the Moments display computer, running a web browser in full screen mode, to your WATCHOUT display computer using a capture card. Such capture cards are available from various vendors such as Datapath and Black Magic.
Advantages of this method include:
- Simple configuration - just connect the Moments display computer directly to a capture card in your WATCHOUT display computer using a video signal cable.
- Renders at full frame-rate.
- Well known and established method of bringing in live feeds.
Some cons:
- Capture card(s), combined with necessary cabling, distribution amplifiers or signal splitters, may be quite costly.
- No support for alpha channel (transparency).
The last point may be the most significant. When you bring in a signal through a capture card, "what you see is what you get". It will show the feed exactly as it appears on a monitor connected to the Moments display computer. If the background is black, it will be black also in WATCHOUT. Even though WATCHOUT excels at dealing with background transparency, such an transparent "alpha channel" is not provided by the capture card. This nullifies some of the advantages of playing Moments through WATCHOUT, since the integration will not be as seamless as other content.
But if you're OK with bringing in a rectangular feed from Moments, with whatever background color you have chosen for your moments display, this option certainly does work well.
 You may be tempted to set a solid background color in Moments, and then use the color keying capabilities of WATCHOUT to knock out the background, thereby recreating the missing background transparency. While this method does work, it tends to result in unwanted visual artifacts due to the extensive use of transparency and anti-aliasing in Moments itself.
Using the Dynamic Image Server
WATCHOUT comes with its own separate program for rendering dynamic content into WATCHOUT; the Dynamic Image Server (DIS). Since DIS is capable of rendering a web page, it can be used to integrate Moments into WATCHOUT. Advantages of this method are:
- DIS is a part of WATCHOUT, thus well known to many in the WATCHOUT community.
- Can render a proper alpha channel for transparent backgrounds.
Cons include:
- DIS requires its own WATCHOUT license key, making it quite expensive.
- Poor performance, often rendering no more than 5-10 frames per second.
The last point above often precludes the use of this solution except for semi-static applications (i.e., applications that make little or no use of animations in Moments).
Using vMix
Riding on the popular NDI video distribution standard supported in recent versions of WATCHOUT, vMix streaming software can be used to manage various kinds of live feeds, piping the result into WATCHOUT. One of the many sources that can be managed through vMix is HTML5, making it a perfect fit for Moments. Advantages of the vMix solution include:
- Transparent background (alpha channel) supported, depending on color mode.
- Full frame-rate, or close to it, depending on resolution and color mode.
- Supports up to 4k resolution.
- Very cost effective, with the basic HD version currently at US$60 (free demo available).
And some cons:
- Requires a fast network (like anything based on the NDI protocol).
- Possibly unfamiliar product to be brought into the mix.
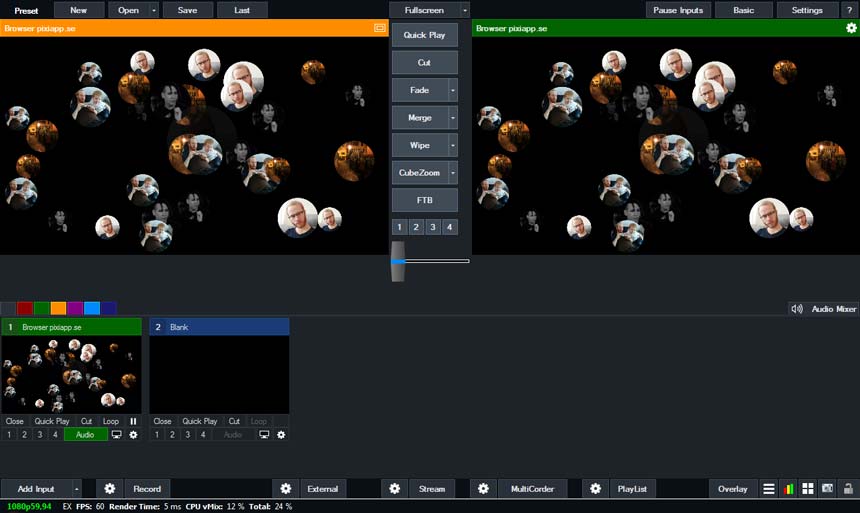
Here's a screenshot from vMix, rendering an "Audience Moment" set to "Bouncing Balls" display mode, on a transparent background.
You may want to give it a try using the free demo version. Keep in mind that you need a fast network path from vMix to your display computer (1-10 GBit/second). Here's how to configure vMix for this purpose:
- Configure vMix for RGBA output (see below) if you need transparent background. Note that a transparent background must also be specified for your Moments account.
- Click "Add Input" in the lower left corner.
- Chose "More".
- Chose "Web Browser".
- Specify the desired resolution to be rendered by Moments.
- Select the highest "Browser Version".
- Type the URL as described here into the URL field for unattended operation.
Send the vMix output over NDI into WATCHOUT, adding it to the Media window with the output resolution set in vMix. Drag its media item onto a timeline as usual to show Moments as part of your WATCHOUT show.
In vMix, activate the Moments browser source when desired, or have it set permanently as the current source if that's all you use vMix for.
Additional vMix configuration
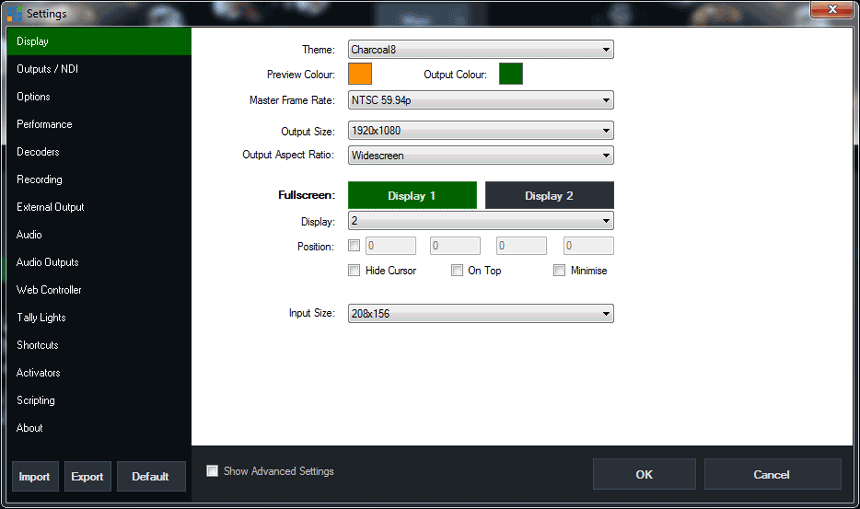
Here are some further screenshots showing how to configure vMix for use with Moments and WATCHOUT. The first screenshot shows the general settings, where you configure the frame rate and output resolution of vMix. Note that vMix supports only standard video resolutions. If you need odd aspect ratios and/or resolutions, you have to use only a portion of the available output pixel space and "letterbox" the source into the output. vMix has some positioning and scaling abilities that can help with this.
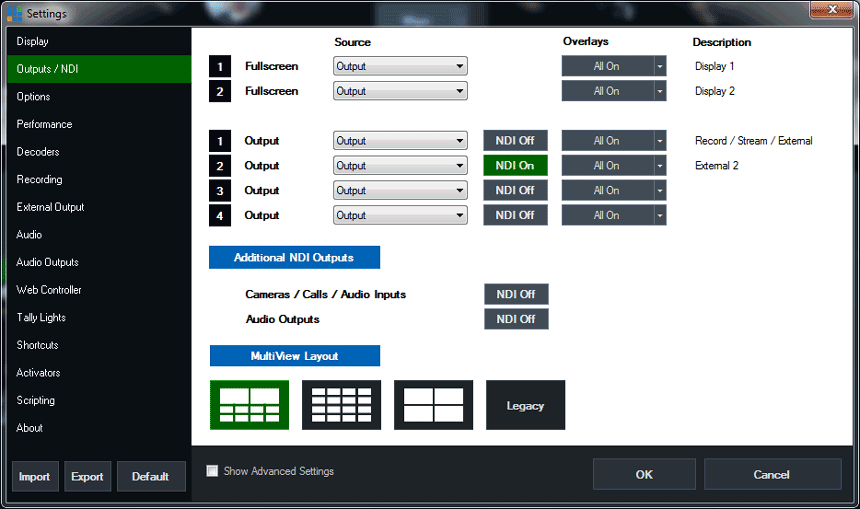
The next screenshot shows how to configure the NDI output from vMix.
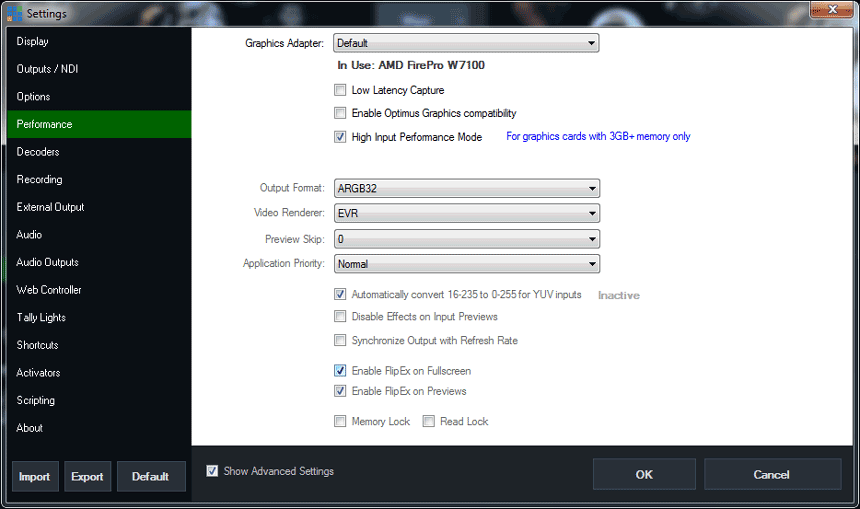
Finally, under Performance, select ARGB32 as the "Output Format" if you want to use the alpha channel for transparent background.
Here's a complete vMix configuration file for HD as well as one for 4k resolution. Unpack the ZIP file and open the resulting .vmix file with vMix (you need to adjust the URL to match your Moments account).