Zigbee Lights and Power Switches
Zigbee is a wireless protocol for controlling lights and other devices, often used in home automation systems. It is supported by major players such as Philips, with their HUE series as well, IKEA with their Trådfri series, Osram, Innr and numerous other manufacturers.
Being a reasonably priced and, by now, rather mature technology, it may be of interest to use as part of a Blocks system. Compared to other lighting control standards, such as DMX-512, DALI and KNX, Zigbee has the following advantages:
- Low cost (lamps and switches start in the €10 range).
- Wireless mesh network, with no need for additional cabling.
A zigbee system typically consists of the following pieces:
- The individual lights or other devices.
- A radio transceiver.
- A controller, managing the zigbee network (sometimes combined with the transceiver).
- Some means of interaction, such as a phone app.
In relation to Blocks, the last piece above is the Blocks system itself, where buttons, sliders and tasks are used to control the zigbee devices, just like any other device in a Blocks system.
Radio Transceiver Range
A professional zigbee transceiver can often control lights at a distance of up to several hundred meters. As always with radio transmission objects such as walls can limit the range. Since zigbee uses the same frequency bands as wifi, nearby wifi networks can also interfere with the zigbee system. In cases where you can control the wifi network, you can choose non-overlapping frequency bands for zigbee and wifi in order to to minimize interference.
Due to the mesh nature of a zigbee network, mains-powered lights and other network nodes typically also act as routers, allowing radio packets to hop between nodes. This allows for wider reach than what a direct radio link would handle on its own. As long as there are lights along the way, it is usually possible to control a fairly large area from a single controller.
Controller
Many manufacturers tends to have their own controllers, working primarily with their products. An example here is the Philips HUE Bridge. Sometimes, such a controller can also work with other brands' zigbee products, but not always.
Another option is to use a controller from an independent company, specializing in this kind of products. Such a controller often works with a wide variety of zigbee products, since they're in the business of selling the controller itself, rather than their own brand of lamps.
The remainder of this document is based on such a controller from Dresden Electronics. This solution is available in two forms:
- A network-based controller/radio combo (Phoscon gateway).
This article is based on the software controller and USB radio module, with the software controller running in the background on a Linux Blocks Server. The Phoscon gateway packages the radio module and the controller into the same box, which internally runs the same DeConz software, so the method described below would work the same here, with minor variations.
Controller Installation
On your Blocks server, do as follows:
- Plug in the ConBee USB transceiver.
- Switch to the pixi-admin account.
- Download and install theDeConz software (you don't need to install the "development package").
- Switch back to the pixi-server account.
- Click the icon in the top left corner and type deconzinto the search field.
- Launch the DeConz program by clicking its icon.
- The first time, you may be prompted to install some additional components. Chose to do so, and enter the password for the pixi-admin account when prompted.
- Once DeConz starts, it will prompt you to enter a password. Do so, and make a note of this, as you'll need this later to manage the system.
Once done, you will see a window similar to the one shown below, but containing only a single "node", which is the controller itself. The next step is to add some lights or other devices to the system.

Adding Lights and Other Devices
To add a light to the zigbee network, do as follows:
- Open a web browser, either on the Blocks server itself, or on another computer on the same network.
- Go to the url http://localhost:8080 (replacing localhost with the IP address of the Blocks server if done from another computer).
- Log in using the password specified during the controller installation.
- If requested, configure the ConBee USB transceiver. Make sure it uses the latest firmware version. If not, an option will appear allowing you to update it (requires an internet connection).
 In some cases, logging in using localhost may fail to accept your password. If you run into this problem, then use the actual IP address of the computer instead of localhost.
- Click the "hamburger menu" in the top left corner and choose "Lights" (see illustration below)
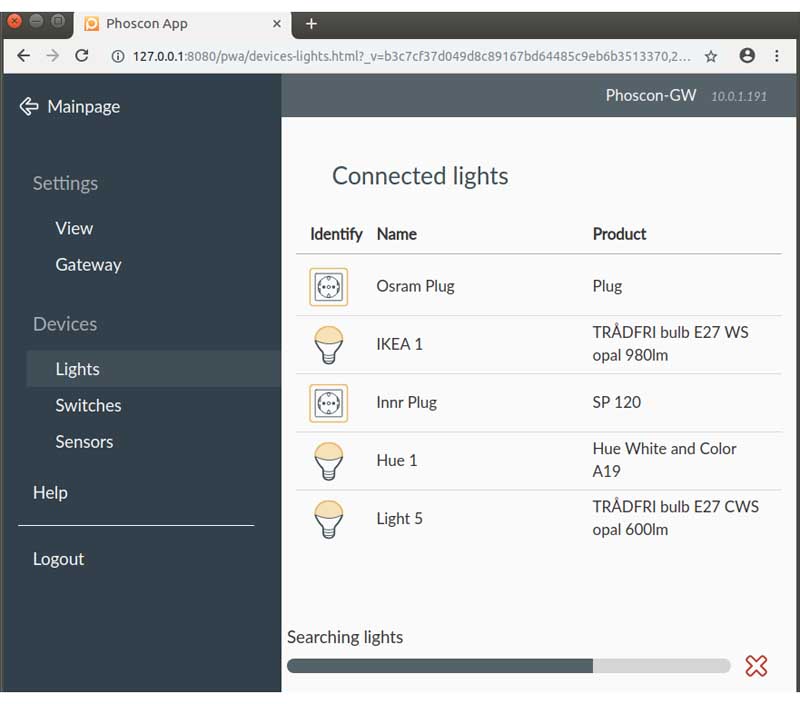
- Click "Add new lights".
- Connect or turn on on a lamp.
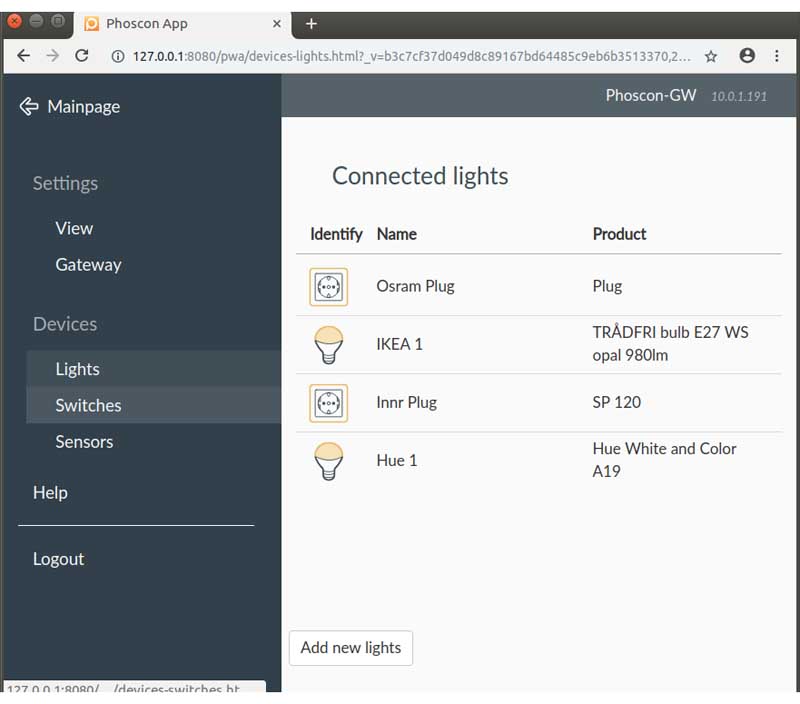
The controller will now search for the new light, adding it to the list, as shown below. In some cases. you may need to move the light close to the transceiver for it to be found.
If the lamp or plug has been used with another gateway before, or was bought with a preconfigured remote control, it is already locked to that controller, and needs to be reset in order to add it the new network. The procedure for resetting a zigbee device varies, but here are some common methods:
- An IKEA lamp can be reset by turning its power on/off rapidly six times in a row. It will then blink briefly to indicate it has been reset.
- A Philips HUE light can be reset by pressing the ON and OFF button on a hue remote for about 15 seconds, as shown in this video. Do the reset cycle while searching for new Lights in Phoscon for easy adoption.
- Most plugs have a small button that can be used to manually turn the plug on and off. Keeping this button pressed for several seconds performs a reset. A flashing light on the plug indicates it's ready to be adopted into a new network.
Even if the lamp is factory reset, you may still need to power it up while the search is running. If the above doesn't work for your device, search the manufacturers website for the term "reset" or "factory reset".
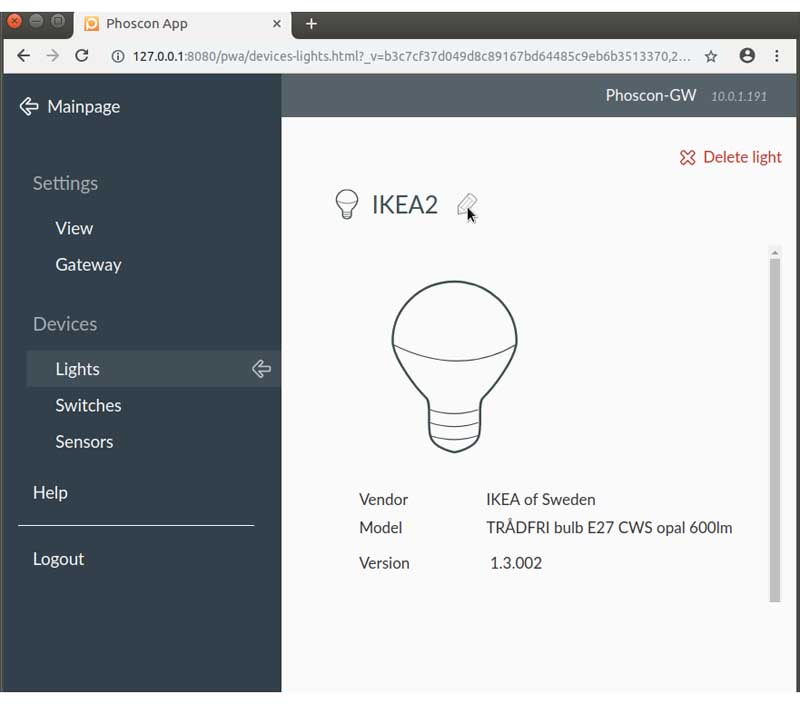
Give the lamp a meaningful name, which will later be used to program it from Blocks.
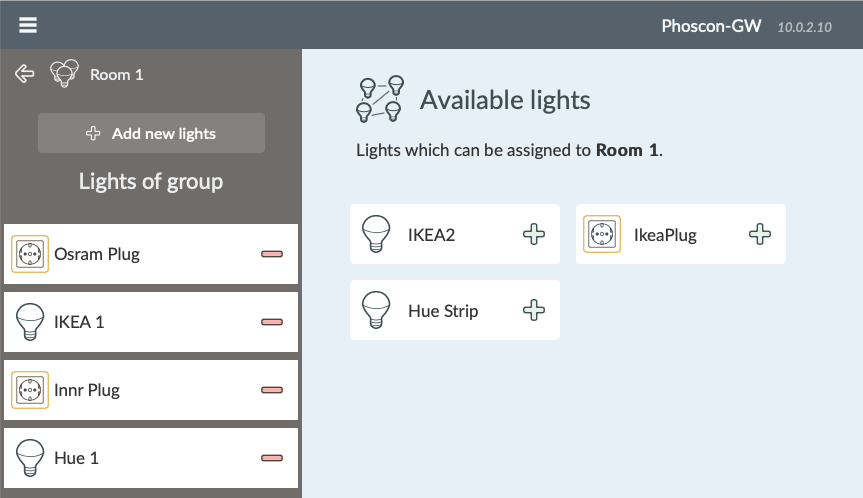
Arranging Devices into Groups
When using lots of devices, grouping them in relevant ways will simplify the subsequent programming. Putting devices into groups does not preclude individual device control.
On the main page of the Phoscon web page, click "Add group".
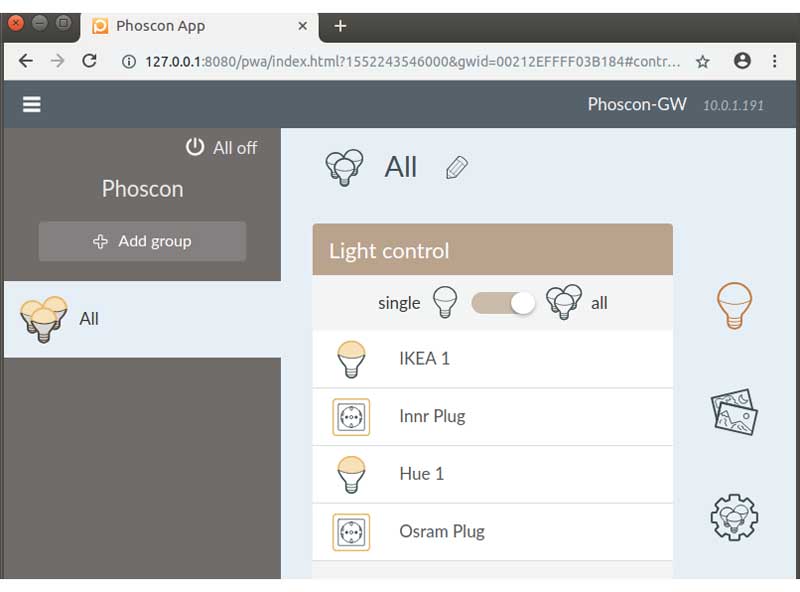
Name the group, then press the "Edit" (cogwheel) button at the bottom of the window then "Manage lights". Lights can now be added by clicking the plus sign next to the light in the main area of the window, or removed by clicking the minus sign next to a light in the left hand sidebar.
Installing the Blocks DeConz Driver
Download the DeConz driver from the driver repository, along with the latest version of the support files for your Blocks server.
If your server isn't set up to automatically load new drivers, you need to restart your server to make the driver available.
Configuring the DeConz Device
Add a new device to Blocks, under Manage, TCP/UDP Devices. Choose DeConz on the driver menu, and enter the IP address of the computer to which the ConBee USB transceiver is connected. If this is the Blocks server itself, you can type localhost into the IP Address field. Once the driver connects to the DeConz controller, the indicator next to its name in the list will turn green.
Authorizing the Driver
As an additional security measure, the driver needs to be authorized to communicate with the DeConz controller program. Until this is done, no commands will be accepted. Proper authentication is indicated by the authorized property of the DeConz Device becoming true. You can monitor this by adding an indicator to a panel, connected to the authorized property.
To authorize the driver, do as follows while Blocks is connected to the gateway with the DeConz driver active:
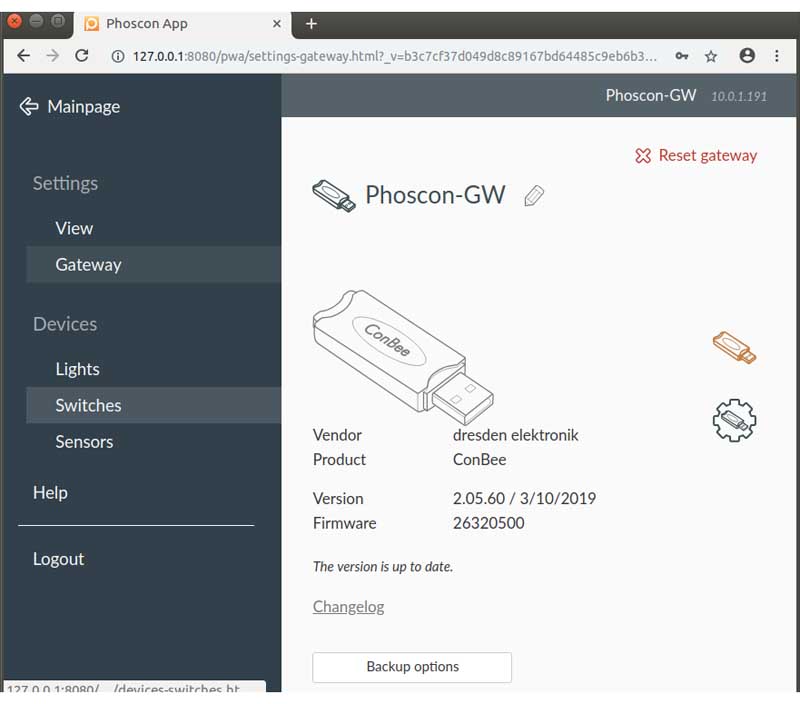
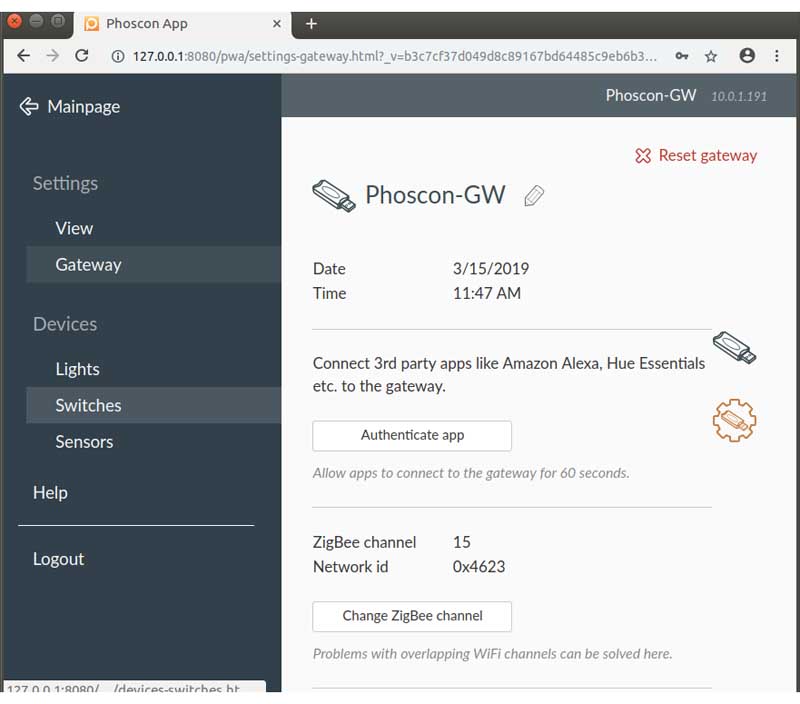
- In PhosCon web UI, click the hamburger menu in the top left hand corner and choose Gateway.
- Click "Advanced".
- Click "Authenticate app"
The driver should now be authorized within a few seconds, confirmed by the indicator for this property turning blue. This step only needs to be done once. The authorization code will be stored in the script/files folder, under the name DeConzDriver_XXX, where XXX is the name you gave to device under Manage, TCP/UDP Devices above.
If you change the name of the device under Manage, TCP/UDP Devices, you need to rename this settings file accordingly and restart the server, or re-authorize the device as described above.
Controlling Lamps and Other Devices
Use a Task to control zigbee devices and groups that have been added to the DeConz controller. Add a do statement and choose the desired function of the DeConz Network device.
In the target field, specify the name of a single device or a group. Remember to put the name within quotes if using a literal expression, as shown below
Avoid using the same name for both an individual device and a group. If you do, the single device will be controlled, and the group will be inaccessible.
Setting the Brightness of a Lamp
Use the setBrightness function to set the desired brightness of a lamp or group

The brightness field specifies the desired brightness, as a normalized value between 0 and 1, with 1 being fully on. You can specify a fade time in the time field, if desired. You can also change the color of the lamp using the hue and saturation fields, if the lamp supports this kind of color control.
Turning a Lamp or Plug On and Off
Use the setOn function to turn a device or switching device on or off. This is particularly useful for switching devices, but works on most types of devices, including lamps. When used with lamps, most lamps remember the brightness they hade before being turned off, and will return to that brightness when later turned on.
Setting the Color of a Lamp
Not all lamps support arbitrary colors. Some support only brightness, while others support brightness and color temperature.
To change the color temperature, use the setColorTemperature function, specifying the desired color temperatur in Kelvin, in the range 2000 through 6500 Kelvin.
To change the color using Hue and Saturation, use the setBrightness command, shown above, and enter the desired hue and saturation into the corresponding fields. Both values are normalized 0…1, with 0 corresponding to red and no saturation respectively.
- Red 0
- Yellow 0.16
- Green 0.33
- Cyan 0.5
- Blue 0.66
- Magenta 0.83
While most lamps support the Hue/Saturation color model, some handle only the CIE color model. Thus, if you know your lamp supports color but yet fails to respond to the hue and saturation values, it may only support the CIE model.
To control the color of such a lamp, use the setCIEColor function, specifying the X and Y color coordinate, corresponding to this diagram. Note that both values are normalized to 0…1.
Adding New Lamps and Groups
The driver learns about the set of devices and groups when started. If you add or rename lamps or groups, you must invoke the refresh function to update the driver with those changes. If you don't, newly added/renamed lamps and groups may not respond.
Backup your DeConz Configuration
The configuration of all zigbee devices and groups is stored in various files managed by the DeConz program. It's a good idea to make a backup copy of these settings after making any significant changes to the zigbee sub-system.
You can backup the zigbee system configuration as follows:
- In PhosCon web UI, click the hamburger menu in the top left hand corner and choose Gateway.
- Click "Backup options".
- Click "Create Backup"
Store the backup file in a safe location. If necessary, the backup can later be restored using the "Load backup" button also found under "Backup options".
Using DeConz in Headless Mode
While running the DeConz controller GUI, as described above, is useful for initial tests, a more robust way is to run it as a headless service. This can be accomplished by enabling the deconz.service system daemon. Use webmin to enable and start this service, or use the Linux terminal command systemctl.
Alternatively, to be able to access the deconz GUI, launch deconz using a user service instead, similar to how Blocks is launched. To do so, put the following into file "/home/pixi-server/.config/systemd/user/deconz-gui.service":
[Unit]
Description=deCONZ: ZigBee gateway -- GUI/REST API
Wants=deconz-init.service deconz-update.service
After=default.target

[Service]
Environment="DISPLAY=:0"
ExecStart=/usr/bin/deCONZ --http-port=9080
Restart=on-failure
StartLimitIntervalSec=0
RestartSec=30

[Install]
WantedBy=default.target
Then start the service with the following terminal command under the pixi-server user:
systemctl --user enable --now deconz-gui