Wifi Network
 This article is no longer maintained and should not be used other than as historical reference.
WARNING: Installing unify controllers dependencies will interfere with the JAVA setup and that will in turn prevent Blocks from starting if installed on the same computer. It is probably technically possible but rather complicated and not covered by PIXILAB support.
NOTICE:
The Unifi controller is no longer pre-installed on our Linux server. You may, however, install it yourself, in which case you may find some information in this article useful.
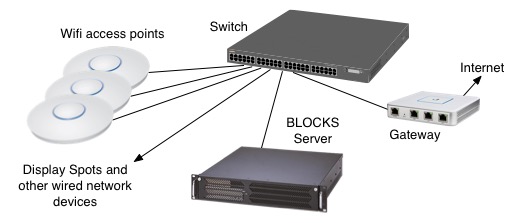
If you want to use the Mobile Guide functions of BLOCKS, you need a solid Wifi network. A Mobile Guide can be based either on loaner devices handed out by the staff, or using your visitors' own mobile devices (or a combination of the two).
There are many high-end systems for building enterprise grade Wifi networks. Which one you chose may depend on your previous experience in this area, business relations, already existing networking infrastructure, or the preferences of network administrators or other local staff on site.
If you have no particular preferences, but merely want to get started with a basic (but scalable) wifi system, we've included support for the Unifi system in our Linux server image. The Unifi brand includes wifi access points in a variety of form factors, for indoor and outdoor use, a security gateway as well as switches. It is well liked by many in the business, and there are numerous free guides available on youtube and other places on how to set up and configure Unifi systems.
Since the Unifi Controller software is already part of the BLOCK Linux Server, the bare minimum you need to get started is a wifi access point, such as the UniFi AP-AC-Lite. If you also want to provide internet access from your public wifi, you'll also need a gateway, such as the Unifi Security Gateway. While you may of course use any gateway you like, choosing the Unifi model means it can all be managed through the same Unifi controller.
Finally, to connect everything together, you need a switch. Any good quality switch will do. Since the wifi access points can be powered using Power-over-Ethernet, choosing a switch that provides compatible PoE power can be a good idea. Again, the Unifi includes several models of switches that can also be managed through the same controller software. But since there isn't really that much you need to "manage" in terms of the switch, feel free to choose whichever switch you like here.
Starting the Controller
Assuming you've followed the articles titled Creating a Server and Advanced Server Configuration, you can use the webmin user interface to enable the Unifi controller.
A wifi network pretty much requires a DHCP and DNS server. If you don't already have such services available on your network, you should consider enabling and configuring those servers as outlined in Advanced Server Configuration.
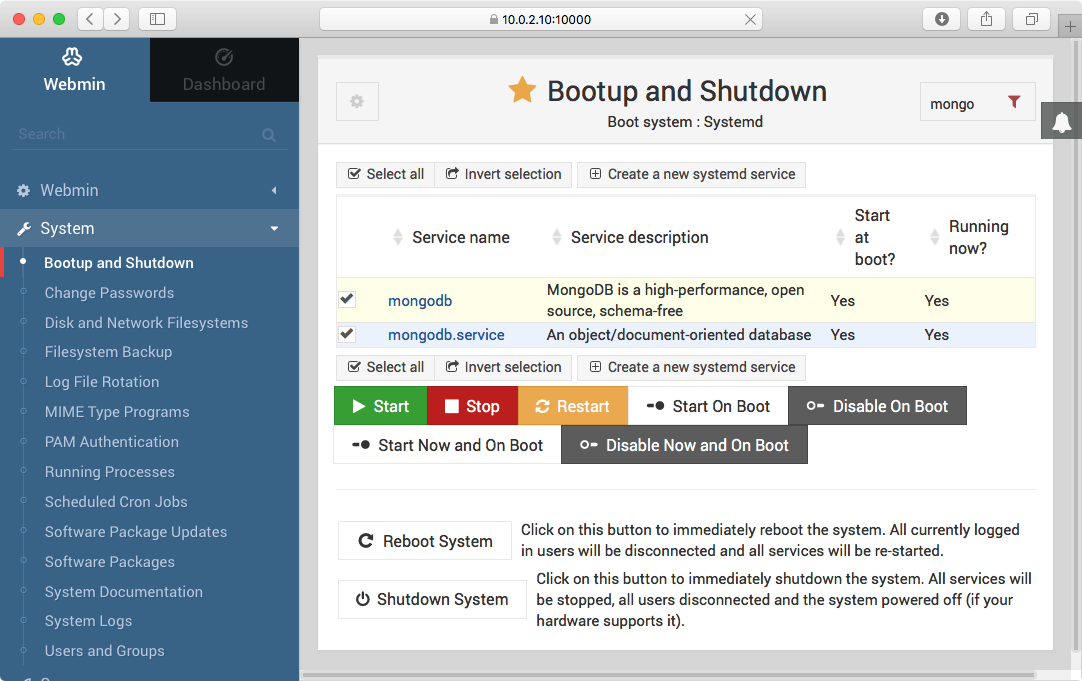
To enable the Unifi controller, open the webmin user interface then select System > Bootup and Shutdown. Filter on mongo in the top right hand corner. Select both "mongodb" and "mongodb.service" and click "Start Now and on Boot". Re-visit this view to make sure the "mongodb" server is started. Mongodb is a database server used by the Unifi software, and therefore needs to be installed and enabled prior to activating the unifi software.
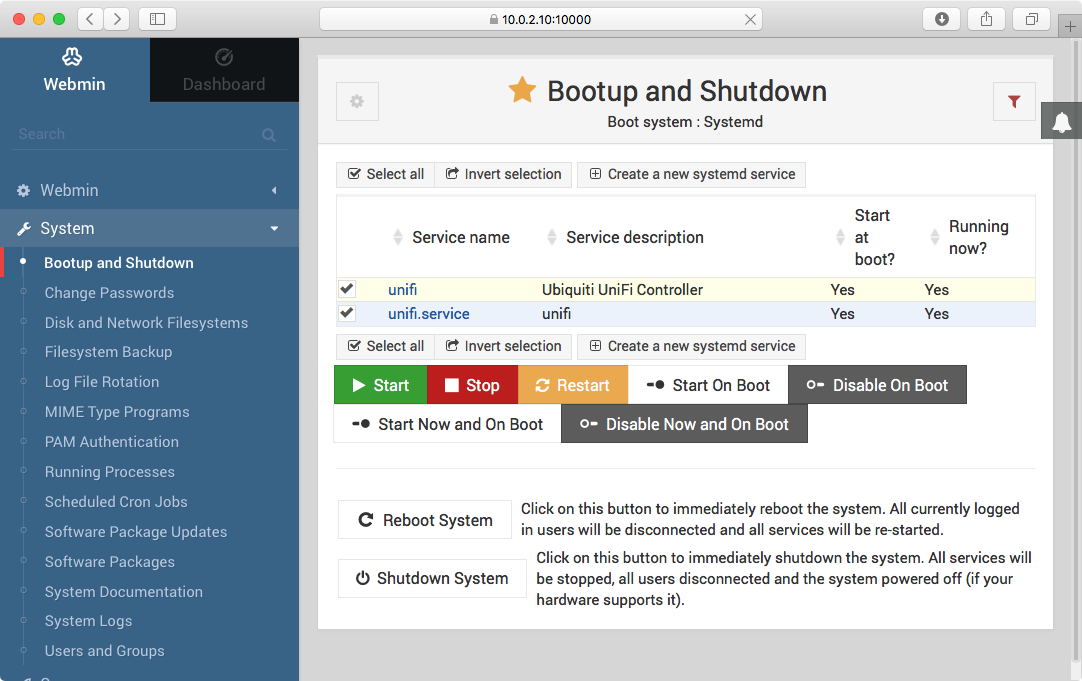
Repeat the steps above but entering unifi as the filter in the top right hand corner. Select "unifi" and "unifi.service" and click "Start Now and on Boot".
Setting the Unifi Controller Password
Before you do anything else you must change the default password of the Unifi controller.
WARNING. Leaving the default password unchanged allow anyone who knows the default password and has access to your network to change its configuration.
Access the Unifi controller by typing the IP address of your BLOCKS server into the address bar of a web browser on the same network (if you're using a local browser on the Server computer itself, you can simply type localhost:8080). Assuming your server has the address 10.0.2.10, type the following into the address bar:
10.0.2.10:8080

You may see a warning message when first accessing the Unifi controller. This warning is caused by the kind of certificate used by the Unifi controller to encrypt the communication. You need to convince your web browser that this is normal, asking it to store a certificate exception, thereby avoiding this warning in the future.
Type the user name pixi-admin, with the same password pixi-admin. A start page, similar to the one shown below, will appear. Chose "Edit Account" from the menu in the top right hand corner. Type pixi-admin into the password field, then type your new, secure password into the "New Password" and "Confirm Password" fields, your own email into the Email field, and click SUBMIT.
The start-page of the Unifi Controller shows various vital statistics of your wifi network. However, for these to become operational, the controller must be connected to your access point(s) and any Unifi Security Gateway (USG).
Connecting Access Point and USG
Assuming the access point(s) and USG are connected to the same network and have been started, you should be able to see them on the DEVICES page, accessed by clicking the circle symbol in the toolbar on the left hand side.
There may also be some devices in the list that were present when the BLOCKS Server image was created. Delete such left-over devices by clicking the name of the device ("USG" and "Flying Saucer" in the illustration below), click MANAGE DEVICE in the window appearing on the right hand side, then click FORGET.

For the devices to appear in this list, your network must include a properly configured DHCP server, such as the one built into the PIXILAB Linux server. If the devices fon't appear in the list, follow the procedure outlined in the Unifi documentation for connecting and "adopting" the devices into the controller.
Unless the devices have already been used with your controller, they will not be recognized as part of your system. This is indicated by the presence of an ADOPT button in the Actions column of the device. Click that ADOPT button to connect the device to the controller, and wait for it to complete.
There may also be software updates available for your devices. If so, there will be UPGRADE buttons in the Actions column. Click those as well once the devices have been adopted.
You can name each of the devices as appropriate by clicking their name (typically a group of digits and colons), then click Config or GENERAL in the window appearing on the right hand side and type the desired name into the Alias field.
Wifi Network Settings
Once the devices have been adapted, upgraded (if required) and named, proceed with the settings for the wifi network as a whole. Click the Settings "cogwheel" button in the toobar on the left hand side.
. Click //APPLY CHANGES//.
=== Wireless Networks Settings ===
{{ :blocks:unifi:wireless.png?nolink |wireless.png")
Click "Wireless Networks" in the blue list on the left hand side, then click the "EDIT" button in the Actions column for the pixi.guide network. This is the open guest network intended for accessing the mobile guide functions.

Review the settings and make any require changes. Note that this network by default is set as "Open, with no security whatsoever. This is typically what you want for a guest network for a mobile guide application, as you want to make it as easy as possible for your visitors to access the network. if you prefer to use a password to access the wifi network choose "WPA Personal" and enter a "security key", or one of the other secure options. For a guest network, leave "Guest Policy" selected. Finally, note that this wireless network is cordoned off as a separate "virtual LAN", using VLAN 10, as shown at the bottom of the illustration above.
Click SAVE at the bottom of the view if you made any changes.
Network Settings
Click Networks in the menu on the left hand side. Two networks are pre-configured:
- LAN. This is your wired Ethernet network, used by the BLOCKS server and any subsystems managed by BLOCKS.
- pixi.guide. This is the wireless guest network (associated with VLAN 10, as mentioned above).
A Unifi system can manage multiple networks at the same time. This includes the wifi access points, which may have one open and restricted wifi network for guests and another secure network with less restrictions for staff use.
LAN Network Settings
Click the EDIT button in the Actions column of the LAN network to review its settings.

The key setting here is the Gateway/Subnet field, which establishes the LAN address of the USG gateway (10.0.2.1), as well as the type of network. You may need to change the address of the wired network here if this network is to coexist with a previously existing network. But in this case, you hopefully already have your network administrator involved in this process.
The network class is specified as a /16 (equivalent to netmask 255.255.0.0). Using such a B-class network provides more "room" for adding devices. if you don't need more than a few hundred devices on the LAN, you may want to change this to 10.0.2.1/24 (corresponding to the netmask 255.255.255.0, as used in the BLOCKS Server configuration). Since we're assuming you'll use the BLOCKS server as DHCP server, those functions are disabled here. If you for some reason don't want to use the DHCP server in the BLOCKS server, you may instead chose to enable and configure the Unifi DHCP server here.
Guest Network Settings
Return to the Networks page, then click the EDIT button for the pixi.guide network.

This view is similar to the one shown above, but specifies that this is a Guest network. Note that this network runs on its own subnet, as indicated by the first two groups of digits in the Gateway/Subnet field being different from the LAN network's. Again, we're specifying a B-class network (as indicated by /16), giving us plenty of address space for guests. As for the LAN network, if you know you'll never have more than 250 guests, you may change this to 10.1.1.1/24 for a C-class network. But doing so really has no advantage, so you may as well leave it as /16.
Note that the Unifi DHCP server is active for the Guest network. This is required since the DHCP server built into the BLOCKS server only serves the LAN subnet. Since we're on a B-class network, we've allocated plenty of addresses in the "DHCP Range" for dynamic use by your visitors (approximately 700 addresses).
A very important field is the "DHCP Name Server". This specifies the DNS provided to visitors, and points to the BLOCKS server's IP address, assuming you use this as the DNS server. This is hat allows your visitors to access your mobile guide by typing pixi.guide into their browser once connected to your wifi. If you for some reason need to choose another IP address for the BLOCKS Server, adjust this field accordingly.
Finally, note that the "DHCP Lease Time" has been set to a rather small value, since visitors are rarely assumed to hang around for more than 5400 seconds (90 minutes). This value will result in a new DHCP lease being established every 1.5 hours. It won't disconnect your visitor from the wifi network, or have any other noticeable effect, but will attempt to free up the dynamically assigned address every 90 minutes if the visitor is no longer connected to the network. Feel free to adjust this value as you see fit.
As always, if you make any changes, remember to click the SAVE button at the bottom of the page.
Guest Control Settings
Click "Guest Control" in the menu on the left hand side and review the Guest Control settings.

The important field on this page is the "Pre-Authorization Access". As mentioned above, the wifi guest network and the Ethernet network are on different subnets. This means they normally can't talk to each other. However, as the BLOCKS server typically provides the DNS for the guest network (in order to resolve pixi.guide), as well as other server functions used by guests, they must be able to reach the BLOCKS server from the guest network. This is accomplished by entering the IP address of the BLOCKS server in this field. The /32 suffix specifies that guests should only be able to access the BLOCKS server on the LAN subnet. They can not access any other "things" that may live on the Ethernet network. This is an important feature, since it protects potentially vulnerable resources on the LAN network (such as Modbus I/O devices, which have no security at all of their own).
Learn More
As you may have noticed, the Unifi Controller is a complex beast, with a multitude of settings and options. Here we've just scratched the surface, looking at the most relevant areas in relation to a mobile guide guest wifi network for use with BLOCKS. The ultimate guide to the Unifi controller is the UniFi Controller User Guide. There are also numerous introductory videos freely available, such as the ones produced by Willie Howe.