This is an old revision of the document!
Blocks Mirroring Service
Our Linux-based Blocks server dated 2020-05-14 and later, running Ubuntu 20.04, supports a new redundancy feature for increased system reliability. While the Blocks server software is very robust, the complete system can never be more reliable than the hardware it runs on.
Introduction
A typical Blocks system has a single server computer and a main network switch.
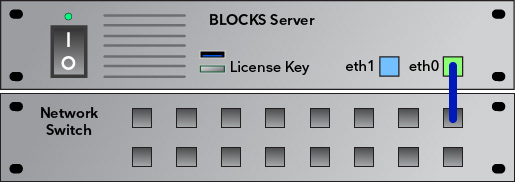
In such a system, both the server computer and the main switch constitute a single point of failure. If any of these components die, the entire system stops.
The first thing you should do if any of these components appear to not function is to make sure they're actually on. You may also connect a computer directly to the main switch and try to log in to your Blocks system from there. If that works, the problem is downstream from the main switch, such as in a secondary switch further out or in the player device.
Once you determined that power's on and you can't reach Blocks even from a computer plugged into the main switch, the next step is typically to power down the server computer, wait a minute then power it up again. While waiting, also power-cycle the main switch. If this restores full functionality, you should take a look at the server log files to see if they give any clue to what happened. The problem may have been caused by some software error, or some intermittent hardware error.
If you suspect that the main switch is the culprit, replace it with another similar switch, then restart the Blocks server, to see if the problem goes away. Having a backup switch ready to go in the rack may be a good idea to safeguard against such problems.

However, if your Blocks server dies, and won't come back by turning power off and back on again, things are a bit more difficult. Assuming you have an up-to-date backup of your Blocks root directory, as well as other relevant server settings, you can replace the server with a new one, and bring it back to life using those backups. However, that may take a while to accomplish, rendering your entire Blocks installation non-functional in the meantime.
A better option is to have a spare server sitting in the rack all along, just as suggested for the main switch above. If you're sufficiently concerned about your system's reliability to keep such a spare on hand, this new feature is for you.
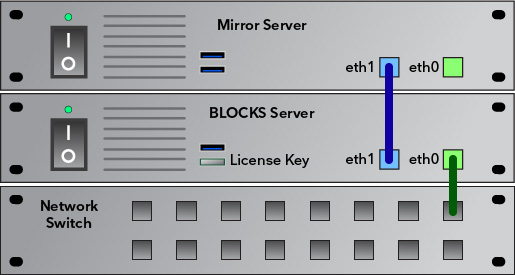
The new Blocks Mirroring Service will keep your spare computer up to date with any changes applied to Blocks. As soon as you make any changes, such as editing a block or adding a new spot, those changes are copied across to the mirror server. Note, in the illustration above, that the main Blocks server is still connected and used as it was in the stand-alone illustration shown at the beginning of this article. The Mirror server uses a second network port as a backdoor connection to your Blocks server. This backdoor is used as a secure channel for copying all changes across as the system runs.
Furthermore, the Mirror Server is en exact copy of the main Blocks Server. All its settings and configurations are identical. The only difference between the two is which one has the Blocks license key. The license key controls which of the two computers that run Blocks. Apart from this difference, they're identical.
Hence, should disaster strike and your main Blocks server dies, all you need to do is to move the license key and the network connection to the other server.
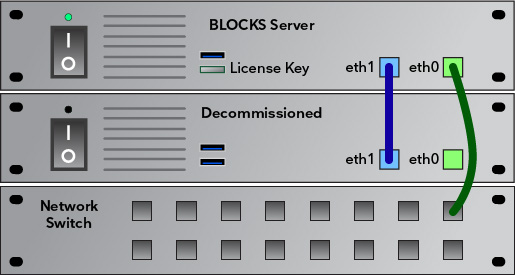
Once that's done, the old Blocks server can be removed in order to be repaired or replaced. All players and other parts of your system will pick up where they left off once they see the new server, allowing you to be up and running in a matter of minutes rather than hours or days.
What you Need
To use this new capability, you need the following:
- A Blocks server with at least two network ports, running our current Linux server image and Blocks 4.1 or later.
- A second, identical computer.
- A sufficiently large USB hard disk to use for backing up and cloning your main server.
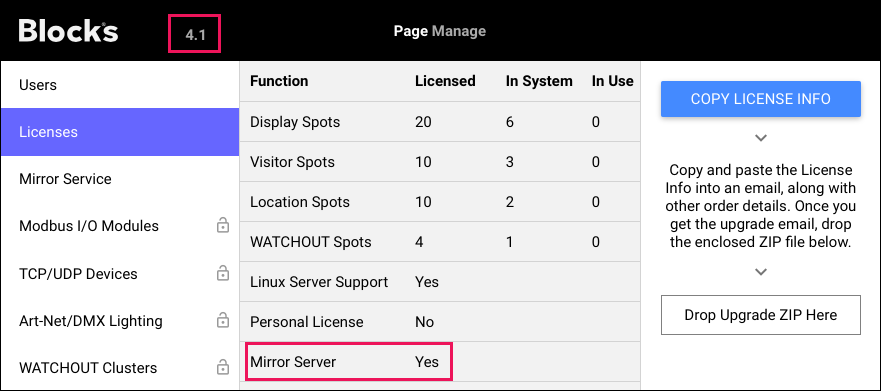
- The "Mirroring Service" license added to your Blocks license key.
To verify eligibility, do as follows:
- Open your Blocks editor.
- Select the "Manage" page.
- Select "Licenses".
- Look for the "Mirror Server" license option.
Configuring the Blocks server
Assuming you have your Blocks server configured and running as you want, there are a few additional settings you need to apply before proceeding with cloning the server. You may also want to take this opportunity to update the operating system of your server.
Open the Settings panel of your server by clicking the cog-wheel icon on the left hand side, then select Network. This lists the network interfaces available on your computer, allowing you to turn them on or off and set their configuration. The illustration below shows the settings of a Blocks server that has two network interfaces, of which only the first one has been used so far. You settings should look similar, but the interfaces may have other names.
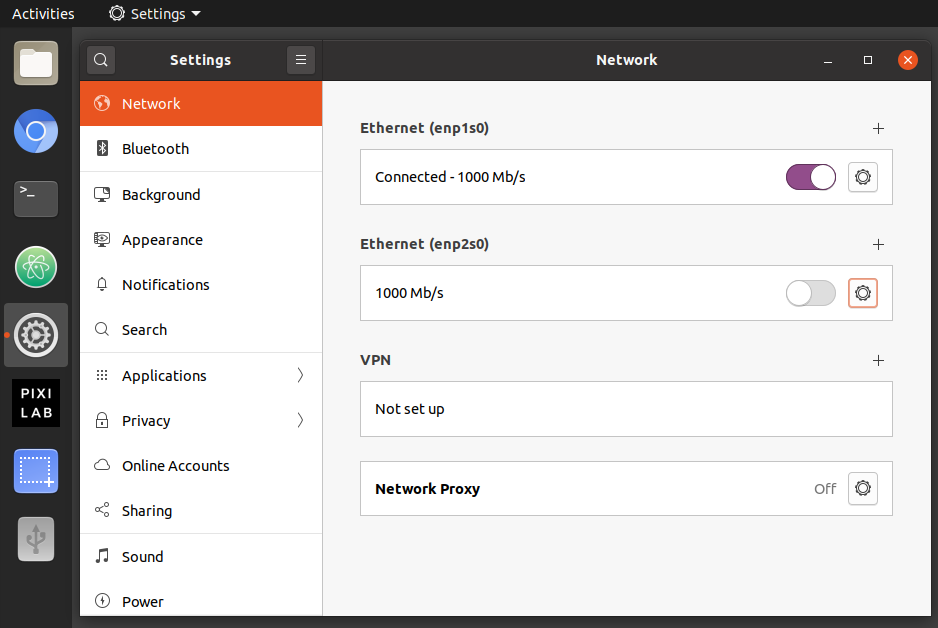
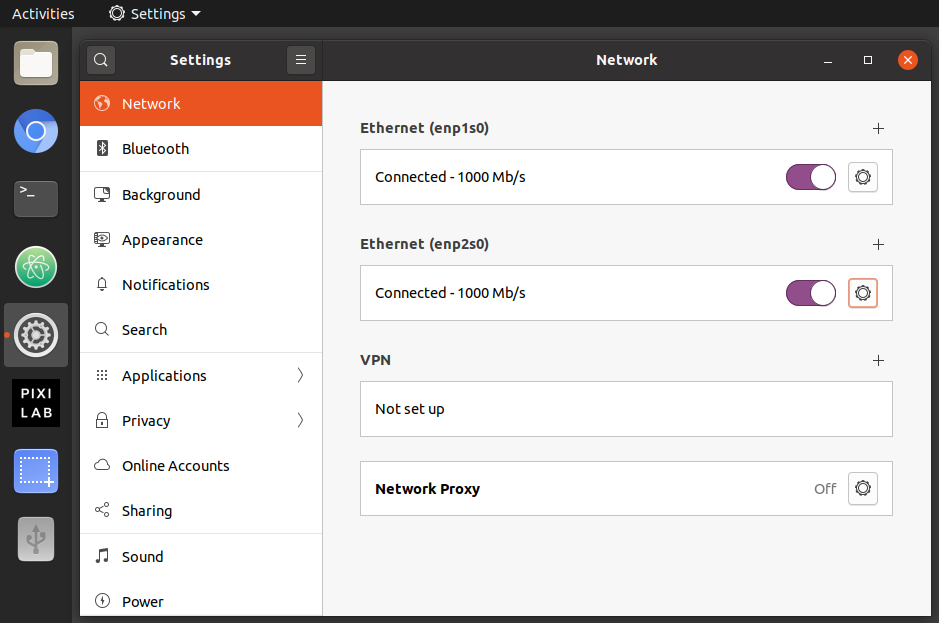
Identify the second network interface, which will be used as the mirror server back-channel. Turn it on using the purple switch. This enables the network interface.
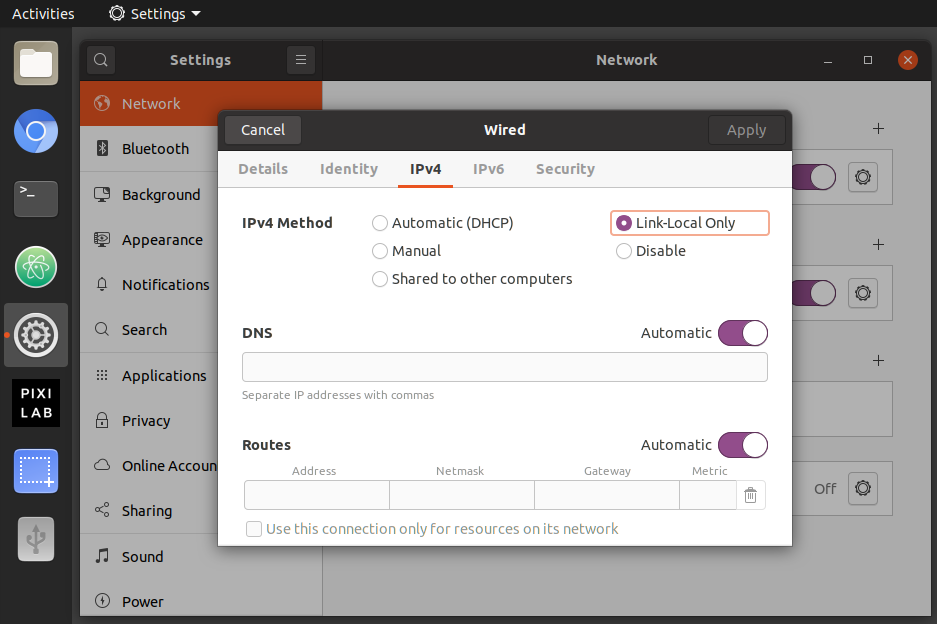
Click the small cogwheel button next to the purpose switch. This opens the settings for this network interface. Chose "Link-Local Only", as shown below. This option allows the two computers to talk to each other over their private network link.
Restart your server to make sure that everything still works as before. Then use the option select command to select the mirror mode:
./option-select.sh mirror gui

The gui option will make Blocks show windows on screen while running. This is helpful if you like to access your server using the graphical user interface. If not, you can instead pass headless as the second option. But if you have GUI access to the server, leave it set to gui for the time being, as the mirror service shows its own window with it status, which may help getting things up and running.
Start Blocks by either of the following means:
- Click the PIXILAB icon on the left hand side.
- Type ./start.sh into a terminal window.
This will now start the mirroring service, with its window appearing on screen. Assuming the license key is still connected to this computer, Blocks will also be started, appearing on top of the mirroring service's window.
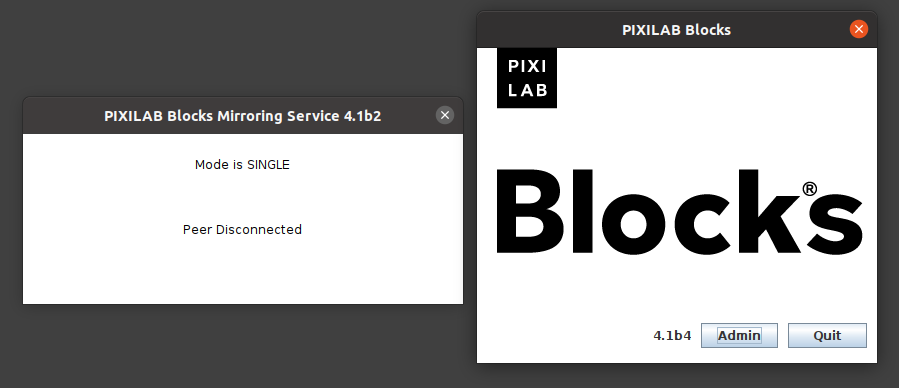
At this point, the mirroring service is running in SINGLE mode, as indicated in its status window. This means that no mirror server has been found. The mirror server is the other (redundant) computer, which is not yet connected. The mirror service, now running in the background will keep looking for its peer, and will connect automatically once found.
Enabling SSH
The mirroring service uses SSH (secure shell) for its secure back-channel. This requires SSH to be enabled. If that's not the case, a message to this effect will be shown when enabling the mirror option. To enable SSH, do as follows:
- Switch to the pixi-admin user.
- Open a terminal window.
- Type the following command into the terminal window:
sudo systemctl enable ssh
Type the pixi-admin's password when requested. Then restart the computer and re-run the option-select command.
Security Considerations for SSH
Since SSH can be used to access your server over the network, it is very important that you have secured the configuration of your Blocks server. At a bare minimum, you must change the default passwords as described under First Start.
If you don't plan on using SSH with password to manage the server remotely, you may want to disable this ability. Follow these instructions to disable password login over SSH:
- Switch to the pixi-admin user.
- Open a terminal window.
- Type the following command into the terminal window:
sudo nano /etc/ssh/sshd_config
Enter the pixi-admin's password when requested. This opens the configuration file for SSH using a simple text editor called nano. Press the down-arrow key on the keyboard to scroll down to the bottom of the file. After the last line, type a new line with the following content:
PasswordAuthentication no
Press Enter at the end of the line, to close off the new command added, then proceed as follows:
- Press Ctrl-O. That is, type the letter O while holding down the Ctrl key (not the Command key, for those Mac users out there).
- Press Enter to save the file using its current name.
- Press Ctrl-X to exit the editor.
- Restart the computer.
This setting disables the ability to access the computer over the network using SSH with a password. The mirroring service can still function, since it uses SSH in another way that's not depending on a password. Should you ever change your mind and want to use SSH with password to access the server remotely, just remove that last line you added to sshd_config above and restart. Remember to make sure you're using a secure password.
++++++++++++++«
Cloning the Blocks Server
It is now time to configure the mirror server. Since this will be an exact copy of the main Blocks server, a cloning process is used to copy the main Blocks server over to the mirror server.
The tool used is Clonezilla, the same image tool used to initially setup a Blocks Linux server. Read this article to find out how to obtain and get started with Clonezilla.
Boot the device from a bootable Clonezilla memory. (Select the usb drive as first boot device in bios)
Select English (This guide assumes English)
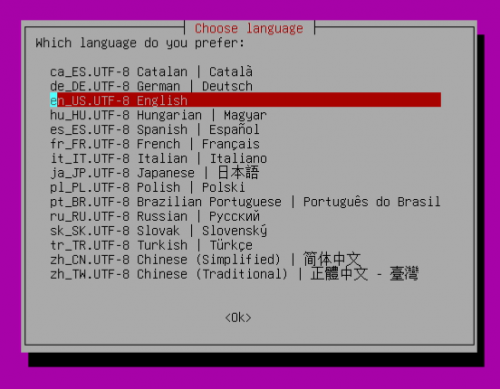
Select your keyboard mapping.
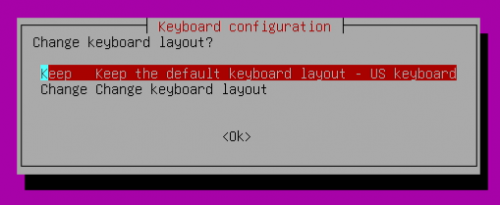
Select start Clonezilla.
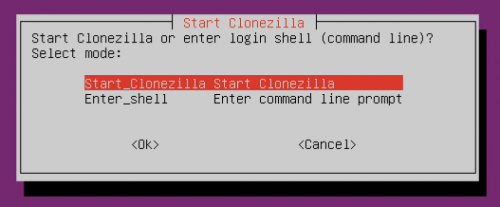
Select the device-image option.

Select use local device option.

Confirm that a usb drive has been attached with enter.

Exit this window with Ctrl-C when you can see that your USB drive has been detected.

Select the device to mount as your destination repository.

Select Done and enter, this will create the image under the root of the drive.
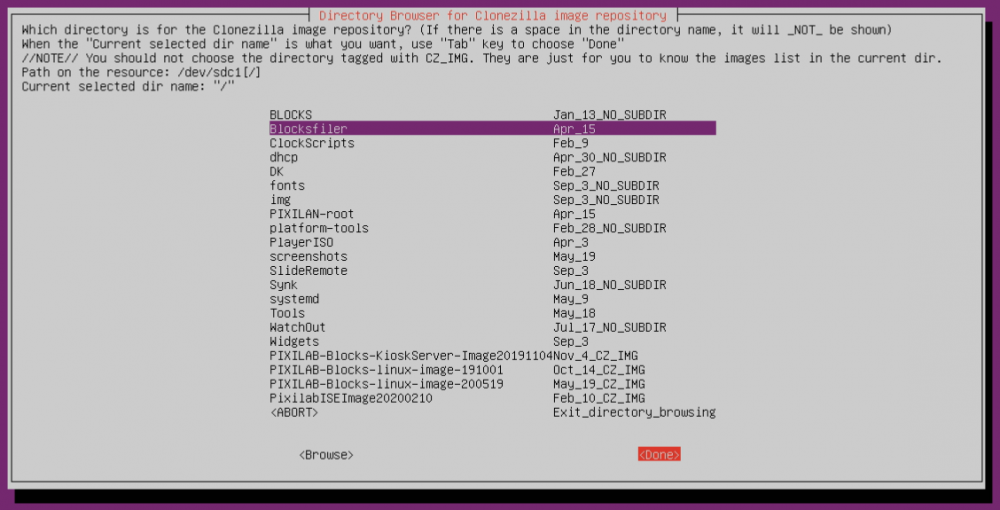
Confirm with enter to continue.

Select the beginner’s wizard.

Select the savedisk option to save the local disk as an image.

Give the image a describing name.

Select your source disk.

Skip check and repair the source filesystem.

Skip checking if the saved image is restorable.

Select the option to not encrypt the image.

Choose the poweroff action to be performed when everything is finished.
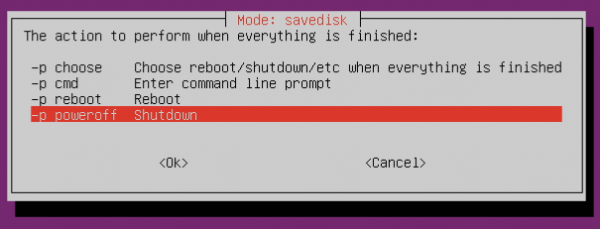
Press enter to continue.


Follow the progress or get some coffee.
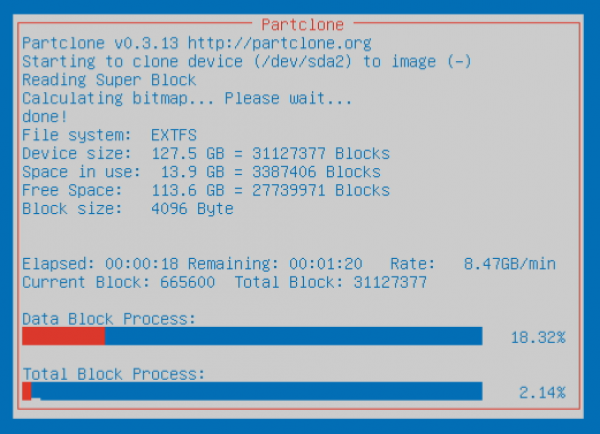
The computer will shut down when done.
Remove the Clonezilla drive and the destination drive.
Boot up the computer.
Follow this guide for creating a Linux server to clone the image on to the destination computer.
Connecting the Mirror Server
Once the cloning operation is complete, connect the mirror server as shown below, using the second network interface a a back-channel between the two.


Power up both computers. It's helpful to have a display connected to both computers during the set-up process, so you can see what's happening. Both computers should launch the mirroring service, with its status window appearing on screen. However, only the main Blocks server will launch Blocks. As mentioned above, this is controlled by the presence of the license key. Unplugging the license key from the main Blocks server automatically shuts down Blocks here.
Any errors in the connection process will also be indicated there. In addition, the mirror service will also write its own log file in the same directory as Blocks' log files (in the logs directory inside your Blocks root directory).
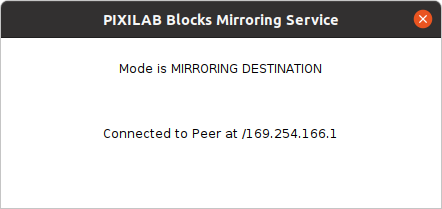
Once the two computers connect to each other, the one running Blocks will be marked as MIRRORING SOURCE and the other as MIRRORING DESTINATION.
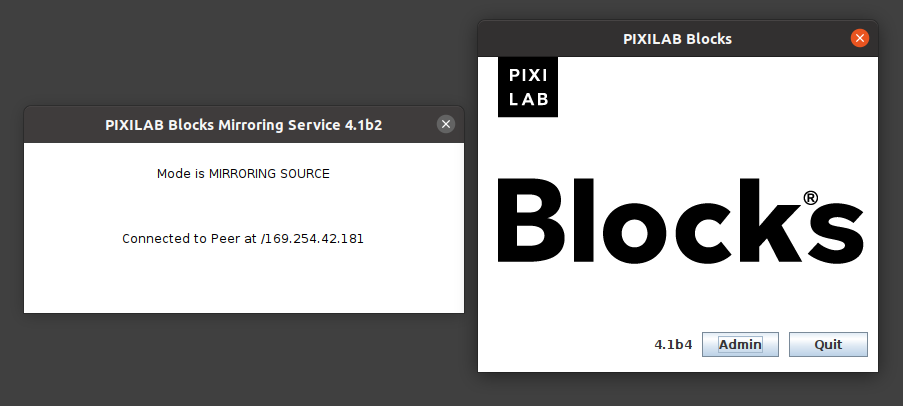
The IP address of the other computer will also be indicated in the status window. This link local address is dynamically assigned, and will not match the network address of your Blocks server. It is used only for the mirroring communication.
Monitoring the Mirror Server
Since there's no direct network connection to the mirror server, you can not connect to it over the network to view its status. Instead, its status is shown in Blocks. Go to the Manage page then select Mirror Service in the list.
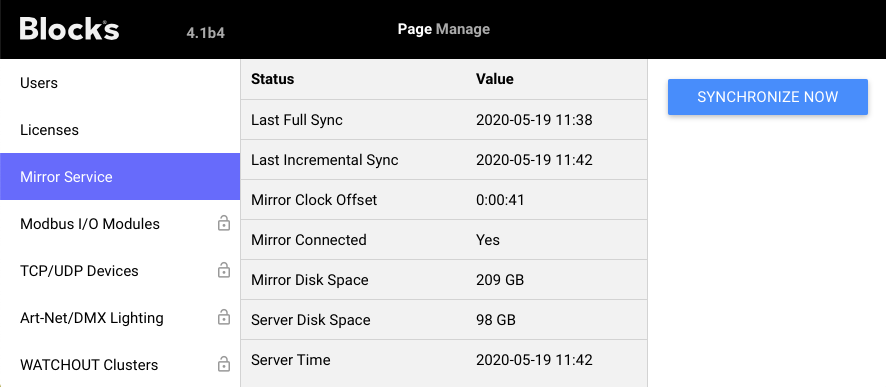
- Last Full Sync. When a full file synchronization was last performed. This is generally done once every night (see Mirror Server Configuration below for other options).
- Last Incremental Sync. When an incremental file sycnhronization was last performed. An incremental sync is performed whenever a change is made through the Blocks editor, such as adding a Spot or changing a Block.
- Mirror Connected. Indicates that the Mirror Server is online.
- Mirror Clock Offset. Shows the difference between the clock in the Blocks Server and the Mirror Server. Check this status every few months or so, and adjust its clock as required, so it doesn't get too far off. Since the Mirror Server doesn't have Internet access, it can't set its clock automatically.
- Mirror Disk Space. Shows the amount of free space on the Mirror server. Check this every now and then, especially after adding new content, to make sure there's at least 15 GB of free disk space.
- Server Disk Space. Indicates the amount of free space on the Blocks Server itself. This also makes sens to keep an eye on – especially before adding a significant amount of new content.
- Server Time. Shows the current time of the clock in the Blocks Server. If your server has Internet access, this is generally adjusted automatically. If not, you may want to check this every few monts to make sure that it is reasonably accurate.
The SYNCHRONIZE NOW button can be used to force a full synchronization. Use this after making manual changes to the files in the /home/pixi-server directory of the Blocks server, such as updating Blocks itself or the mirroring service (the files PIXILAN.jar and MIRROR.jar respectvely). Doing so pushes those changes over to the Mirror Server immediately rather than waiting for the next scheduled full synchronization.
Testing the Mirror Server
Assuming a display is still connected to the mirror server, open a directory in your Blocks root containing blocks, such as
public/block/Main
Then create a new block using the Blocks editor:
- Open the Display page.
- Select the Main group (matching the directory selected above).
- Chose "Add Text" on the Block menu, adding a new block.
- Change the text in the block. Blocks automatically saves changes as you edit.
Now, looking inside the directory opened on the mirror server, you can see how the block you just added also appears there. As all blocks and other data entered into Blocks live in this file hierarchy, all the mirror service need to do is to maintain an up-to-date copy of the data on the Mirror Server.
In addition to those immediate changes that are initiated as soon as you make changes to blocks, spots and other settings available in the Blocks editor, the mirror service will also run a daily full mirror, to bring along any other files that may have changed for other reasons, such as someone installing or updating devices drivers on the main Blocks server. Even the Blocks program file (named "PIXILAN.jar") and the mirroring service program file (MIRRIR.jar) will be copied across if those are updated on the main Blocks server.
How often, and when, this full mirror will be performed can be set in the configuration file, along with some other options (see below). If not specified there, a full mirror will be performed every morning at 03:00.
Switching Servers
Once you have everything up and running, with the mirroring service doing its job, you can try your disaster recovery plan by doing as follows:
- Move the Blocks license key from its USB port on the Blocks Server to a USB port on the Mirror Server.
- Move the main network connection (the one connecting the Blocks server to the switch) to the corresponding network port on the Mirror Server.

The roles of the two computers will now be reverse, as indicated in the status windows of the mirror services as well as by the fact the Blocks will now be started on the other computer.
Display spots or other clients will re-connect to the new server within a few minutes, without any changes needed.
Once you verified full operation of your system, move the license key and network connection back to the original Blocks server again.

Mirror Server Configuration
The mirroring service can be configured in the PIXILAB-Blocks-config-yml file also used by Blocks. Add a top-level entry in this file with the following settings (where all settings are optional, with reasonable defaults):
mirror:
  fullSyncTimes: ["03:00"]
  fullSyncOnStartup: false
  logging:
    handlers: java.util.logging.FileHandler
    java.util.logging.FileHandler.level: WARNING
The settings shown above correspond to the default settings, which applies if you don't add any mirror settings at all. You can change those settings as follows:
- Specify another time for full synchronization, or several fullSyncTimes, like this: ["03:00", "12:30"]
- Set fullSyncOnStartup to true to run a full synchronization once when mirroring service is started.
- Set java.util.logging.FileHandler.level to ERROR for less verbose logging, or INFO for more details (sometimes useful when troubleshooting).
The settings under logging follow the java.util.logging standard, sometimes referred to as JUL, allowing you to use any settings available there, for example to log to an external log handler.