&
BMD ATEM Mini Pro into Blocks
The Blackmagic Design ATEM Mini Pro is a popular device for video streaming. It has four HDMI inputs and does switching/mixing/scaling/picture-in-picture, with the result a sent through a streaming encoder. All this fits into a small-keyboard-sized desktop box. Thanks to the addition of RTMP as a streaming format in Blocks 4.1, the Atem Mini can now be used as a streaming source into a Live Video block.
Atem Mini Pro Configuration
The following two steps are required to use the ATEM Mini Pro with Blocks:
- Edit a configuration file on your computer.
- Select the correct streaming destination in the ATEM Software Control application.
XML Configuration File
Unfortunately, there's no user interface for adding streaming destinations to the ATEM. You must edit an XML file named "Streaming.xml" to add the streaming configuration. On MacOS, that configuration file is located at "/Library/Application Support/Blackmagic Design/Switchers/" and under Windows it's found at "C:\Program Files (x86)\Blackmagic Design\Blackmagic ATEM Switchers\ATEM Software Control". Here's a useful guide the describes in detail how to use this file to add more streaming destinations. You need to add a few lines at the beginning of that file, specifying the URL of your Blocks server as the stream destination, as well as the bitrates you want to stream at. Here's an example of such a "Streaming.xml" can look like, showing the Blocks-related settings. The part added for Blocks extends from the first <service> tag up to and including the first </service> tag. For brevity, the remaining services have been elided, replaced with <!– … –> below (the full XML file can be found here). You can leave any other services you may want to use intact in your file here if desired.
 Enter the IP address of your Blocks server inside the url tag, instead of "10.2.0.10" shown below.
<?xml version="1.0" encoding="UTF-8" ?>
<streaming>
    <service>
        <name>Blocks</name>
        <servers>
            <server>
                <name>Default</name>
                <url>rtmp://10.2.0.10/</url>
            </server>
        </servers>
        <profiles>
            <profile>
                <name>1080p60-7Mb</name>
                <config resolution="1080p" fps="60">
                    <bitrate>7000000</bitrate>
                </config>
                <config resolution="1080p" fps="30">
                    <bitrate>4500000</bitrate>
                </config>
            </profile>
            <profile>
                <name>1080p60-4Mb</name>
                <config resolution="1080p" fps="60">
                    <bitrate>4000000</bitrate>
                </config>
                <config resolution="1080p" fps="30">
                    <bitrate>3000000</bitrate>
                </config>
            </profile>
            <profile>
                <name>1080p50-7Mb</name>
                <config resolution="1080p" fps="50">
                    <bitrate>7000000</bitrate>
                </config>
                <config resolution="1080p" fps="25">
                    <bitrate>4500000</bitrate>
                </config>
            </profile>
            <profile>
                <name>1080p50-4Mb</name>
                <config resolution="1080p" fps="50">
                    <bitrate>4000000</bitrate>
                </config>
                <config resolution="1080p" fps="25">
                    <bitrate>3000000</bitrate>
                </config>
            </profile>
        </profiles>
    </service>
    <!-- ... -->
</streaming>
You may need to change the access rights of the file to allow you to write to it. This is done by right-clicking the file and selecting "Get Info" (MacOS) or Properties (Windows), locating the permissions area, and setting it so that you can write to the file. Use a pure text or "code" editor to edit the file. Avoid using a word processor as it may add invisible control characters to the file, which may then cause it to malfunction.
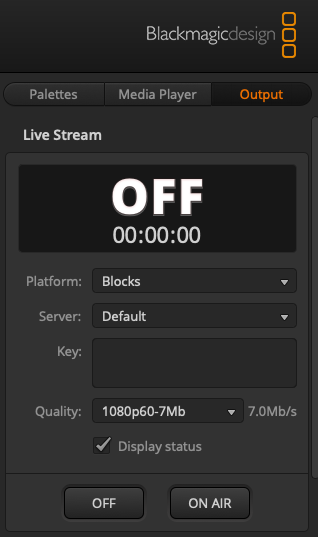
ATEM Software Control settings
Once the settings file is in place:
- Start the ATEM Software Control application on the computer that has the edited "Streaming.xml" file.
- Connect your ATEM Mini Pro to that computer with a USB cable.
- Wait for ATEM Software Control to connect to the ATEM Mini Pro.
- Select the "Output" page using the controls in the top right corner.
- Select "Blocks" on the Platform dropdown menu.
- Leave the Key field empty.
- Select the desired quality on the Quality dropdown menu.
Blocks Configuration
In Blocks, add a Live Video block, either as a top level block or inside a Composition or other suitable container:
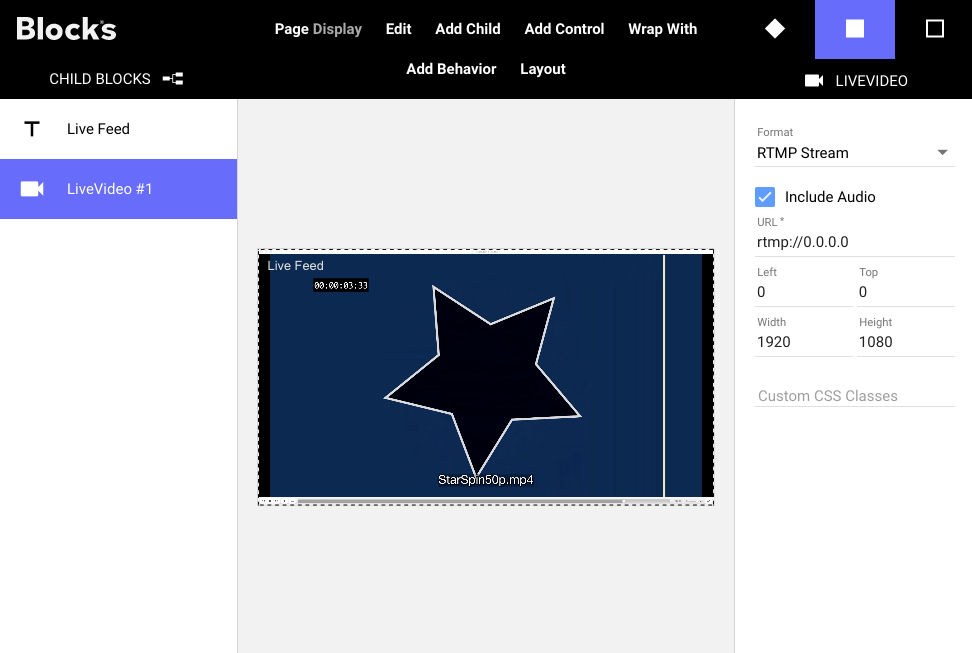
Enter the same URL here as used in the "Streaming.xml" file, or just keep the default URL as shown in the example above. Drag this block onto a Spot where you want the live feed to appear. Finally, start the stream by clicking the ON AIR button either on the ATEM Mini Pro or inside the ATEM Software Control program. This starts the stream.
The Result
Here's a short slo-mo video shot simultaneously of two displays. The source feed is a 1080p50, and the Display Spot used by Blocks was also set to 50Hz. The top display shows the preview from the ATEM and the bottom display shows the Display Spot. This gives an indication of the kind of propagation delay you can expect with this solution, as well as the fluid performance that can be accomplished by making sure all framerates throughout the chain are the same (here 50p).