Controlling devices with RS232/RS485 serial data
While network control, using the TCP or UDP IP standards is preferable for best performance and reliability, some devices may only support control over a serial data (COM) port. Such devices can be controlled eirther through a USB-to-Serial device connected to a USB port on a PIXILAB Player or through a TCP-to-serial data bridge, such as the MOXA NPort series of interface modules.
 NOTE: While the method described here for controlling serial devices still work just fine, Blocks now also supports connecting serial devices through USB on any Display Spot running PIXILAB Player. See "Serial Port" under "Network Devices" in Blocks' User's Guide for details.
Prerequisites
Before proceeding, make sure you know the answers to the following quesions:
- What's the physical connection? For RS232, this is often a standard 9-pin D-sub. If not, you may also need to source an adapter cable.
- What's the electrical standard used? While RS232 and RS422 and RS485 serial data standards are similar in many ways, they're not electrically compatible. Some devices (such as the "NPort 5150A" model) may support all three standards through customization options.
- What's the required communication parameters, such as baud-rate, parity, stop-bits and possibly handshake signals (RTS/CTS, DTR/DSR). Often handshake signals are not used, but when they are, they mush be properly connected and configured in the control end to work reliably.
- What's the exact details of the control protocol? Is it Text/ASCII based, or binary? Are there specific framing and/or check data (such as a CRC or checksum) involved?
- If text based, what's the line termination convention (CR, LF, CR/LF)?
Some of the answers above have a bearing on the physical connection. E.g., if handshake signals are required, those must be properly connected in the cable. Most options correspond to settings in the interface device's configuration (such as baud-rate, stop bits, handshake modes, etc).
Verifying Device Operation
Once you have the above details at hand, you should verify the command protocol using a terminal emulator. Such a program can talk directly to the device (if your computer is equipped with a serial port, or one can be easily added using a USB adapter). Note that most USB-to-serial adaptors handle RS232 only. For such direct-from-computer tests, use one of the following programs:
The above programs are mainly useful when your device uses a text based protocol. If the device uses a binary protocol, it can't be easily tested using a terminal emulator.
MOXA NPort Configuration
After confirming the protocol details and configuration options, move on to the Network-to-serial adapter device. Here you'll need to set the same serial communications parameters. Before doing so, you need to configure the MOXA NPort adapter using its "Web Console".
- Temporarily set your computer to an IP address in the same subnet as the NPort device (factory default IP address is usually noted on the device, or in its manual).
- Connect the NPort device and computer to a switch.
- Log in to the NPort server by opening a web browser and entering the IP address of the NPort device. Follow the instructions under "Configuration by Web Console" in the MOXA NPort manual. Set the password of the device, and make a note of this in a secure place.
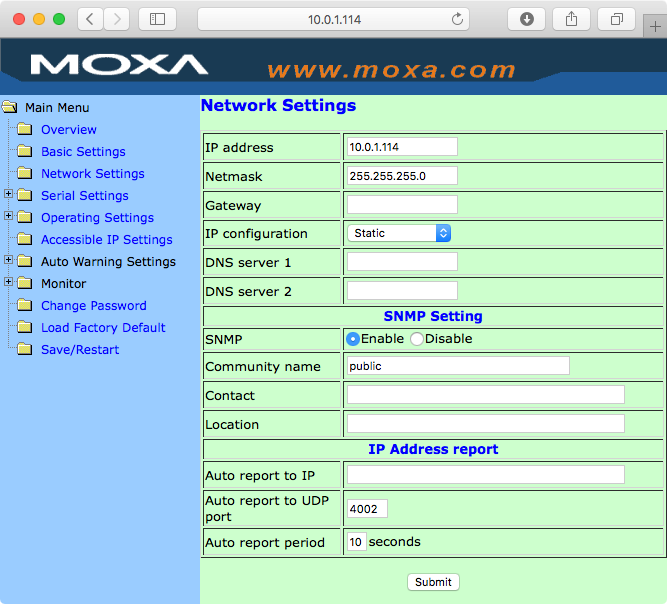
- Follow the instructions under "Quick Setup" to set the desired IP address of the NPort device (see illustration below).
This illustration shows how you set the IP address of the NPort 5110 (a single RS232 port interface).
Setting the Operating Mode
After applying the above settings, the IP address of the NPort device will change, so you will have to change the IP address of your computer accordingly in order to reconnect to the NPort device.
- Switch your computer to an IP address matching the subnet range of the NPort device set above.
- Once restarted, open the "Web Console" again now using the new IP address of the NPort device.
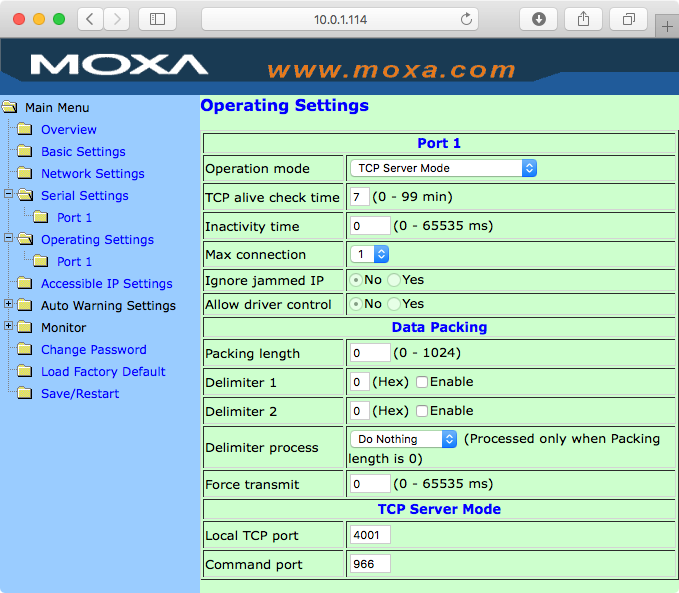
- Select the "TCP Server Mode" as described under "Choosing the Proper Operation Mode" in the NPort manual (see illustration below).
- Make a note of the "Local TCP Port" associated with each serial port, as this will be needed later to configure the communications port in Blocks.
This illustration shows how to set the operation mode of the NPort 5110.
Setting the Serial Communications Parameters
Now you're ready to connect the serial device to the serial port on the NPort interface, using the proper cable for the device at hand. Once this is done, set the serial communications parameters as described under "Serial Settings" in the NPort manual. This includes the data rate ("baud rate"), parity, stop bits, and handshake ("flow control").
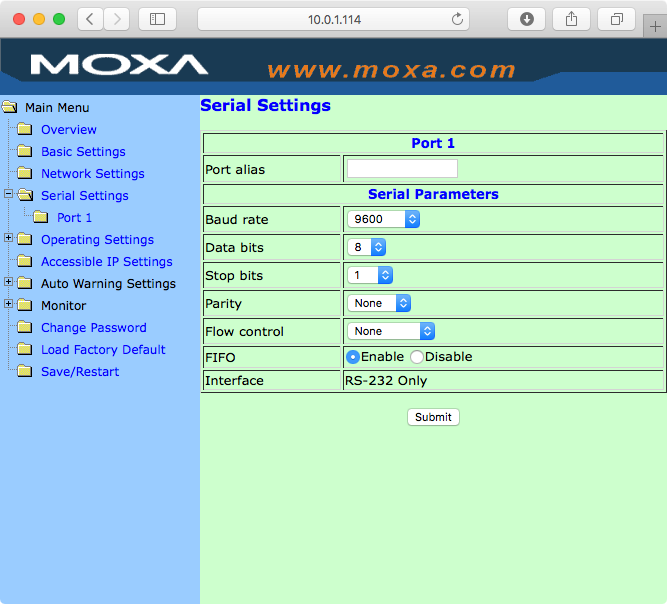
Some NPort devices have multiple serial ports, in which case those parameters are set individually per port. In this case, you should also select a different "Local TCP Port" in the configuration of each serial port, allowing the ports to be addressed individually from Blocks.
Using the Device from Blocks
Assuming your Blocks server is on the same network as the NPort interface, you can now add the NPort to Blocks.
- Access the Blocks editor using a web browser.
- Select the Manage page.
- Click TCP/UDP Devices on the left hand side.
- Add a device using the Add menu.
- Set "Communications Mode" to TCP.
- Enter the IP address of the NPort device, and the port number from the "Local TCP Port" setting of the Nport (see above).
- If you have a device driver for the device controlled through the NPort interface, select that on the Driver menu.
Controlling the Device
The device can be controlled in either of two ways:
- Using an device-specific "driver", exposing high-level functions of the device being controlled (such as "current video input").
- Using direct command strings, sent by a Task, using the raw command protocol of the device.
The former method is usually preferred, as it allows panel buttons tasks and other similar functions to be directly bound to high-level states of the device being controlled. The latter may be useful for some very simple cases, where all you want to do is "send a string" to the device.
Using a Device Specific Driver
When using device driver specifically written to manage the device at hand, this driver exposes high level functions, such as input selection, power on/off, volume, etc, as appropriate for the device. Such properties can be directly connected to buttons and sliders, manipulated using a Task, or even be used to trigger a Task. The set of parameters and functions available is entirely dictated by the device driver.
Furthermore, a device driver can handle bi-directional communication with the device. This can be used to verify proper device response to command, pick up the device's initial state, or simply to expose some state of the device as read-only properties.
Using Direct Commands from a Task
if no dedicated device driver is available, you may still be able to control it by sending it raw character strings according to its control protocol.
- Access the Blocks editor using a web browser.
- Select the Task page.
- Add a Task, giving it a descriptive name.
- Add a do statement, targeting the Network device by its name, and selecting the "sendText" command.
- Type the string to send to the device in the toSend field.
- Type the desired line termination sequence into the eoln field (or leave blank to use a single carriage return).
- Add a button to a panel, triggering the task.
- Display the panel on a Spot, and press the button to send the command.