Controlling Devices through IR
Emulating av IR remote to control a device is far from ideal, and comes with its own set of challenges (such as toggling/cycling buttons). So whenever there are other control options available, those are usually to be preferred. But sometimes, IR is all there is. For instance many network/cable-TV boxes provide only IR remote control, e.g. for switching channels.
Hardware Interface
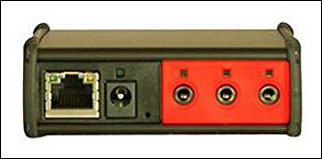
To control such a device from Blocks, you need an Ethernet-to-IR interface box, such as the iTach Ethernet from Global Caché.
 This device is available also with a power-over-ethernet (PoE) option.
Configuring the iTach
The iTach connects to your Ethernet network, and is configured using a simple browser-based user interface. After connecting the iTach to the network, point a web browser to the IP address of the iTach device and set its IP address as desired.
If you don't know the IP address, use the iHelp program to find it on the network.
Connecting the device to be controlled
Attach the device to be controlled using the enclosed IR Emitter cable, which attaches over the IR receiver of the device. The iTach unut has three outputs, and comes with three adhesive emitters, allowing you to control up to three separate devices.
There's also "blaster" cable included. This can be used to control one or many deices from a distance. However, whenever possible, use the individual emitters, firmly attached to each device to be controlled.
Learning the IR codes
On Windows, you can use the iLearn program to read the IR codes from the remote control. Alternatively, use a telnet program, pointing it at the IP address of the device as well as its port number (4998).
telnet 10.0.2.103 4998
In the example above, 10.0.2.10 is the assigned IP address of the iTach device. To learnt the IR codes required, type the following command into the telnet session, then press RETURN:
get_IR
Point the IR remote control at the receiver in the iTach device. This is located in a small hole next to the power connector. Press a button on the remote, and wait for the result to appear in the telnet window or iLearn program. The result will look something like this:
sendir 2:1,4,36231,1,1,70,54,30,9,10,9,10,9,10,9,20,9,13,9,10,4637
The sequence of numbers shown after the word "sendir" varies depending on the remote control and button being pressed. Copy the entire string, and paste it into a text document, and add a comment stating which button you pressed.
When copying/pasting iTach command strings, make sure you get the entire string, which may sometimes be very long. There are no newline characters in the string. When you paste it into a text document, the text editor may soft-wrap it across multiple lines, but it is important that the command remains a single (albeit) long line once sent back to the iTach device, and not broken into multiple lines.
The data retrieved from learning the IR code is in the following format:
sendir,<module>:<port>,<parameter1>,<parameter2>,...,<parameterN>
The <port> parameter controls which port on the device to be used for sending the IR data. The iTach device has three ports. When learning the command, this parameter is always set to 1. By altering this number, you can make the device send on either of the its three ports.
Sending the IR codes
Once you have all the IR codes required to perform the desired function, you can proceed with loading those into Blocks. This can be done in either of the following ways:
- My directly sending the command string from a do statement in a Task.
- By creating a device driver, containing the IR codes as well as any "logic" or functionality desired.
The first method is easiest and fastest, and may be a quick way to perform basic functions. The second option results in a control function that may be easier to use, supporting higher level functions such as "switch to channel 23" rather than "press 2", "press 3", "press OK". By exposing the functionality as properties of a driver, those properties can be directly bound to panel buttons and similar, making the subsequent programming and use of the device simpler.
Regardless of which of the two methods you use, you'll add the iTach unit to Blocks on the Manage page under "TCP/UDP Devices". Enter its IP address, set the port number to 4998 and select TCP. If you made a proper device driver, select it under Driver.
Sending raw command strings
To send a raw ir command string, add a task on the Task page, then add a do statement to the task. Specify the device just added under "TCP/UDP Devices", then select sendText. Finally, paste the entire command string into the parameter field, enclosed within double quotes.
It's easy to forget the double quotes around string parameters to statements. If you get no response form the device, double-check that the entire command string is within double quotes. Also make sure that the entire string is included, with no newline characters accidentally inserted along the way.
Creating a dedicated device driver
While the raw method described above may be sufficient for discrete IR commands, it is often less convenient to use for higher level functions, requiring a sequence of keystrokes to complete. For example, switching a TV to a specific channel often requires one or two digits, possibly followed by an OK button press (or a long delay).
By creating a specialized device driver for the complete system, including the iTach as well as the device being controlled, you can get a solution that's easier to program and use, while often also being more reliable.
You can find an example of such an iTach driver in our open source driver collection on github.