Network Boot of PIXILAB Player Legacy Ubuntu 16
This document describes how to configure your existing Linux-based Blocks server to allow PIXILAB Player to boot from the server over the network, rather than from a USB stick or internal drive.
![]() If your server comes with Blocks 3 from the outset, most of this is already done. If so, you can skip down to Obtaining the PIXILAB Player and continue from there.
If your server comes with Blocks 3 from the outset, most of this is already done. If so, you can skip down to Obtaining the PIXILAB Player and continue from there.
Updating your Blocks Server
Start by updating your server software. Make sure you follow all instructions in that article.
Update the Blocks program itself to version 3 or later. This file is named PIXILAN.jar and is located in the home folder of the pixilab-server user.
Enabling the TFTP server
A part of the network boot procedure uses a TFTP server. Such a server is built into Blocks for this purpose, and must be configured in order to be active. This is done by adding the following two lines to the config.yml file found inside PIXILAB-Blocks-root, unless they're already there.
tftp:
  port: 9069
![]() The YML file format is sensitive to indentation. Make sure you keep the indentation exactly as shown above.
The YML file format is sensitive to indentation. Make sure you keep the indentation exactly as shown above.
Adding Firewall Rule for TFTP
The Linux firewall needs to be updated to allow for the TFTP traffic. To do so, switch to the pixi-admin user, open a terminal window, and enter the following three lines, pressing the return key after each line:
sudo iptables -t nat -I PREROUTING -p udp --dport 69 -j REDIRECT --to-port 9069
sudo bash -c "iptables-save > /etc/iptables.up.rules"
sudo bash -c "iptables-save > /etc/iptables/rules.v4"
Type the pixi-admin user's password when requested. If you haven't changed the passwords since the server was installed, your server still uses the default admin password.
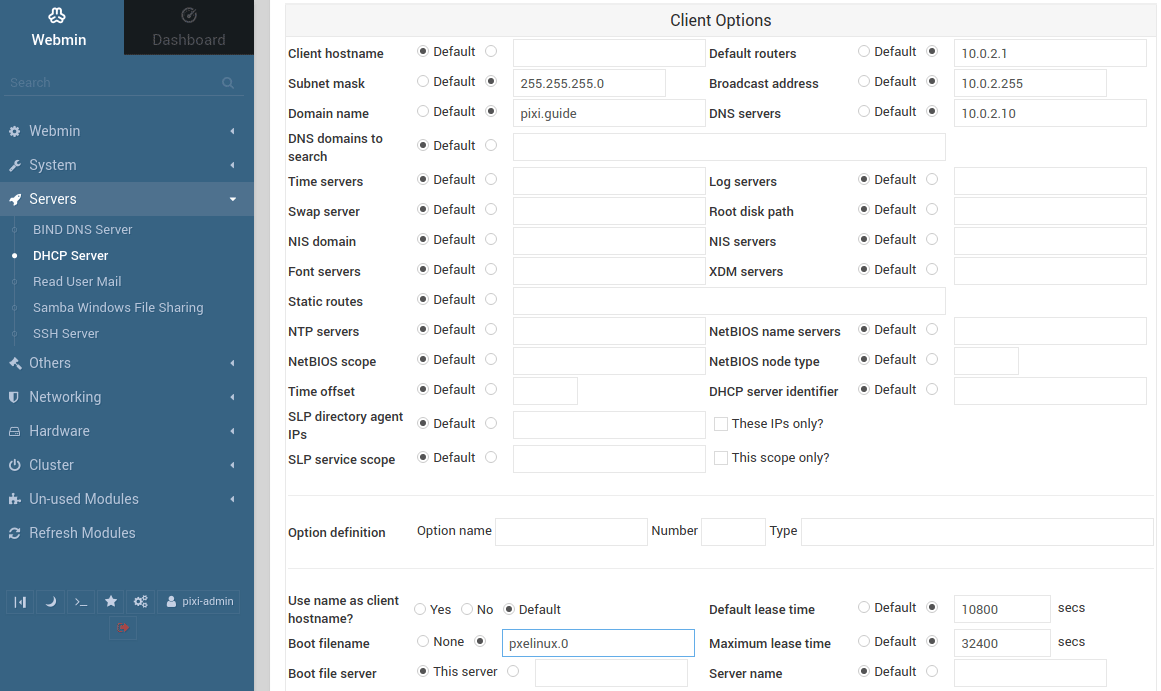
Configuring the DHCP Server
A DHCP server is required as part of the network boot procedure. The method described here assumes you're using the DHCP feature built into our Linux-based server.
Using Webmin:
- Open the Client options settings.
- Locate the "Boot filename" entry.
- Type pxelinux.0 into the text field (the last character is a zero).
- Select the radio button next to this text field.
- Click Save at the bottom of the window.
Obtaining the PIXILAB Player
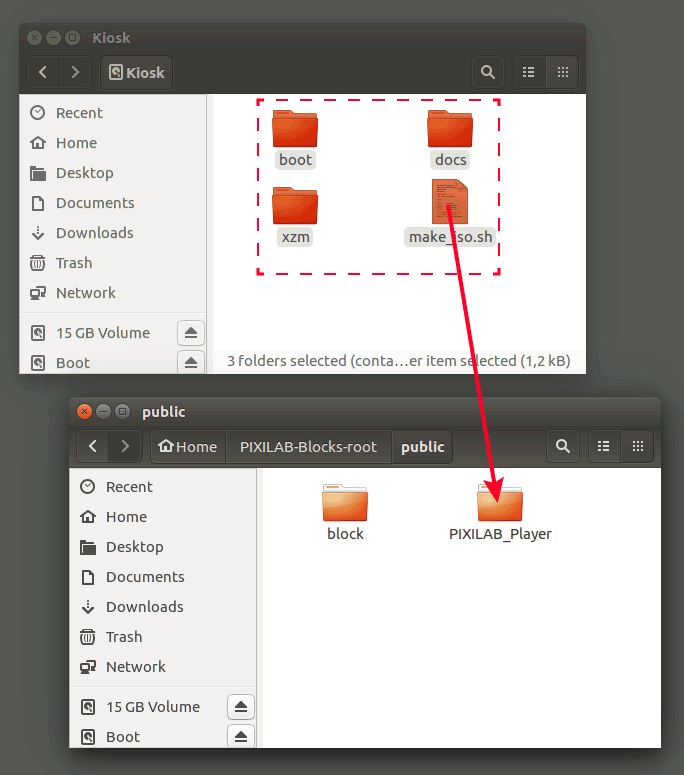
The player software is first installed on a USB stick (please take notice the player has to be pixilab-player-190509-3.0.iso or newer). You can use this USB stick to boot a NUC, as you may have done in the past. This is a good way to make sure the player itself works as desired before transferring it to the server. Once you have a working USB stick, proceed as follows:
- Insert the player USB into your Linux-based Blocks server. It will appear as a number of disks.
- Open the Kiosk disk, so you can see its files and folders.
- Open the public folder found inside PIXILAB-Blocks-root in a new window, so you have them both side by side (see illustration below).
- If there isn't already a folder in the public folder named PIXILAB_Player, make one (see illustration).
- Drag all the items from the Kiosk disk (boot, docs, xzm, etc) into the PIXILAB_Player folder.
Your server is now set up for network boot of players. If you need to update your PIXILAB Player later on, just replace the files inside the PIXILAB_Player folder mentioned above with new files, and restart your players.
![]() The computer you use as player must be configured to boot from the network. This is done in the BIOS settings. See Network Boot Support for detils.
The computer you use as player must be configured to boot from the network. This is done in the BIOS settings. See Network Boot Support for detils.
Implementation Details
This section describes some implementation details that may be of use to you if you're trying to make network boot work with other solutions than those built into our Linux-based server, or using another domain name than pixi.guide. You don't nee to know these details if you can follow the instructions given above.
Network booting requires close cooperation between three services:
- DHCP Server. Provides the IP address to the player, and points the player to the boot-loader code.
- TFTP Server. Provides the boot-loader code requested by the BIOS of the player.
- Web Server. Provides the bulk of the player code, as well as its configuration details.
Those services may all reside on the same computer (as is the case when using those built into our Linux-based server). Or they may live across multiple servers or other devices.
![]() This information is provided only as an overview and starting point for you if you need to configure such services. PIXILAB does not support other methods than those built into our Linux-based server.
This information is provided only as an overview and starting point for you if you need to configure such services. PIXILAB does not support other methods than those built into our Linux-based server.
DHCP Server
The DHCP server first gives the IP address for the player. It can then also inform devices that support network booting of where to find the bootstrap-loader. Two custom fields are of particular importance here:
- Boot filename (option 67). Defines the name of the boot-strap file to load from the TFTP server (in the standard configuration, this name is pxelinux.0, as shown above).
- Boot file server (option 66). IP address of the TFTP server. Not required if the TFTP server is the same as the DHCP server.
TFTP Server
The TFTP server responds with the file specified by the Boot filename DHCP server option (e.g., pxelinux.0). Other files may be loaded as well using this method. Once this step is done, subsequent files are loaded using HTTP from a web server.
The TFTP server must respond to port 69, and must support TFTP options negotiation.
Web Server
The final pieces are downloaded from a web server. The starting URL for this phase is specified in a file inside the PIXILAB Player. This file is found on the Kiosk volume at boot/pxelinux.cfg/default. The last line in this file specifies the URL. In the default player configuration, this URL is:
http://pixi.guide/public/PIXILAB_Player
If your Blocks server uses another domain name than pixi.guide, change this URL to match. Likewise, if you're using another web server than Blocks to serve the PXE boot files, change the path accordingly.